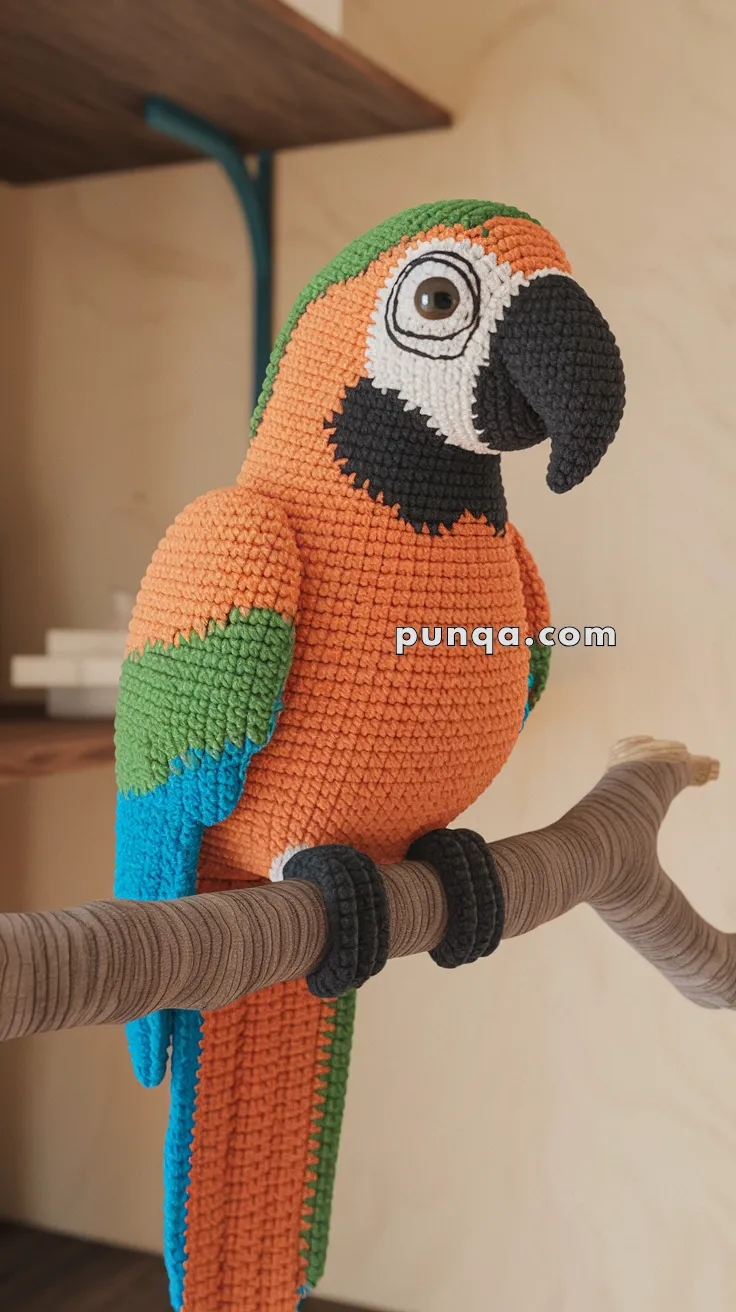
Brighten your day with the vibrant charm of the Amigurumi Parrot, a playful crochet project that’s bursting with color and personality! 🦜🧶 With its curved beak, expressive eyes, and bold feathers, this tropical bird is ready to perch proudly in your handmade collection. Whether you’re crafting a jungle-themed display, gifting to a bird lover, or simply adding a splash of fun to your décor, this parrot is sure to steal the spotlight.
Perfect for crocheters who love lively details and cheerful designs, this pattern invites you to explore bold color combos, feathery textures, and whimsical shaping. Customize your parrot with rainbow wings, a cheeky expression, or even a tiny perch to sit on. The Amigurumi Parrot is a joyful way to stitch up sunshine, silliness, and a whole lot of handmade flair—one loop at a time! 🧵🌴
🦜 Amigurumi Macaw Parrot Crochet Pattern
Bring the vibrant beauty of the rainforest into your home with this stunning crochet macaw! With its bold orange chest, green neck, brilliant blue wings, and striking black-and-white face, this pattern captures the tropical charm of one of nature’s most colorful birds. Perch it on a branch or display it as a cheerful centerpiece — it’s sure to turn heads wherever it sits.
✨ Skill Level
Intermediate to Advanced – involves shaping, color changes, surface embroidery, and optional wired claws.
📏 Finished Size
Approximately 28–32 cm (11–12.5 in) tall when made with worsted-weight yarn and a 3.5–4.0 mm hook.
🧶 Materials
- Orange yarn (body & chest) – 70 g
- Green yarn (nape, upper wings, part of tail) – 40 g
- Blue yarn (lower wings, tail tip) – 35 g
- White yarn (face patches) – 20 g
- Black yarn (beak, claws, embroidery) – 25 g
- 12–14 mm brown or gold safety eyes
- Polyester fiberfill stuffing
- Pipe cleaners or floral wire (for claws)
- 3.5–4.0 mm crochet hook
- Yarn needle & scissors
- Optional: stick or wooden dowel for perch
🧵 Abbreviations (US Terms)
MR – Magic Ring
sc – Single Crochet
inc – Increase (2 sc in same st)
dec – Decrease (sc2tog)
ch – Chain
sl st – Slip Stitch
FO – Fasten Off
(Work continuously in spiral rounds unless stated otherwise.)
🟠 Head
With orange yarn:
R1: MR, 6 sc (6)
R2: inc ×6 (12)
R3: (sc, inc) ×6 (18)
R4: (2 sc, inc) ×6 (24)
R5: (3 sc, inc) ×6 (30)
R6: (4 sc, inc) ×6 (36)
R7–12: sc around (36)
R13: (4 sc, dec) ×6 (30)
R14: (3 sc, dec) ×6 (24)
R15: sc around (24)
R16: (2 sc, dec) ×6 (18)
Do not close. Stuff the head firmly — this 18-st opening will connect to the neck.
⚪ Face Patches (Make 2)
With white yarn:
Ch 12
Row 1: sc in 2nd ch from hook, sc 9, 3 sc in last st. Rotate and work on the opposite side of chain, sc 9, 2 sc in last st (24).
Row 2: sc around, inc at both curve ends (28).
FO and leave a long tail for sewing.
Sew patches symmetrically on each side of the head.
Embroider thin black streaks running vertically across each patch to mimic the macaw’s facial texture.
👀 Eyes
Insert 12–14 mm brown or gold safety eyes in the center of each white patch.
🖤 Beak (2 Parts – Black Yarn)
Upper Beak:
R1: MR, 6 sc
R2: inc ×6 (12)
R3: (sc, inc) ×6 (18)
R4–6: sc around (18)
R7: (2 sc, dec) ×6 (12)
R8: (1 sc, dec) ×4 (8)
FO and stuff lightly.
Lower Beak:
R1: MR, 6 sc
R2: inc ×6 (12)
R3–4: sc around (12)
R5: dec ×6 (6)
FO.
Sew the upper beak centered between the eye patches, and place the lower beak slightly underneath, curving downward for that distinctive macaw profile.
🟢 Neck & Nape
Attach green yarn to the 18-st opening at the base of the head.
Mark the back-center stitch.
R1: sc around (18)
R2–3: Work back 8 sts in green (nape area), remaining 10 in orange.
R4: Repeat R3.
This forms the soft green transition seen behind the head and upper back.
🟠 Body
Continue from neck:
R5: (sc, inc) ×9 (27) — keep back 8 sts in green, rest orange.
R6: (2 sc, inc) ×9 (36) — same color split.
R7–18: sc around (36) – all orange.
R19: (4 sc, dec) ×6 (30)
R20: (3 sc, dec) ×6 (24)
R21–22: sc around (24)
R23: (2 sc, dec) ×6 (18)
R24: (sc, dec) ×6 (12)
R25: dec ×6 (6)
FO and close. Stuff firmly, shaping the belly smoothly.
🟩 Wings (Make 2 – Green to Blue Gradient)
Start with green yarn:
R1: MR, 6 sc (6)
R2: inc ×6 (12)
R3: (sc, inc) ×6 (18)
R4–13: sc around (18)
Switch to blue yarn:
R14–22: sc around (18)
R23: (2 sc, dec) ×4, sc 2 (14)
R24: (1 sc, dec) ×4, sc 2 (10)
R25–26: sc around (10)
FO and flatten (do not stuff).
Placement:
- Sew top edge of each wing starting two rounds below the green nape.
- Angle slightly backward so the tips align just above the start of the tail.
- The wings should curve gently along the body’s sides.
🌀 Tail (Orange → Green → Blue)
Start with orange yarn:
R1: MR, 5 sc
R2: sc around (5)
R3: (sc, inc) ×2, sc (7)
R4–10: sc around (7)
Switch to green yarn:
R11–18: sc around (7)
Switch to blue yarn:
R19: (2 sc, dec, sc) ×1, sc (6)
R20–32: sc around (6)
R33: dec ×3 (3)
FO and leave tail for sewing.
Lightly stuff the base; keep the last third unstuffed for a sleek, flexible look.
Sew centered at the lower back, angling slightly downward.
🦶 Legs & Claws (Black Yarn)
Legs:
R1: MR, 6 sc (6)
R2: inc ×6 (12)
R3–8: sc around (12)
FO and stuff lightly.
Claws:
For each foot, make 3 claws.
Ch 8, sc back across (7).
FO, insert a small piece of wire or pipe cleaner before attaching.
Wrap the claws around a perch, bending gently to hold shape.
Sew the legs to the underside of the body, positioning them for balance when perched.
🪡 Assembly
- Attach the head to the neck base firmly.
- Sew the wings onto both sides of the body, angled downward.
- Sew the long tail at the center back.
- Attach the legs underneath the body.
- Wrap the wired claws around a stick or dowel to perch your macaw securely.
- Embroider two small black nostrils near the top of the beak for added detail.
🌟 Finishing Touches
- Add light blush on the cheeks for a playful expression.
- You can lightly brush the wing edges with a small amount of yarn fluff for a feathery effect.
- Optionally, attach a small loop at the back to hang it as a colorful room accent.
🏁 Conclusion
Your tropical macaw is now ready to perch proudly and brighten any space! With its orange chest, green collar, blue-tipped wings, and expressive beak, this handmade parrot captures the lively spirit of the rainforest. Whether displayed on a shelf or gifted to a bird lover, it’s a crochet creation that truly stands out. 🦜💚