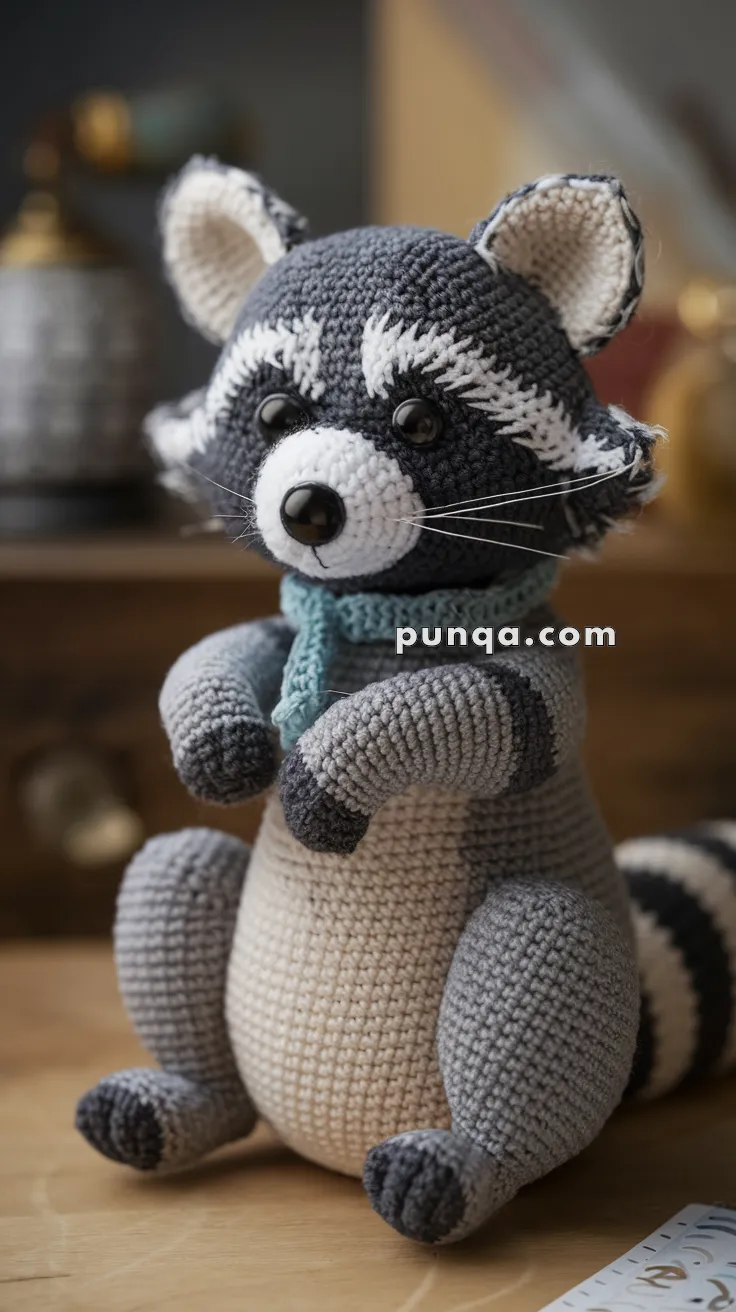
Bring a touch of woodland charm to your crochet collection with this Amigurumi Raccoon pattern! With its adorable masked face, fluffy striped tail, and playful personality, this little raccoon is ready to scamper into your heart. Whether you’re crafting for nature lovers, adding a whimsical accent to your decor, or simply enjoy making cute amigurumi designs, this pattern lets you stitch up a mischievous forest friend bursting with character! Perfect for gifting, decorating, or just keeping as a cheerful companion, this crochet creation brings a touch of handmade woodland magic to every stitch. 🦝✨
Designed for customization, this pattern allows you to experiment with different shades of gray, embroidered details, or even tiny accessories like a miniature scarf or acorn for extra charm. Craft a classic raccoon with bold black-and-white markings, create a pastel version for a softer aesthetic, or even stitch up a full set of woodland-inspired amigurumi for a delightful display! Whether gifted as a thoughtful keepsake, displayed as a charming accent, or made simply for the joy of crafting, this Amigurumi Raccoon is a fun and creative project—perfect for bringing a touch of handmade forest magic to every stitch! 🧶💖✨
🦝 Amigurumi Raccoon Crochet Pattern
This sweet little raccoon, complete with stripey tail and expressive face, makes a delightful woodland companion. Whether as a forest nursery plushie or a lovable toy, this soft sculpture is fun to make and hug.
✨ Skill Level
Intermediate – Includes shaping, color changes, and detailed assembly.
📏 Finished Size
Approx. 9–11 in (23–28 cm) tall when using DK or worsted weight yarn and a 2.5–3.5 mm hook.
🧶 Materials
-
DK or Worsted Weight Yarn:
-
Dark Gray (main body)
-
Light Gray or Beige (belly/inner parts)
-
Black (hands, feet, mask, stripes)
-
White (face detail)
-
Light Blue (for scarf)
-
-
2.5–3.5 mm crochet hook
-
10 mm safety eyes
-
Stitch marker
-
Polyfill stuffing
-
Yarn needle
-
Wire (optional, for shaping tail)
-
Black embroidery thread (for nose and whiskers)
🧵 Abbreviations (US Terms)
MR – Magic Ring
sc – Single Crochet
inc – Increase
dec – Decrease
sl st – Slip Stitch
ch – Chain
FLO – Front Loop Only
BLO – Back Loop Only
FO – Fasten Off
🧍♂️ Body (Work from bottom up) – Start with Light Gray
-
MR, 6 sc
-
inc x6 (12)
-
(1 sc, inc) x6 (18)
-
(2 sc, inc) x6 (24)
-
(3 sc, inc) x6 (30)
-
(4 sc, inc) x6 (36)
7–14. sc around (36) -
(4 sc, dec) x6 (30)
-
(3 sc, dec) x6 (24)
Change to Dark Gray
17–24. sc around (24)
Stuff firmly -
(2 sc, dec) x6 (18)
-
(1 sc, dec) x6 (12)
-
dec x6 → FO, close
🧠 Head – Dark Gray
-
MR, 6 sc
-
inc x6 (12)
-
(1 sc, inc) x6 (18)
-
(2 sc, inc) x6 (24)
-
(3 sc, inc) x6 (30)
-
(4 sc, inc) x6 (36)
7–13. sc around (36) -
Insert 10 mm safety eyes between Rounds 9–10, about 7–8 stitches apart
-
(4 sc, dec) x6 (30)
-
(3 sc, dec) x6 (24)
Stuff firmly -
(2 sc, dec) x6 (18)
-
(1 sc, dec) x6 (12)
-
dec x6 → FO, close
🐾 Arms (Make 2) – Black → Dark Gray
-
MR, 6 sc (Black)
-
inc x6 (12)
-
sc around
Change to Dark Gray
4–10. sc around
Stuff lightly, FO
🦶 Legs (Make 2) – Black → Gray
-
MR, 6 sc
-
inc x6 (12)
3–4. sc around
Change to Dark Gray
5–10. sc around
Stuff firmly
FO and sew to body
🐯 Tail – Start with Black, alternate stripes
-
MR, 6 sc
-
inc x6 (12)
-
(1 sc, inc) x6 (18)
-
(2 sc, inc) x6 (24)
5–20. sc around – Alternate every 2 rounds: Black / Light Gray / Black / Light Gray
Stuff as you go
FO and sew to bottom back
Optional: Insert a flexible wire before sewing closed to allow tail shaping.
👂 Ears (Make 2)
Inner (White or Beige)
-
MR, 6 sc
-
(1 sc, inc) x3 (9)
-
sc around
FO
Outer (Dark Gray)
-
MR, 6 sc
-
(1 sc, inc) x3 (9)
-
sc around
FO and sew inner to outer, fold slightly and attach to top sides of head
🧢 Eye Mask Detail – White
With White yarn, embroider V-like mask lines from the inside edge of each eye outward. (Or crochet: ch 5, sl st across, shape and sew diagonally above the eyes.)
👃 Nose – Black Yarn
-
Embroider a small triangle nose between the eyes and just above the mouth.
-
Optional: Add thin black whiskers using embroidery thread
🧣 Scarf – Light Blue
Ch 41, sc in 2nd ch from hook and across. FO
Wrap around neck and knot.
🪡 Assembly
-
Sew arms to sides just under head
-
Attach legs to front of body
-
Position tail to balance body weight
-
Stitch ears in place
-
Add facial embroidery and scarf
☀️ Final Touches
-
Blush cheeks for cuteness
-
Light shaping with fingers for snout and tail
-
Adjust the scarf or add a small button for detail
This little forest rascal is ready to cuddle, play, or perch on a shelf with mischievous charm. Let me know if you’d like a version holding an acorn, backpack, or flower! 🌲🦝