Bring a splash of tropical charm to your crochet collection with the Amigurumi Toucan Bird, a project that’s as colorful as it is delightful! 🦜🧶 With its bold beak, bright feathers, and playful proportions, this toucan captures the lively spirit of the rainforest in a soft, huggable form. Its cheerful design makes it a standout piece that’s perfect for adding a touch of exotic flair to your handmade creations.
Whether perched on a shelf, gifted to a bird lover, or added to your amigurumi menagerie, this toucan is sure to bring smiles wherever it goes. Fun to stitch and even more fun to display, the Amigurumi Toucan Bird is a joyful way to crochet personality, color, and a sprinkle of handmade magic—one loop at a time! ✨🌴🧵
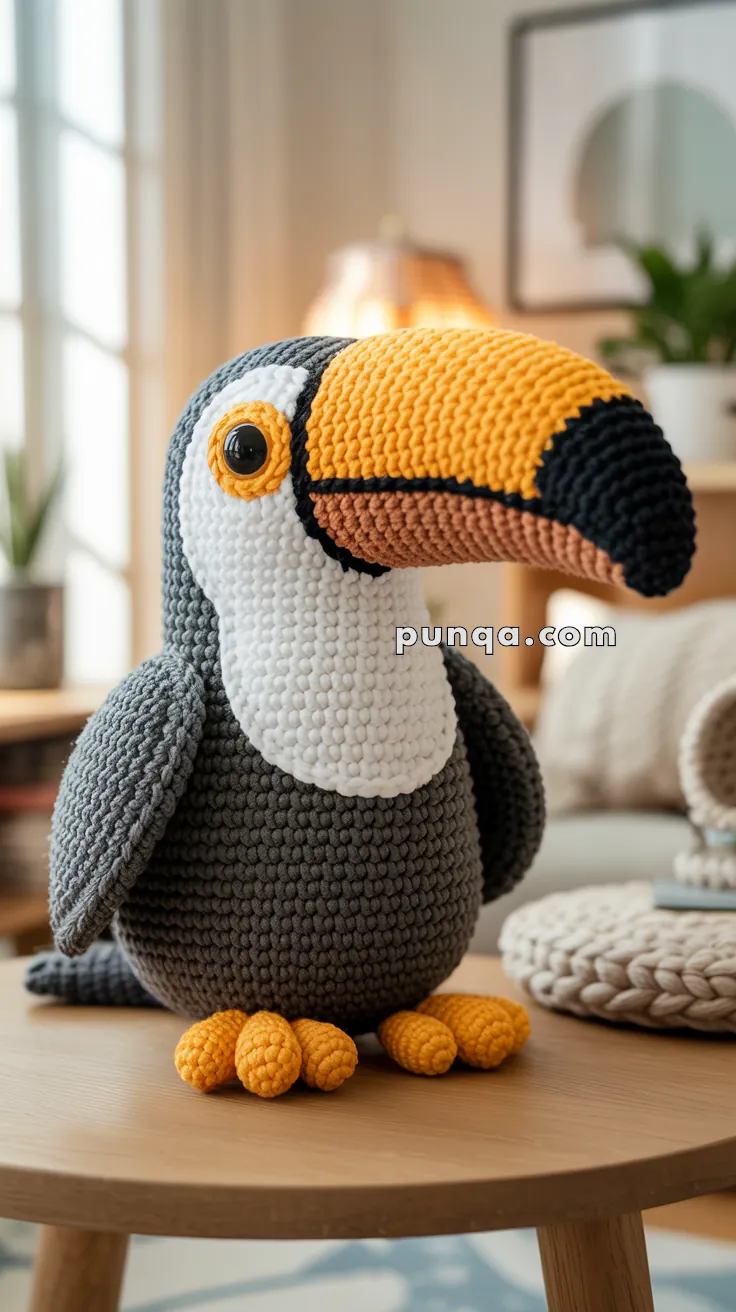
🐦 Amigurumi Toucan Bird Crochet Pattern
Bring a splash of tropical charm to your crochet collection with this adorable Toucan Bird amigurumi! With its oversized curved beak, round plush body, soft wings, and cute little feet, this toucan makes a perfect shelf decoration, nursery accent, or handmade gift for bird lovers.
This pattern is written in a polished blog-style format with clear sections and step-by-step instructions so you can recreate the toucan exactly as shown.
✨ Skill Level
Intermediate
Includes shaping, structured beak construction, and multi-part assembly.
📏 Finished Size
Approx. 24–27 cm (9.5–10.5 inches) tall
(using plush chenille yarn and a 4.0–4.5 mm hook)
🧶 Materials (Approximate Yarn Amounts)
Super bulky chenille yarn (#6):
- Dark Gray (body, wings, head back, tail): 130–150 g
- White (face patch): 40–50 g
- Orange (upper beak + feet): 40–50 g
- Black (beak tip + stripe + neck edge): 30 g
- Light Brown / Tan (lower beak): 25–30 g
- Yellow (eye ring): small amount (~10 g)
Supplies:
- 4.0–4.5 mm crochet hook
- 12–14 mm safety eyes
- Polyester fiberfill
- Tapestry needle
- Stitch markers
🧵 Abbreviations (US Terms)
MR – Magic Ring
sc – Single Crochet
inc – Increase
dec – Invisible decrease
sl st – Slip stitch
FO – Fasten Off
🧩 Pattern Instructions
🟤 Body (One Piece – perfectly round and bottom-heavy)
Rnd 1: MR 6 (6)
Rnd 2: inc ×6 (12)
Rnd 3: (sc, inc) ×6 (18)
Rnd 4: (2 sc, inc) ×6 (24)
Rnd 5: (3 sc, inc) ×6 (30)
Rnd 6: (4 sc, inc) ×6 (36)
Rnd 7: (5 sc, inc) ×6 (42)
Rnd 8: (6 sc, inc) ×6 (48)
Rnd 9: (7 sc, inc) ×6 (54)
Rnd 10–17: sc 54
➡️ Creates a large spherical body
Rnd 18: (7 sc, dec) ×6 (48)
Rnd 19: (6 sc, dec) ×6 (42)
Rnd 20: (5 sc, dec) ×6 (36)
Rnd 21: (4 sc, dec) ×6 (30)
Stuff very firmly.
Rnd 22: (3 sc, dec) ×6 (24)
Rnd 23: (2 sc, dec) ×6 (18)
Rnd 24: (sc, dec) ×6 (12)
Rnd 25: dec ×6 (6)
FO
⚪ Face Patch (Tall, smooth oval panel)
Rnd 1: MR 6
Rnd 2: inc ×6 (12)
Rnd 3: (sc, inc) ×6 (18)
Rnd 4: (2 sc, inc) ×6 (24)
Rnd 5: (3 sc, inc) ×6 (30)
Rnd 6: (4 sc, inc) ×6 (36)
Rnd 7–10: sc 36
- Flatten slightly into a long vertical oval
- Sew centered on front, extending low into the belly area
👁 Eyes with Eye Ring (Distinct feature)
Yellow Ring (Make 2):
Rnd 1: MR 6
Rnd 2: inc ×6 (12)
Rnd 3: (sc, inc) ×6 (18)
FO
- Insert safety eyes through rings
- Place near the top of the white patch
🟠 Upper Beak (Thick, rounded, gently curved downward)
Start with black tip
Rnd 1: MR 6
Rnd 2: inc ×6 (12)
Rnd 3: (sc, inc) ×6 (18)
Change to orange
Rnd 4: (2 sc, inc) ×6 (24)
Rnd 5: (3 sc, inc) ×6 (30)
Rnd 6: (4 sc, inc) ×6 (36)
Rnd 7–15: sc 36
- Stuff lightly near base
- Shape into a smooth downward curve (not sharp)
- Keep top rounded and thick
🟤 Lower Beak (Slimmer, flatter underside)
Rnd 1: MR 6
Rnd 2: inc ×6 (12)
Rnd 3: (sc, inc) ×6 (18)
Rnd 4: (2 sc, inc) ×6 (24)
Rnd 5–9: sc 24
- Light stuffing
- Keep slightly flattened
⚫ Beak Detailing
- Sew lower beak under upper beak
- Add a black embroidered line between upper and lower sections
- Add a short black edge at the base of the beak where it meets the face
🪽 Wings (Rounded, slightly drooping)
Rnd 1: MR 6
Rnd 2: inc ×6 (12)
Rnd 3: (sc, inc) ×6 (18)
Rnd 4: (2 sc, inc) ×6 (24)
Rnd 5–9: sc 24
- Light stuffing only
- Flatten slightly
➡️ Attach high on sides so they naturally angle downward
🟤 Tail (Short and tucked)
Rnd 1: MR 6
Rnd 2: (sc, inc) ×3 (9)
Rnd 3–7: sc 9
- Minimal stuffing
- Keep compact
🦶 Feet (Three distinct rounded toes)
Toes (Make 6):
Rnd 1: MR 6
Rnd 2: sc 6
Rnd 3: sc 6
FO
Join 3 toes:
- Attach yarn and sc across all toes = 18 stitches
Rnd 2–5: sc 18 - Light stuffing
- Shape into rounded foot base
➡️ Repeat for second foot
🧩 Assembly
- Sew face patch neatly onto front
- Attach eyes through yellow rings
- Sew beak centered on face, slightly angled downward
- Attach wings high on sides
- Sew tail at back
- Attach feet wide and slightly forward for stable sitting
✨ Finishing Touches
- Smooth and shape the beak for a natural curve 🐦
- Keep body very round and full
- Ensure feet balance the body evenly
- Slightly tilt wings backward for a relaxed pose
💛 Final Thoughts
With its bold beak, soft sculpted body, and clean color contrast, this amigurumi toucan is both playful and elegant. The design highlights smooth shaping and strong proportions, making it a standout handmade piece for display, gifting, or adding a tropical touch to your décor.
Enjoy every stitch of bringing this charming bird to life! 🧶✨


Amei os padroes