Hop into organization with the Amigurumi Frog Caddy, a cheerful crochet project that’s as functional as it is fun! 🐸🧶 With its wide smile, big googly eyes, and roomy base, this froggy friend is ready to keep your craft tools, pens, or trinkets neatly tucked away. Whether perched on your desk or nestled beside your yarn stash, it brings a splash of playful charm to any creative space.
Perfect for crocheters who love whimsical designs and practical makes, this pattern invites you to explore bold shapes, soft textures, and a touch of amphibious flair. Customize your frog with bright colors, add little accessories, or keep it classic and green. The Amigurumi Frog Caddy is a delightful way to stitch up organization, personality, and a whole lot of handmade joy—one loop at a time! 🧵💚
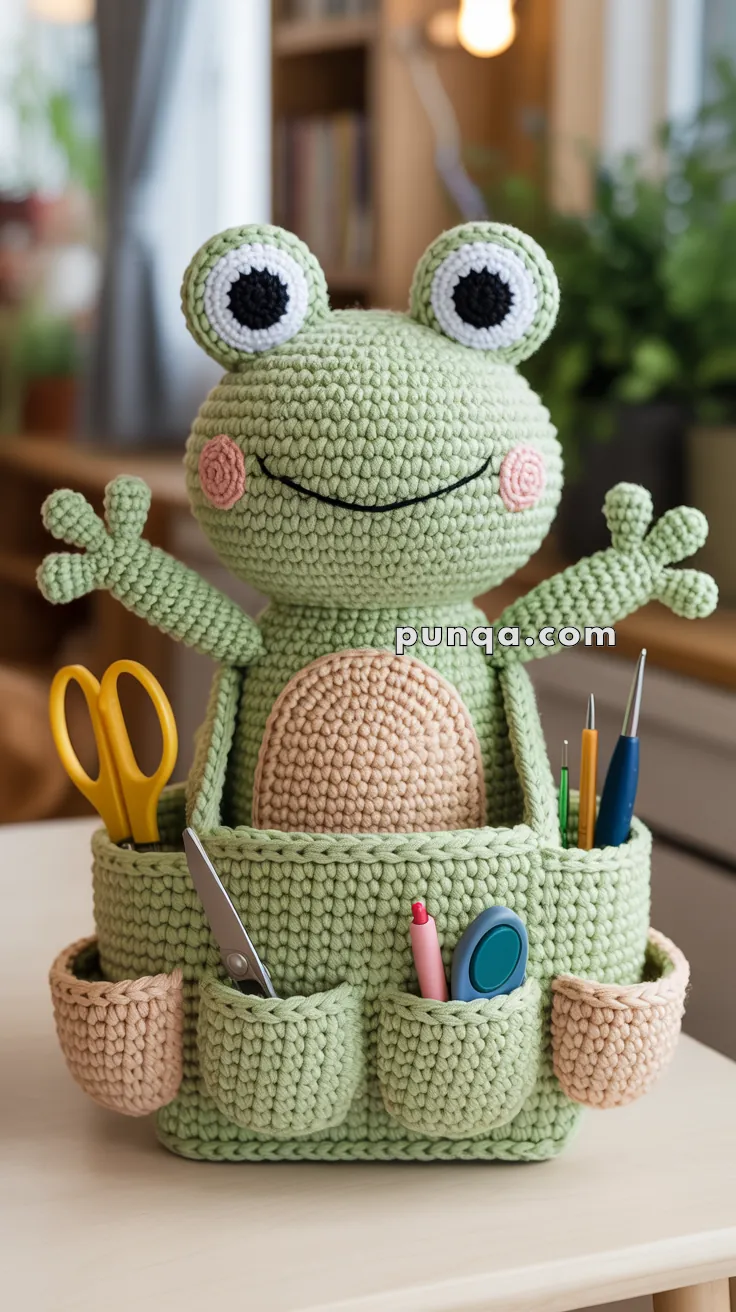
🐸 Crochet Frog Caddy Pattern
A cheerful frog perched on a sturdy two-tier organizer with 7 pockets: 4 lower front cup pockets and 3 upper compartments (left slot, center bin, right slot). Short webbed arms, big eyes, rosy cheeks, and a firm rectangular base keep your tools tidy and cute. 💚
✨ Skill Level
Intermediate – shaping, structural assembly, pocket layering, and sewing.
📏 Finished Size
- Height: 22–25 cm (9–10 in)
- Base: 26 × 16 cm (10 × 6 in)
🧶 Materials
Yarn (DK or light worsted cotton/acrylic):
- Light green – ~180 g (base, walls, inner insert, head, arms, green pockets)
- Beige/tan – ~60 g (belly patch, two corner pockets)
- White – small amount (eye whites)
- Black – small amount (pupils, smile)
- Pink – small amount (cheeks)
Tools & extras
- 3.0–3.5 mm hook
- Polyester fiberfill
- Plastic canvas or heavy cardboard (base + wall panels; optional small panel for insert back)
- Yarn needle, stitch markers, scissors
Gauge: Not critical; keep tension firm and even for structure.
Abbreviations (US)
MR magic ring • sc single crochet • inc 2 sc in same st • dec sc2tog • ch chain • sl st slip stitch • BLO back loop only • FLO front loop only • FO fasten off
Work in continuous rounds unless noted.
CONSTRUCTION OVERVIEW
- Make the outer rectangular box (base + walls).
- Make a U-shaped inner insert; sewing it inside creates the upper three compartments: left slot, tall center bin, right slot.
- Add four lower cup pockets to the front (two green middle cups + two tan corner cups).
- Make and attach the frog (head, eyes, cheeks, short arms) and the belly patch on the inside front.
- Slide in plastic-canvas panels to firm everything up.
1) Outer Base & Walls (Light Green)
Base Rectangle
- Row 1: Ch 28, sc in 2nd ch from hook and across [27].
- Rows 2–17: ch 1, turn, sc across [27].
(With DK + 3.5 mm this gives ~26 × 16 cm.)
Border: sc evenly around; 3 sc in each corner. Do not FO.
Walls
- Rnd 1: Working BLO around border, sc in each st (forms crisp corner).
- Rnd 2–17: sc around (build height to ~12–14 cm).
- Rnd 18 (top rim): FLO sl st loosely all around for the neat braided edge. FO.
Cut plastic-canvas panels to the base and four walls now; insert later when indicated.
2) Inner U-Insert (creates 3 upper compartments) — Light Green
Insert Base
- Row 1: Ch 16, sc in 2nd ch and across [15].
- Rows 2–10: ch 1, turn, sc across [15].
(About half the outer width.)
Border: sc around; 3 sc at corners.
Insert Walls
- Rnd 1: BLO sc around.
- Rnd 2–11: sc around (height ~8–9 cm so the insert rim sits just under/near the outer rim).
- Rnd 12 (rim): FLO sl st around. FO with a very long tail for sewing.
Mounting the Insert
- Center the insert front to back so its front wall sits ~1–1.5 cm behind the outer front wall.
- Center left to right, leaving equal gaps (about 2–3 cm each side) between insert side walls and the outer side walls — these gaps are the left and right upper side slots.
- Sew the insert base to the outer base all along its perimeter. Tack each insert side to the outer wall at 2–3 points to hold its position (keep the top edges open).
Optional: cut a small plastic-canvas panel for the insert back wall and slide it in before the rim round.
3) Lower Front Pockets — 4 Cups
A) Two Center Green Cups (Make 2 – Light Green)
- Rnd 1: MR, 6 sc [6]
- Rnd 2: (inc) ×6 [12]
- Rnd 3: (sc, inc) ×6 [18]
- Rnd 4: (2 sc, inc) ×6 [24]
- Rnd 5–6: sc around [24]
- Rnd 7 (rim): FLO sl st around. FO with long tail.
B) Two Corner Cups (Make 2 – Beige/Tan)
- Rnd 1: MR, 6 sc [6]
- Rnd 2: (inc) ×6 [12]
- Rnd 3: (sc, inc) ×6 [18]
- Rnd 4–5: sc around [18]
- Rnd 6 (rim): FLO sl st around. FO with long tail.
Attachment (left → right along lower front):
tan corner – green – green – tan corner.
Sew sides and bottom only, keeping the top open and rounded.
4) Frog Head & Features
Head (Light Green)
- Rnd 1: MR, 6 sc [6]
- Rnd 2: (inc) ×6 [12]
- Rnd 3: (sc, inc) ×6 [18]
- Rnd 4: (2 sc, inc) ×6 [24]
- Rnd 5: (3 sc, inc) ×6 [30]
- Rnd 6: (4 sc, inc) ×6 [36]
- Rnd 7: (5 sc, inc) ×6 [42]
- Rnd 8–22: sc around [42]
- Rnd 23: (5 sc, dec) ×6 [36]
- Rnd 24: (4 sc, dec) ×6 [30]
- Rnd 25: (3 sc, dec) ×6 [24]
- Rnd 26: (2 sc, dec) ×6 [18] — stuff firmly
- Rnd 27: (sc, dec) ×6 [12]
- Rnd 28: dec ×6 [6]
FO, draw closed.
Eyes (Make 2)
Green Eyelid Base (domed):
- Rnd 1: MR, 6 sc [6]
- Rnd 2: (inc) ×6 [12]
- Rnd 3: (sc, inc) ×6 [18]
- Rnd 4: (2 sc, inc) ×6 [24]
- Rnds 5–6: sc around [24]
- Rnd 7: (2 sc, dec) ×6 [18]
Stuff lightly. FO.
White Disk:
- Rnd 1: MR, 6 sc [6]
- Rnd 2: (inc) ×6 [12]
- Rnd 3: (sc, inc) ×6 [18]
FO flat.
Black Pupil:
- MR, 6 sc, sl st to join, FO.
Assembly: Sew pupil to disk, disk to green base. Sew finished eyes to top of head, slightly angled outward.
Cheeks (Make 2 – Pink)
- Rnd 1: MR, 6 sc [6]
- Rnd 2: (inc) ×6 [12]
FO, flatten and sew just under the eyes, slightly inward.
Smile
With black yarn, embroider a wide shallow curve from cheek to cheek.
5) Arms with Webbed Fingers (Make 2 — Light Green)
Arm Tubes
- Rnd 1: MR, 6 sc [6]
- Rnds 2–12: sc around [6]
Lightly stuff the lower half only. FO with long tail.
Webbed Fingers (3 per arm)
- Rnd 1: MR, 4 sc [4]
- Rnds 2–3: sc around [4]
FO. Join three tips in a slight fan and sew to arm end.
6) Belly Patch (Beige/Tan)
- Rnd 1: MR, 6 sc [6]
- Rnd 2: (inc) ×6 [12]
- Rnd 3: (sc, inc) ×6 [18]
- Rnd 4: (2 sc, inc) ×6 [24]
- Rnd 5: (3 sc, inc) ×6 [30]
- Rnd 6: (4 sc, inc) ×6 [36]
- Rnd 7: (5 sc, inc) ×6 [42]
- Rnd 8: (6 sc, inc) ×6 [48]
- Rnds 9–11: sc around [48]
FO and flatten to a large oval.
7) Final Assembly & Reinforcement
- Attach the Inner Insert
- Center it; sew its base all around to the outer base.
- Tack each side to the outer walls at 2–3 points. This yields the upper three compartments: left slot, center bin, right slot.
- Belly Patch
- Sew the tan oval to the inside front panel of the caddy, centered between the upper rim and lower pockets (clearly visible above the upper compartment line).
- Lower Pockets
- Sew the four cups across the lower front in the order tan – green – green – tan; stitch sides and bottom only.
- Head
- Sew the head just inside the back rim, aligned over the center bin so it appears to rise from the caddy.
- Arms
- Sew to the outer side walls just below the rim and slightly above the upper compartment line, angled outward/upward.
- Reinforce
- Slide plastic-canvas panels into the outer walls and base (and a trimmed panel into the insert back wall if desired). Ensure the base is flat and corners are square.
- Finish
- Weave in all ends, neaten the FLO sl-st rims on box, insert, and cup pockets, and shape everything.
Care
Spot clean only. Avoid soaking reinforcement. Do not machine wash.
Enjoy your friendly organizer with seven functional pockets: four lower front cups and three upper compartments created by the inner insert — plus a smiling frog to brighten your desk!