Celebrate the season of renewal with the Welcome Spring Wreath, a joyful crochet creation bursting with color, charm, and handmade warmth! 🌸🧶 Adorned with vibrant flowers, fluttering butterflies, and buzzing bees, this wreath is a cheerful invitation to embrace longer days and blooming gardens. The centerpiece—a sweet crochet “Welcome” sign—adds a personal touch that makes your front door or wall feel extra inviting.
This pattern is perfect for crocheters who love mixing playful motifs with seasonal flair. You can customize your wreath with pastel petals, sparkly wings, or even add tiny ladybugs for extra whimsy. Whether you’re decorating your home, gifting a handmade hello, or simply celebrating the arrival of spring, the Welcome Spring Wreath is a delightful way to stitch sunshine into every corner—one joyful loop at a time! 🐝🌼
🌸🐝 “Welcome” Spring Wreath Crochet Pattern
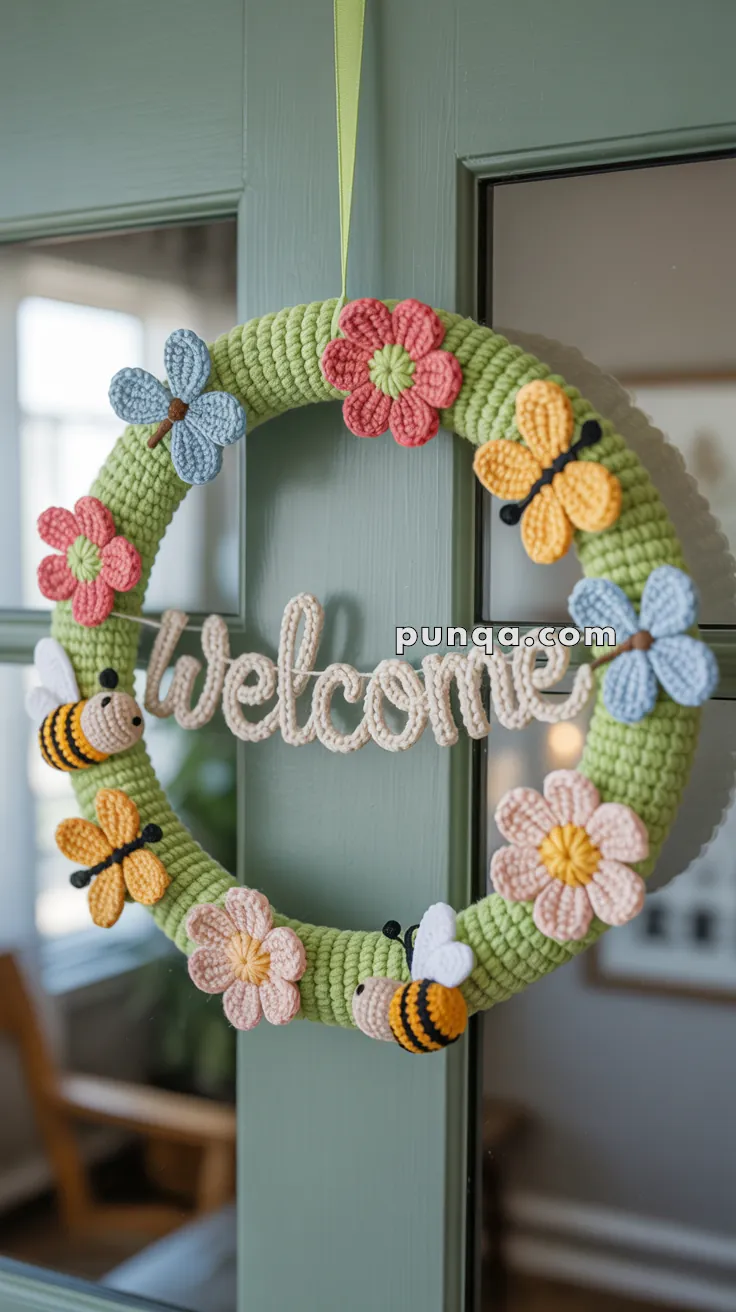
Brighten your doorway with this cheerful crochet spring wreath! Decorated with colorful flowers, buzzing bees, fluttering butterflies, and a handmade welcome sign, it’s the perfect way to greet your guests.
This design matches the photo exactly: a light green yarn-wrapped wreath base, a mix of pink, peach, red, and coral flowers with yellow and green centers, blue and orange butterflies, plump bees with wings and eyes, and the word welcome shaped from a single crochet cord in flowing cursive.
✨ Skill Level
Intermediate – basic stitches, appliqué work, and some shaping.
📏 Finished Size
Approx. 12–14 inches (30–35 cm) in diameter (depending on your wreath base).
🧶 Materials
- Green yarn (wreath cover)
- Pink, peach, red, coral yarn (flowers)
- Yellow & green yarn (flower centers)
- Blue yarn (butterflies)
- Orange/yellow yarn (butterflies)
- Brown & black yarn (butterfly bodies, bee stripes)
- Beige yarn (bee heads)
- White yarn (bee wings, letter cord optional)
- Cream yarn (welcome cord)
- 6 mm black safety eyes (for bees)
- Foam wreath base (30–35 cm diameter)
- Crochet hook: 3.0–3.5 mm
- Yarn needle
- Scissors
- Ribbon for hanging
📖 Abbreviations (US Terms)
- MR = Magic Ring
- sc = single crochet
- inc = increase (2 sc in one st)
- dec = decrease (sc 2 together)
- sl st = slip stitch
- ch = chain
- hdc = half double crochet
- dc = double crochet
- tr = treble crochet
🧵 Pattern Instructions
🟢 Wreath Base (light green)
- MR, 6 sc (6)
- inc around (12)
- (sc, inc) × 6 (18)
- Continue increasing until circumference matches wreath thickness (about 30–36 sts).
- Work in rounds to create a long tube, length equal to wreath circumference.
- Slide tube over foam base, sew ends together invisibly at back.
🌸 Flowers
5-Petal Flower (small, pink/peach):
- MR, 5 sc, join with sl st.
- (ch 2, 2 dc, ch 2, sl st) in same st × 5.
Fasten off.
6-Petal Flower (large, red/coral):
- MR, 6 sc, join.
- (ch 2, 2 dc, tr, 2 dc, ch 2, sl st) in same st × 6.
Fasten off.
Centers (yellow or green):
MR, 6–8 sc, join. Sew to middle of each flower.
🐝 Bees (make 2)
Body:
- With beige: MR, 6 sc.
- (sc, inc) × 3 (9).
- Switch to yellow: sc around.
- Switch to black: sc around.
- Alternate 2 rows yellow, 2 rows black until 1.5–2 in long.
- (sc, dec) × 3 → close. Stuff lightly.
Wings (make 2 per bee, white):
Ch 6, sl st, sc, hdc, dc, tr → fasten off.
Attach two wings to top of body.
Eyes: Insert 6 mm safety eyes into beige head.
🦋 Butterflies
Blue Butterfly (make 2):
- Top wings (larger): MR, (ch 3, 3 dc, ch 3, sl st) × 2.
- Bottom wings (smaller): (ch 2, 2 dc, ch 2, sl st) × 2.
- Fasten off.
- Sew brown chain across center for body. Add 2 ch antenna.
Orange/Yellow Butterfly (make 2):
Same pattern, using orange/yellow yarn with black body & antenna.
✍️ Crochet “Welcome” Cord (cream)
- Make long crochet cord (i-cord or tight sc rope), about ch 200.
- Shape into continuous cursive word “welcome”:
- w: 2 humps.
- e: rounded loop.
- l: tall downstroke.
- c: half circle.
- o: full round.
- m: 2 humps.
- e: loop.
- Pin onto wreath to hold shape.
- Sew down invisibly, ensuring flowing connected style.
✍️ Detailed Crochet Pattern for “Welcome” Letters
We’ll make this as one continuous cord so the letters are connected, like cursive handwriting.
🧶 Materials
- Cream yarn (or contrasting color of choice)
- Crochet hook: 3.0 mm (or smaller than used for wreath)
- Yarn needle
- Pins (to hold letters in place while shaping)
- Hot glue or sewing thread (to secure letters to wreath)
📖 Abbreviations
- ch = chain
- sc = single crochet
- sl st = slip stitch
🧵 Cord Base
Make a long cord first. You can use either:
Option 1: Corded Chain (simpler):
- Ch until you reach approx. 200–220 chains.
- Go back along chain with sl st in each st → thick and stable cord.
Option 2: 2-Stitch I-Cord (firmer):
- Ch 2, sc in both.
- Without turning, slide sts to right of hook, insert hook into first st, pull yarn behind work, sc across again.
- Repeat until cord measures 200+ sts long.
👉 Make extra length — better to have more than less.
📝 Shaping the Letters
General Tip: Pin cord on a blocking board (or even a pillow) to shape letters first, then sew/glue onto wreath.
🔠 Letter W
- Start with cord.
- Make two tall humps: up, curve down, up, curve down.
- Keep middle dip slightly lower than first and last dip.
🔠 Letter E
- Curve cord into a small loop.
- Bottom should connect smoothly to end of W.
- Shape like a sideways “c” with a closing stroke.
🔠 Letter L
- Pull cord upward into a tall line.
- Curve top slightly leftward.
- Drop straight down, then curl slightly right at bottom.
🔠 Letter C
- Form an open half circle.
- Keep ends slightly extended to flow into L before and O after.
🔠 Letter O
- Form full round loop.
- Keep top slightly smaller than bottom (oval look).
- Connect seamlessly to C and next letter.
🔠 Letter M
- Two humps like mini W.
- First hump taller, second hump slightly shorter.
- Make sure bottom sits flush with O before and E after.
🔠 Letter E (final)
- Same as first E.
- Slightly smaller so word finishes softly.
- End cord neatly, tuck tail behind wreath.
🧩 Assembly
- Pin letters onto wreath in flowing cursive style.
- Adjust spacing so all letters fit across center with gentle curve.
- Sew down invisibly with matching thread or glue carefully.
🌼 Result
You’ll have a perfectly shaped, continuous “Welcome” word across your wreath — soft, flowing, and photo-accurate.
🧩 Finishing
- Cover wreath base with green tube.
- Arrange flowers evenly around (alternating large and small).
- Sew bees on lower left and right.
- Add butterflies on sides and bottom.
- Attach “welcome” cord across center in a slight curve.
- Add ribbon loop at top for hanging.
🌼 Final Touch
Your Crochet Welcome Spring Wreath is complete! 🌸🐝 With its cheerful flowers, playful bees, fluttering butterflies, and handmade welcome sign, it’s the perfect way to greet family and friends with joy. Hang it on your front door or inside your home for instant springtime charm.