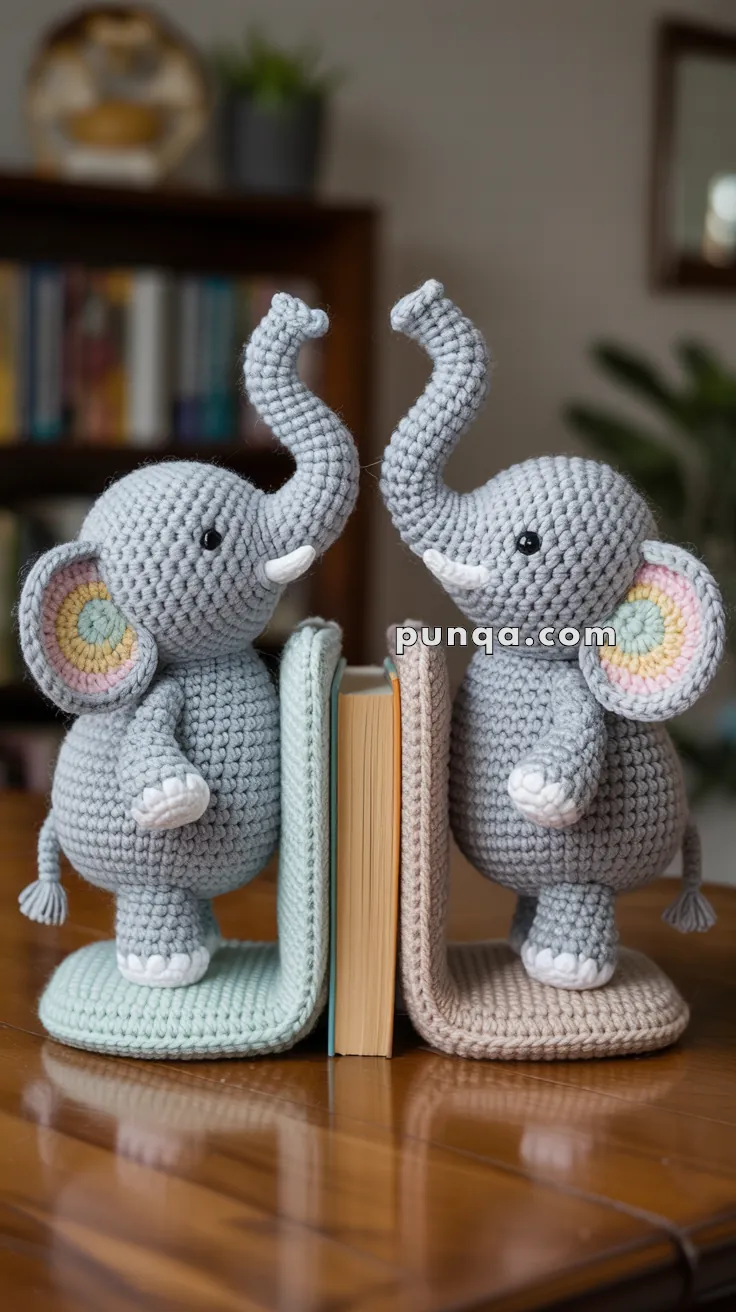
Make way for the most adorable shelf buddy around—this Amigurumi Elephant Bookend is here to keep your favorite reads standing tall with a trunkful of charm! 🐘📚 With its floppy ears, gentle eyes, and sturdy shape, this clever crochet creation blends function with cuteness in the best possible way. Whether you’re decorating a nursery, organizing your craft books, or just love elephants, this project adds a playful touch to any space.
Crafted to slip over standard metal bookends, this pattern lets you customize your elephant with fun colors, textured stitches, and sweet extras like a tiny tail or embroidered smile. You can pose the trunk, fluff the ears, and even make a matching pair to guard both ends of your shelf. Whether gifted to a fellow book lover or stitched just for fun, this Elephant Bookend Amigurumi is a joyful and satisfying project—perfect for stitching up a little pachyderm personality, one loop at a time! 🧶💙✨

🐘 Amigurumi Elephant Bookend Crochet Pattern
These Amigurumi Elephant Bookends are not only adorable but also functional! Their plump bodies, rainbow-colored ears, and upright trunks make them a charming way to keep your favorite books in place. The design includes firm bases for stability and a clever technique for shaping the trunks so they stay upright, just like in the photo.
✨ Skill Level
Intermediate – requires shaping, sewing, and some reinforcement.
📏 Finished Size
Approx. 9–10 in (23–25 cm) tall when made with worsted yarn and 3.5 mm hook.
🧶 Materials
- Worsted weight yarn in:
- Light gray (body, head, trunk, limbs, tail)
- White (tusks, toes)
- Pastel shades (for rainbow inner ears)
- Mint and beige (for base panels)
- 3.5 mm crochet hook
- Yarn needle
- Safety eyes (12–14 mm) or black yarn for embroidery
- Stuffing (polyfill)
- Plastic canvas, cardboard, or MDF board (for base reinforcement)
- Pipe cleaners, craft wire, or chenille stems (for upright trunks)
- Hot glue (optional, for base reinforcement)
🔤 Abbreviations (US Terms)
- MR = magic ring
- sc = single crochet
- inc = increase (2 sc in same st)
- dec = decrease (sc2tog)
- ch = chain
- sl st = slip stitch
- BLO = back loop only
- FLO = front loop only
🧵 Pattern Instructions
1. Head & Body (Gray)
- MR, 6 sc (6)
- inc around (12)
- (sc, inc) ×6 (18)
- (2 sc, inc) ×6 (24)
- Continue increasing evenly until 48 sts.
- Work 12 rounds even.
- Begin shaping neck: (6 sc, dec) ×6 (42)
- (5 sc, dec) ×6 (36)
- Stuff head firmly.
- Continue decreasing until closed.
Body:
- MR, 6 sc (6)
- inc around (12)
- (sc, inc) ×6 (18)
- (2 sc, inc) ×6 (24)
- Keep increasing until 54 sts.
- Work 18–20 rounds even.
- Stuff firmly.
- Decrease gradually and close.
Sew head to body securely.
2. Trunk (Gray – Upright)
- MR, 6 sc (6)
- inc around (12)
- (3 sc, inc) ×3 (15)
- Work even for 20–24 rounds.
- Lightly stuff as you go.
- Insert wire or 2–3 pipe cleaners twisted together inside before finishing. Bend wire into the upright curve you want.
- Continue crocheting until trunk reaches desired length.
- Decrease gradually to close.
💡 Tip: If you prefer not to use wire, crochet the trunk tightly and insert a rolled strip of plastic canvas inside. This keeps it naturally upright.
3. Ears (Make 2 – Gray + Rainbow Inside)
Inner Ear (Rainbow):
- With pastel yarn, MR, 6 sc. Change color every 2–3 rounds. Increase until you have a half-circle approx. 10–12 cm across.
Outer Ear (Gray):
- Work same half-circle in gray, slightly larger.
- Crochet both panels together with sc border.
Sew ears to sides of head.
4. Tusks (Make 2 – White)
- MR, 4 sc (4)
- Work 6–7 rounds even.
- Lightly stuff, sew under trunk.
5. Legs (Make 4 – Gray, with White Toes)
- MR, 6 sc (6)
- inc around (12)
- (2 sc, inc) ×4 (16)
- Work 10 rounds even.
- Stuff, close, sew to body base.
- Embroider or surface crochet white toes.
6. Tail (Gray)
- Ch 15, sl st back. Add small tassel at tip. Sew to back of body.
7. Bookend Base (Make 2 – Mint & Beige)
- Ch 24, turn, sc across.
- Work in rows until rectangle is approx. 5×7 in.
- Make 2 identical panels for each side.
- Insert plastic canvas, cardboard, or MDF between panels for firmness.
- Sc around edges to close.
Back Support:
- Ch 18, repeat rows until rectangle is approx. 5×5 in.
- Sew it upright to base, forming an “L” shape.
- Reinforce inside with stiff insert.
8. Assembly
- Sew elephant securely onto the base, trunk facing outward.
- Ensure weight is balanced – add small pouch of stones or pellets inside the body/base for stability.
- Repeat for second elephant, mirroring the placement.
🪄 Finishing Touches
- Position trunks upright by gently shaping the wire or reinforced insert.
- Embroider eyebrows and add blush with yarn or fabric paint if desired.
- Place them on either side of your favorite books!
🎉 Final Words
Your Amigurumi Elephant Bookends are now complete! The sturdy bases keep your books safe, while the upright trunks add extra cuteness and personality. With their pastel rainbow ears and playful stance, these elephants are sure to brighten up any bookshelf.
👉 A perfect project for nursery décor, kids’ rooms, or as a handmade gift for any elephant lover.


