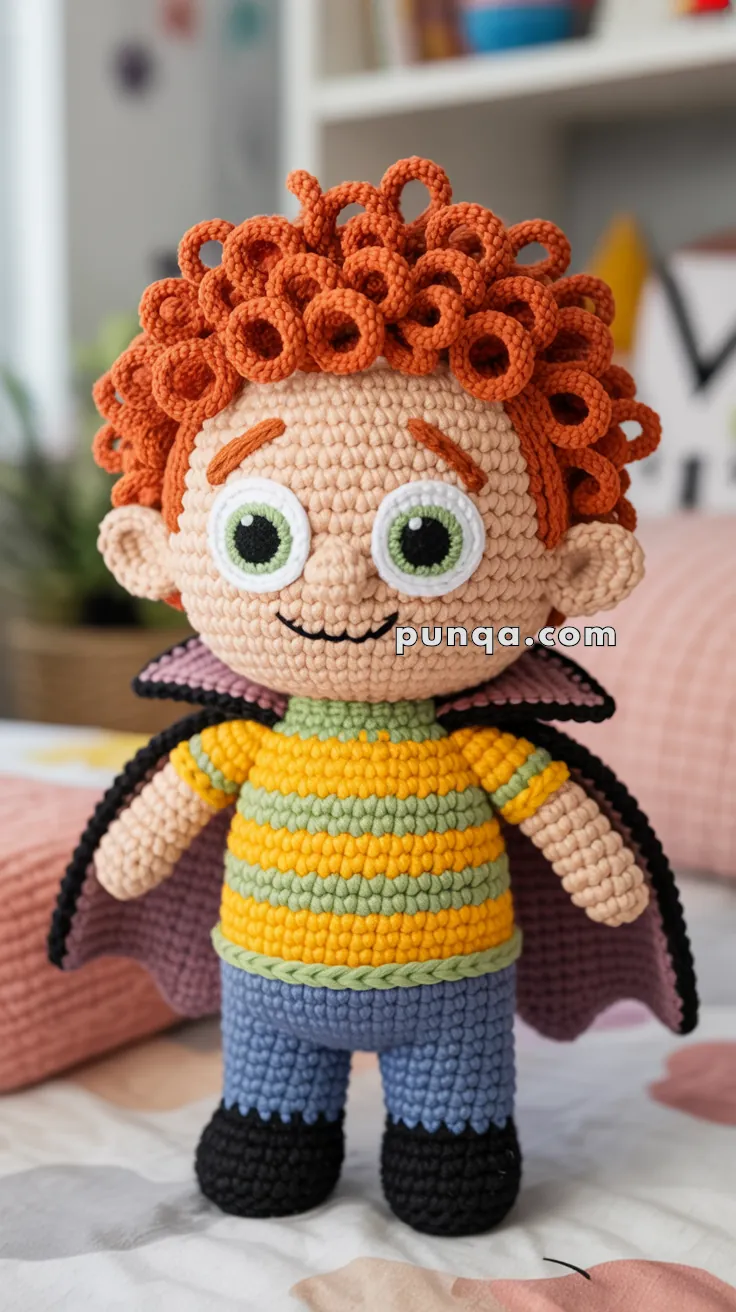
Get ready to stitch up some monster-sized cuteness with this Amigurumi Dennis from Hotel Transylvania crochet pattern! With his wild red curls, wide-eyed wonder, and playful personality, Dennis brings all the charm of Dracula’s grandson straight into your yarn stash. Whether you’re crafting for a fan of the spooky-fun series, adding to a Halloween display, or simply love bringing animated characters to life, this little vampire-in-training is sure to steal the spotlight—fangs and all! 🧶🧛♂️🧡
Designed for whimsy and detail, this pattern invites you to explore expressive features, vibrant hair, and fun extras like a tiny cape, bat plushie, or even a monster-themed toy. Customize his outfit with bold colors or add embroidered accents to reflect his quirky style. Whether perched on a shelf, nestled in a gift basket, or starring in a handmade monster mash, this Dennis Amigurumi is a joyful and satisfying project—perfect for stitching up a little handmade mischief, one loop at a time! 💖✨🎃
🦇Amigurumi Dennis from Hotel Transylvania Crochet Pattern
Get ready to create the most adorable little half-vampire from Hotel Transylvania! This Dennis doll captures his signature bouncy orange curls, striped shirt, sweet cape, and that characteristic smile. He’s the perfect project for fans of the movie! 🧛♂️✨
💫 Pattern Details
Skill Level: Intermediate to Advanced
Finished Size: Approximately 26 cm (10 inches) tall
Time to Complete: 12-15 hours
🧶 Materials You’ll Need
Yarn: Light worsted weight/DK yarn (50g = approx. 125m/137yds)
- Peach/skin tone: 50g
- Burnt orange: 40g
- Black: 25g
- Light purple/mauve: 30g
- Yellow/gold: 20g
- Sage green: 20g
- Periwinkle blue: 20g
- Light pink/salmon: 10g
- White: small amount (5g)
- Dark green: small amount (5g)
Other Materials:
- 2.5mm crochet hook
- Fiberfill stuffing
- Black embroidery thread
- Yarn needle
- Stitch markers
- Scissors
- Fabric glue (optional)
📝 Abbreviations
- MR: Magic Ring
- SC: Single Crochet
- INC: Increase (2 SC in same stitch)
- DEC: Invisible decrease
- BLO: Back Loops Only
- FLO: Front Loops Only
- HDC: Half Double Crochet
- DC: Double Crochet
- CH: Chain
- SL ST: Slip Stitch
- ST(S): Stitch(es)
👦 Head
Use peach yarn
Round 1: MR, 6 SC (6)
Round 2: INC in each ST (12)
Round 3: (SC, INC) x6 (18)
Round 4: (2 SC, INC) x6 (24)
Round 5: (3 SC, INC) x6 (30)
Round 6: (4 SC, INC) x6 (36)
Round 7: (5 SC, INC) x6 (42)
Round 8: (6 SC, INC) x6 (48)
Rounds 9-18: SC around (48) – 10 rounds total
Round 19: (6 SC, DEC) x6 (42)
Round 20: (5 SC, DEC) x6 (36)
Round 21: (4 SC, DEC) x6 (30)
Round 22: (3 SC, DEC) x6 (24)
Round 23: (2 SC, DEC) x6 (18)
Stuff the head very firmly!
Round 24: (SC, DEC) x6 (12)
Round 25: DEC x6 (6)
Fasten off and close the opening. Set aside.
👂 Ears (Make 2)
Use peach yarn
Round 1: MR, 6 SC (6)
Round 2: SC around (6)
Round 3: SC around (6)
Fasten off, leaving a long tail. Don’t stuff. Flatten slightly and sew to the sides of the head between rounds 12-14, angling them so they’ll be partially covered by hair later.
👁️ Eyes (Layered Appliqué)
White backing circles (Make 2):
With white yarn, CH 2
Round 1: 8 SC in 2nd CH from hook
SL ST to first SC, fasten off, leaving a tail for sewing
Green iris circles (Make 2):
With dark green yarn, CH 2
Round 1: 6 SC in 2nd CH from hook
SL ST to first SC, fasten off, leaving a tail for sewing
Assembly:
Position white circles between rounds 11-13 of the head (centered at round 12), spacing them about 6-7 stitches apart center-to-center. They should be fairly close together for that sweet, innocent look. Sew or glue them securely to the head.
Center the green circles on top of the white circles and attach them securely.
Use black embroidery thread to add a small vertical oval pupil in the center of each green circle. Then add a tiny white highlight stitch (just 1-2 small stitches) at the upper right area of each pupil for that sparkly, lively expression! ✨
🎨 Facial Features
Eyebrows: Using burnt orange yarn, embroider two short, gently angled lines above each eye at rounds 9-10. Each eyebrow should be about 2-3 stitches long, angled very slightly with the inner ends pointing down toward the nose area (giving a gentle, soft expression).
Mouth: Using black embroidery thread, create a gentle smile curve between rounds 16-17, centered below the eyes. Make it subtle and sweet – just a small curved line about 4-5 stitches wide. The smile should curve upward gently at the ends.
Cheeks: Add light pink blush using yarn scraps or fabric pastel between rounds 14-16 on both sides, positioned below and slightly to the outside of the eyes. Just a light touch – don’t overdo it!
🦱 Curly Hair Construction
This is Dennis’s signature feature! The voluminous, springy curls are arranged in layers to create that adorable crown effect. 🧡
Individual Curl (Make 30-34):
With burnt orange yarn:
CH 15
Starting in 2nd CH from hook: work 3 SC in each CH across (42 SC)
Fasten off, leaving a 6-inch tail for sewing
The chain will naturally spiral into a tight, bouncy curl! If your curls are too loose, try working even more tightly or use a smaller hook just for the hair.
Hair Assembly Pattern:
Front Row (Hairline): Sew 9-10 curls around the front hairline at rounds 8-9, spacing them about 1-2 stitches apart. These should frame the face, with a few curls falling slightly forward.
Side Rows: Sew 4-5 curls on each side of the head, continuing from the front hairline around toward the back at rounds 8-9.
Second Layer (Mid-crown): Sew 8-9 curls directly behind and slightly above the first row, positioned at rounds 6-8. Offset these curls between the first row curls for fuller, more dimensional coverage.
Top Layer (Crown): Sew 4-5 curls on the very top of the head (rounds 4-6), focusing on the center-front area to create maximum height and volume. These are the “showstopper” curls!
Back Coverage: Sew 2-3 curls at the back of the head for light coverage, keeping this area deliberately less dense than the front and top.
Styling Tip: As you sew each curl, position it so it points upward and outward rather than flat against the head. Think “bouncy and springy”! The overall effect should be a voluminous crown of curls concentrated at the front and top, giving Dennis that signature adorable look! 🌟
👕 Body with Legs (Worked as One Piece)
We’ll create the legs first, join them together, then work up to create the striped body with collar!
First Leg:
Start with black (shoe):
Round 1: MR, 6 SC (6)
Round 2: INC in each ST (12)
Round 3: (SC, INC) x6 (18)
Round 4: BLO, SC around (18)
Note: Working in back loops only creates a ridge that defines the sole of the shoe!
Rounds 5-6: SC around (18)
Switch to periwinkle blue (pants):
Rounds 7-12: SC around (18) – 6 rounds total
Stuff the foot and lower leg lightly but firmly. Fasten off and set aside.
Second Leg:
Work exactly as first leg through round 12, but do NOT fasten off. You’ll continue working from this leg.
Joining the Legs:
Round 13: With the second leg still on your hook, SC 18 around the second leg. Then CH 4. Now join to the first leg with a SC in any stitch, then SC 17 more around the first leg (18 SC total around first leg). Now SC 4 across the chain stitches. Finally, SC 17 around the remaining stitches of the second leg to complete the round. (Total: 18 + 4 + 18 + 4 = 44 stitches, but we’ll adjust this down in the next round)
Round 14: SC around all stitches evenly (40)
Note: You may need to skip a few stitches as you work around to get down to 40 total. Work evenly to avoid puckering.
Round 15: (18 SC, DEC) x2 (38)
Round 16: SC around (38) – continue with blue
Round 17: (17 SC, DEC) x2 (36)
Switch to yellow (start of striped shirt):
Rounds 18-19: SC around (36) – 2 rounds
Switch to sage green:
Rounds 20-21: SC around (36) – 2 rounds
Switch to yellow:
Rounds 22-23: SC around (36) – 2 rounds
Switch to light pink/salmon (collar):
Round 24: SC around (36)
Round 25: SC around (36)
Continue with light pink:
Round 26: (4 SC, DEC) x6 (30)
Round 27: SC around (30)
Round 28: (3 SC, DEC) x6 (24)
Round 29: SC around (24)
Stuff the legs and body firmly as you go. The body should be firm and well-shaped. Fasten off, leaving a long tail (about 24 inches) for attaching to the head.
💪 Arms (Make 2)
Start with peach (hands):
Round 1: MR, 6 SC (6)
Round 2: (SC, INC) x3 (9)
Rounds 3-5: SC around (9) – 3 rounds
Switch to sage green (sleeve – bottom stripe):
Round 6: SC around (9)
Round 7: SC around (9)
Switch to yellow (middle stripe):
Round 8: SC around (9)
Switch to sage green (top of sleeve):
Rounds 9-11: SC around (9) – 3 rounds
Fasten off, leaving a long tail (about 12 inches). Stuff only the hand area – insert a small amount of stuffing into the first 3-4 rounds only. Keep the arm portion soft and flexible for natural posing and movement.
Sew arms to the sides of the body at rounds 25-26 (where the pink collar meets the top yellow stripe).
🦇 Cape
Use light purple/mauve yarn
CH 32
Row 1: SC in 2nd CH from hook and across (31)
Row 2: CH 1, turn, 2 SC in first ST, SC 29, 2 SC in last ST (33)
Row 3: CH 1, turn, 2 SC in first ST, SC 31, 2 SC in last ST (35)
Row 4: CH 1, turn, SC across (35)
Rows 5-8: CH 1, turn, SC across (35) – 4 rows total
Row 9: CH 1, turn, DEC, SC 31, DEC (33)
Row 10: CH 1, turn, DEC, SC 29, DEC (31)
Row 11: CH 1, turn, DEC, SC 27, DEC (29)
Row 12: CH 1, turn, DEC, SC 25, DEC (27)
Row 13: CH 1, turn, DEC, SC 23, DEC (25)
Row 14: CH 1, turn, DEC, SC 21, DEC (23)
Fasten off, leaving a 12-inch tail.
Cape Edging:
With black yarn, attach to the bottom right corner:
- Work SC evenly around the entire cape
- Bottom edge: 1 SC in each stitch across (23 SC)
- Bottom corners: 3 SC in each corner stitch for smooth rounded corners
- Side edges: SC evenly in row ends (approximately 1 SC per row = about 14 SC per side)
- Top edge (neck): 1 SC in each stitch across, but work slightly more loosely to allow the neckline to curve and drape naturally (31 SC)
- Top corners: 2 SC in each top corner (not 3) for a gentler curve
- SL ST to first SC and fasten off
The black edging creates that signature finished look and helps the cape hold its shape! 🦇
🎯 Final Assembly
1. Attach head to body:
Position the head on top of the body opening. The face should be centered and facing forward, with the pink collar sitting right at the base of the neck.
Using the long tail from the body and a yarn needle, whip stitch around the entire opening, going through the last round of the body (round 29) and the lower edge of the head. Work evenly around, pulling the stitches snug but not too tight.
Before closing completely, add extra stuffing to the neck area if needed to ensure the head sits firmly and doesn’t wobble. The head should feel very secure and stable.
2. Attach arms:
Sew arms to the sides of the body at rounds 25-26 (at the shoulder area where the pink collar meets the yellow stripe).
Position them pointing slightly forward and downward at a natural resting angle – they shouldn’t stick straight out to the sides.
Sew through the flattened opening of each arm and attach firmly to the body, working around the entire arm opening to ensure it’s secure. Make sure both arms are attached at the same height and angle for symmetry!
3. Attach the cape:
Center the top straight edge of the cape at the back of the neck, positioning it to sit on top of the pink collar.
The cape should drape like a shawl or cloak over the shoulders. Take the top corners of the cape and bring them around toward the front of the shoulders, so they’re visible from the front view (almost like lapels).
Use small stitches to tack the top corners of the cape to the front-top of each shoulder, right at the point where the arms attach. This creates that characteristic draped look and keeps the cape in place.
Add 2-3 additional small tack stitches along the back of the shoulders (through both the cape and body at rounds 26-27) to keep the cape secure and prevent it from sliding backward.
The cape should hang naturally down the back with a nice drape – don’t pull it too tight or it will look stiff!
4. Final touches:
- Weave in all remaining yarn ends securely, hiding them inside the body
- Fluff and arrange each curl for maximum volume, ensuring they’re bouncy and three-dimensional
- Gently shape the curls so they point upward and outward from the head
- Adjust the cape drape so it hangs smoothly and symmetrically
- Position the arms in a natural, relaxed pose (slightly forward)
- Check that the head is secure, centered, and doesn’t wobble
- Make sure the facial features are well-positioned and even
- Give your Dennis doll a final inspection from all angles!
🌟 Tips for Success
Curl Volume is Everything: The hair is what makes Dennis instantly recognizable! The curls should be concentrated at the front and top, creating that signature crown effect. Don’t flatten them while sewing – keep them springy and pointing upward/outward! Each curl should maintain its spiral shape. If a curl gets flattened during assembly, gently reshape it with your fingers. 🧡
Tight, Even Tension: Keep your tension consistent and fairly tight throughout the entire project, especially for the head and body, so the stuffing doesn’t show through the stitches. If you’re a loose crocheter, consider going down to a 2.0mm hook.
Stuffing Strategy (Very Important!):
- Head: VERY firm and perfectly round – pack it tightly! This is crucial for the face to look right and for the head to sit properly on the body
- Body: Firm but not rock-hard – should feel solid but have a very slight give
- Legs: Medium-firm stuffing – firm enough to support the body weight when sitting/standing but not overstuffed
- Feet/Shoes: Light-medium stuffing – enough to give them shape and definition
- Arms: Only stuff the hands (rounds 1-4), leave the arm portions completely soft and poseable for natural movement
Color Changes for Stripes: When changing colors, always change at the same point in each round (like at the back center) for the cleanest, most professional look. You can carry the unused color up the inside of the work to avoid weaving in too many ends, but make sure the carried yarn doesn’t show through on the outside or create bumps.
Stripe Pattern Verification: The stripe order from bottom to top is:
- BLUE pants (6 rounds)
- YELLOW stripe (2 rounds)
- GREEN stripe (2 rounds)
- YELLOW stripe (2 rounds)
- PINK collar (2 rounds, then decreases)
Make sure you follow this exact order for accuracy!
Eye Positioning is Critical: The eyes should be fairly close together (6-7 stitches apart measured center-to-center) and positioned in the lower half of the face between rounds 11-13. This creates that sweet, innocent, childlike expression that makes Dennis so adorable! Take your time positioning them before sewing – you can use pins to test placement first. The white highlight stitch in each pupil makes a huge difference in bringing the face to life – don’t skip it!
Pink Collar Detail: This pink/salmon collar at the neckline is an important identifying detail that makes the doll match the character exactly. Make sure it’s clearly visible and not hidden by the cape!
Cape Positioning: The cape should sit on the shoulders like a shawl or cloak, with the corners wrapping around toward the front. It shouldn’t sit too high on the neck or too low on the back. The black edging should frame the cape nicely and be clearly visible from both front and back views.
Arm Sleeve Stripes: The arm stripes go: peach hand → green (2 rounds) → yellow (1 round) → green (3 rounds). This creates sleeves that coordinate with but don’t exactly match the body stripes.
Color Matching Guide:
- Skin: “Apricot,” “peach,” “skin tone,” “buff,” or “biscuit”
- Hair: “Burnt orange,” “pumpkin,” “rust,” “tangerine,” or “carrot”
- Pants: “Periwinkle,” “powder blue,” “baby blue,” “sky blue,” or “light denim”
- Cape: “Lilac,” “lavender,” “light purple,” “mauve,” or “wisteria”
- Collar: “Salmon,” “light coral,” “dusty pink,” “blush,” or “peach pink”
- Shirt – Green: “Sage green,” “dusty green,” “eucalyptus,” or “mint (muted)”
- Shirt – Yellow: “Mustard yellow,” “gold,” “honey,” “goldenrod,” or “marigold”
🎬 Display and Care
Dennis looks adorable sitting on a shelf, perched on a desk, nestled among other Hotel Transylvania characters, or displayed in a child’s room. His bouncy curls and sweet cape make him a real showstopper and conversation starter!
Care Instructions:
- Cleaning: Spot clean only with a damp cloth and very mild soap. Gently dab any dirty areas – don’t rub vigorously
- Water: Never submerge in water – the appliqué eyes may shift, colors may bleed, and the stuffing may clump or become damaged
- Sunlight: Keep away from prolonged direct sunlight to prevent color fading over time (especially the burnt orange hair)
- Curl Maintenance: Fluff curls occasionally with your fingers to maintain volume and shape
- Storage: Store in a cool, dry place away from humidity and extreme temperatures
- Reshaping: If curls become flattened during storage or handling, gently reshape them with your fingers – they should spring back nicely!
- Pet Safety: Keep away from pets who might be tempted to chew on the curls or other parts
Display Ideas:
- Create a complete Hotel Transylvania character collection
- Halloween or monster-themed seasonal display
- Shelf companion in a child’s bedroom or playroom
- Desk buddy for Hotel Transylvania fans in home offices
- Photography prop for creative themed photos or stop-motion
- Centerpiece for a Hotel Transylvania birthday party
- Gift for movie fans of all ages! 🎃
Make the Whole Hotel Gang: Dennis would love some company! Consider creating other characters from the movie to display alongside him:
- Mavis (his mom) – with long black hair and purple gothic dress
- Dracula (his grandpa) – with red-lined black cape and tuxedo
- Johnny (his dad) – with orange hair and backpack
- Winnie (his werewolf friend) – with wild brown fur
- Blobby – translucent green blob character
- Frankenstein, Wayne, Murray – the other hotel guests
- Dennis’s dog Tinkles – if you’re feeling ambitious! 🦇👻🐺
💭 Pattern Notes
This pattern creates a doll that closely matches Dennis’s character design from Hotel Transylvania. The key identifying features that make Dennis recognizable are:
✨ The voluminous orange curls – concentrated at the front and top in a crown shape (this is THE most important feature – don’t skimp!)
✨ Large, close-set eyes with white backing circles, green irises, and black pupils with white highlights
✨ Burnt orange eyebrows that match the hair color
✨ Gentle smile – small and sweet, not too big
✨ The distinctive pink/salmon collar at the neckline
✨ Yellow and green striped shirt (yellow-green-yellow stripe pattern)
✨ Purple/mauve cape with black edging that drapes over the shoulders
✨ Periwinkle blue pants and black shoes with defined soles
✨ Sweet, innocent facial expression – this is a young child character
✨ Large head relative to body – typical of cute child character proportions
Take your time with the details, especially the hair assembly and facial features. These are what bring the character to life! The curls are the most time-consuming part, but they’re absolutely what make this doll special and recognizable.
Skill Building: This pattern is excellent for practicing:
- Working in the round with consistent tension
- Multiple color changes and stripe work
- Joining separate pieces (legs to body)
- Layered appliqué for facial features
- Creating textured elements (the curly hair technique)
- Assembling complex multi-piece amigurumi
- Adding clothing details and accessories (cape with edging)
- Embroidery for facial details
Customization Ideas:
- Make Dennis in different sizes by using thicker/thinner yarn and adjusting hook size proportionally
- Create different expressions by adjusting the mouth embroidery
- Make alternative outfits (pajamas, winter clothes, etc.)
- Add small props like his favorite teddy bear or toy
Common Troubleshooting:
- Curls too loose: Work more tightly or use a smaller hook for hair only
- Head wobbles: Add more stuffing to neck area and use more whip stitches when attaching
- Stripes not lining up: Change colors at the same spot each round (mark with stitch marker)
- Stuffing shows through: Use tighter tension or go down a hook size
- Cape won’t stay in place: Add more tack stitches along the shoulders
- Arms too floppy: You can add 1-2 pipe cleaners inside for structure (optional)
Happy crocheting, and enjoy creating your adorable little half-vampire! Dennis is sure to bring smiles wherever he goes! 🧛♂️💕