Dial up the fun with this quirky Amigurumi Mobile Phone crochet pattern! Whether you’re crafting a playful plushie, a tech-themed gift, or a whimsical desk buddy, this soft and squishy phone brings a touch of modern charm to your handmade collection. With its rounded edges, cheerful screen, and customizable buttons, it’s a delightful way to blend nostalgia and creativity—perfect for beginners and seasoned crocheters alike. 🧶📱💬
Designed for simplicity and flair, this pattern invites you to explore basic shapes, expressive details, and fun extras like a smiley face, colorful keypad, or even a tiny antenna. Customize the screen with felt emojis, stitch on a favorite app icon, or add a strap to turn it into a playful pouch. Whether perched on a shelf, nestled in a gift basket, or starring in a tech-inspired display, this Mobile Phone Amigurumi is a joyful and satisfying project—perfect for stitching up a little handmade connection, one loop at a time! 💖✨📞
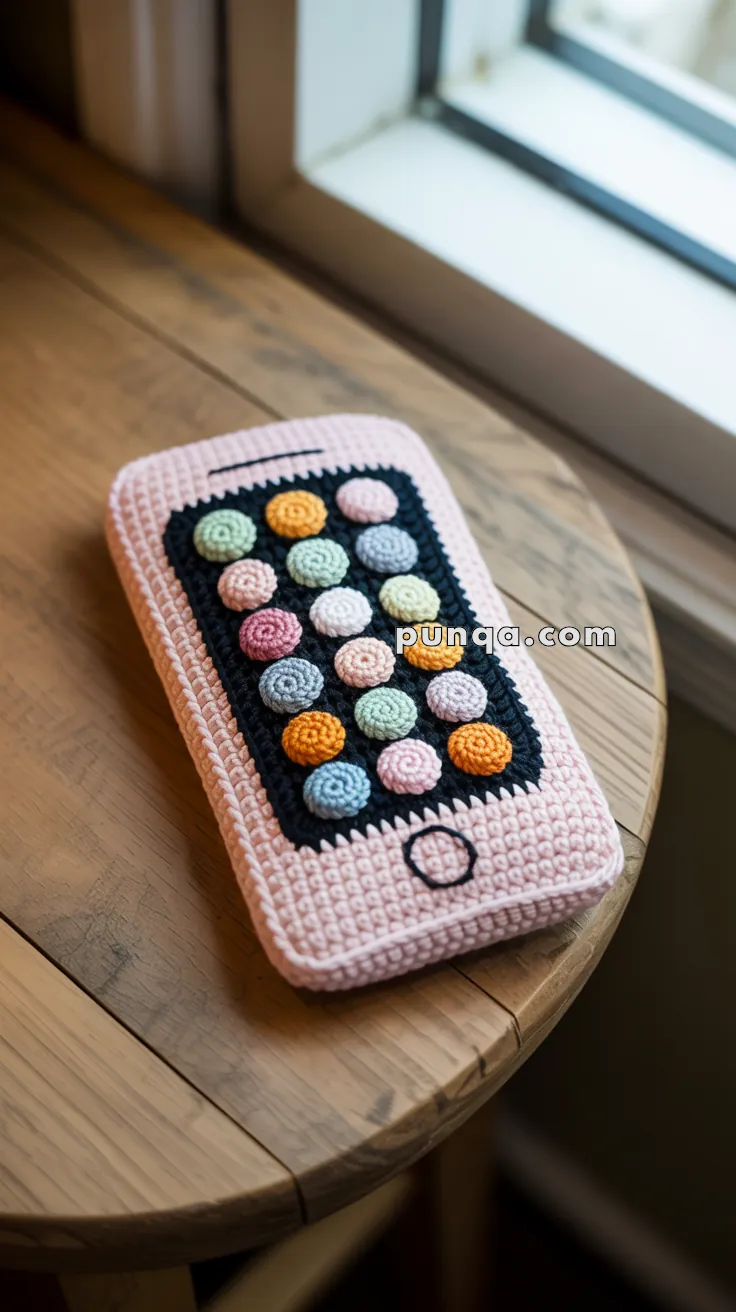
📱 Amigurumi Mobile Phone Crochet Pattern
Add a touch of handmade whimsy to your craft collection with this adorable amigurumi mobile phone! Featuring a soft pink body, a colorful “app screen” made of spiral buttons, and simple embroidered details, this playful plush makes a delightful gift for kids or a fun desk companion. Perfect for tech lovers with a love for yarn!
✨ Skill Level
Beginner–Intermediate
Perfect for crocheters comfortable with even stitching, shaping, and assembly
📏 Finished Size
Approx. 17 × 9 cm (6.7 × 3.5 inches)
Thickness: about 2–2.5 cm
🧶 Materials & Yarn Amount
- Light pink yarn (main body): 100–120 g
- Black yarn (screen panel): 20–25 g
- Pastel yarns (buttons, 10–12 shades): 40–50 g total
- Black embroidery thread: small amount
Other supplies:
- 2.5–3.0 mm crochet hook
- Polyester fiberfill (~120 g)
- Yarn needle, stitch marker, scissors
🧵 Abbreviations (US Terms)
MR – magic ring
sc – single crochet
inc – increase
dec – invisible decrease
sl st – slip stitch
ch – chain
FO – fasten off
BLO – back loop only
📱 Front & Back Panels (Make 2)
With light pink yarn:
Ch 23
Row 1: sc in 2nd ch from hook, sc across (22 sts)
Rows 2–36: ch 1, turn, sc across (22 sts each row)
Each panel forms a clean rectangle that defines the phone’s shape. Do not fasten off on one panel, as you’ll continue working from it.
🔄 Shaping the Rounded Edges
Continue from the working panel and crochet evenly around the rectangle:
- Work 36 sc down the long side
- 3 sc in the corner
- 22 sc across the bottom
- 3 sc in the next corner
- 36 sc up the second side
- 3 sc in the next corner
- 22 sc across the top
- 3 sc in the final corner
Join with a slip stitch.
This round creates soft, rounded corners and results in a total of 124 stitches, ensuring a perfectly even edge.
🧱 Creating the Phone Thickness
To build the soft, padded depth:
Rounds 2–7: sc around in BLO (124 sts each round)
Working in the back loops only forms a crisp edge and gives the phone its structured, realistic profile.
Fasten off.
🔁 Back Panel Edge
On the second panel, repeat only the edge round (124 stitches) without adding thickness. This ensures both sides align perfectly during assembly.
🖥️ Screen Panel
With black yarn:
Ch 16
Row 1: sc in 2nd ch from hook, sc across (15 sts)
Rows 2–22: ch 1, turn, sc across (15 sts each row)
Fasten off.
This panel is intentionally smaller to leave an even pink border around the screen. Sew it neatly centered on the front panel.
🔘 Spiral App Buttons (Make 20)
Using assorted pastel colors:
Round 1: MR 6 (6)
Round 2: inc ×6 (12)
Optional detail: slip stitch in the front loops around for a subtle spiral texture.
Fasten off and leave a tail for sewing.
Arrange the buttons in 4 rows of 5, keeping spacing even and alignment straight. Sew securely onto the black screen.
🔊 Speaker Detail
Using black yarn, embroider a short horizontal line centered above the screen. Keep it minimal and clean, about 5–6 stitches wide.
🔘 Bottom Button
Embroider a small circle centered below the screen using black yarn. Stitch around twice for a defined, polished look.
🧵 Assembly
Carefully align the front (with side walls) and back panel:
- Sew stitch-to-stitch around all 124 stitches
- Add stuffing gradually as you close
- Keep the shape flat and evenly padded
- Finish with a neat invisible seam
Take your time here—clean assembly makes a big difference in the final look.
✨ Finishing Touches
Gently shape the piece with your hands, smoothing the stuffing so the surface remains even. Ensure the edges are straight, corners rounded, and the screen sits centered. A light steam (if suitable for your yarn) can help refine the final shape.
💡 Customization Ideas
- Use bright or neon colors for a playful vibe 🌈
- Try soft pastels for a calm, aesthetic look
- Add a wrist strap or keychain loop
- Personalize button colors for themed designs
💖 Final Thoughts
With its structured silhouette, soft padding, and colorful textured details, this crochet phone blends modern design with handmade charm. It’s a fun, satisfying project that looks polished and professional while still feeling cozy and unique.
Whether you’re gifting it or keeping it for yourself, this little plush phone is sure to bring smiles. 📱🧶✨