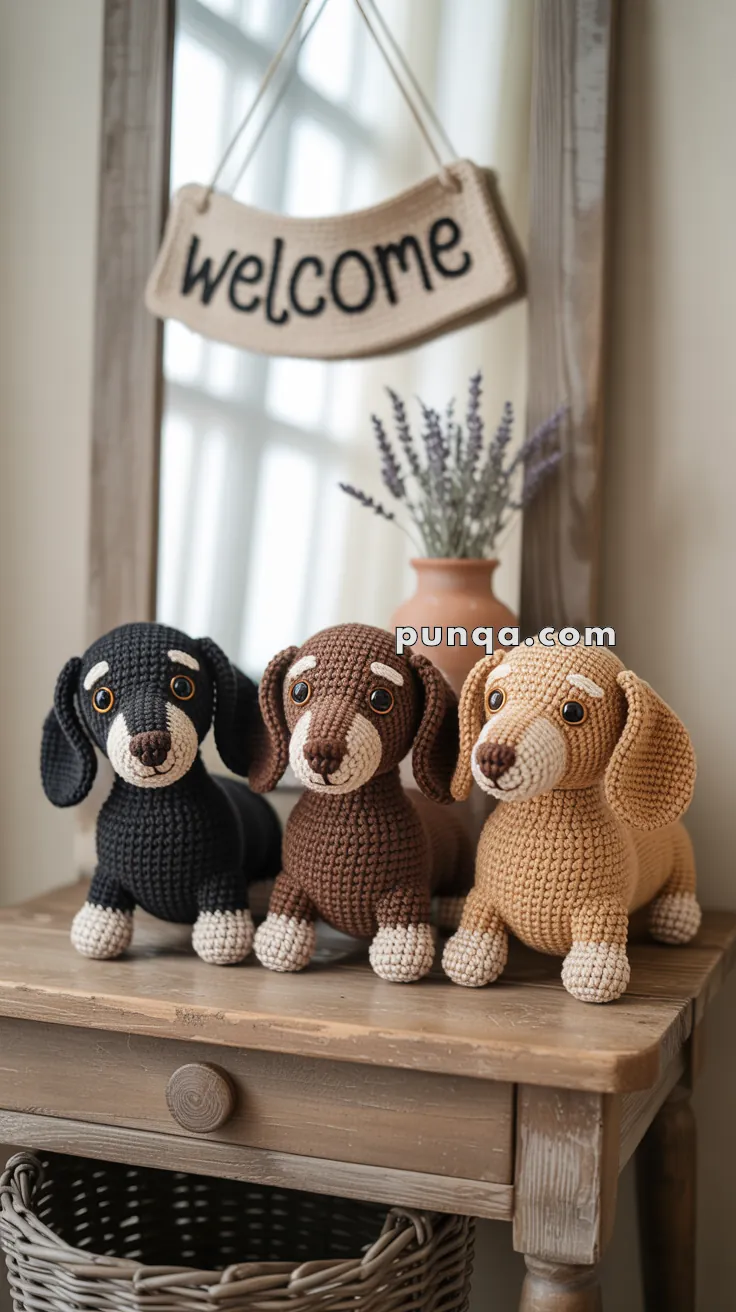
Get ready to triple the cuteness with this Amigurumi Dachshund Trio crochet pattern! Featuring three adorable wiener dogs with their signature long bodies, floppy ears, and button noses, this set is a must-make for dog lovers and amigurumi fans alike. Whether you’re crafting a playful pup family, creating gifts for fellow dachshund devotees, or simply adding to your handmade menagerie, this trio brings loads of personality in every stitch. 🐾🧶🐶
Designed for charm and variety, this pattern invites you to mix and match colors, add tiny sweaters, or even give each pup its own unique expression. Try classic black-and-tan, soft browns, or go whimsical with pastel hues and accessories like bows or bones. Whether they’re perched on a shelf, tucked into a gift box, or trotting along your craft table, this Dachshund Trio is a joyful and satisfying project—perfect for stitching up a little handmade bark and heart! 💖✨🐕
🐾 Amigurumi Dachshund Trio Crochet Pattern
These delightful dachshund amigurumi capture the unmistakable charm of the breed—long, low bodies, short sturdy legs, floppy ears, and expressive faces with classic accent markings. Designed as a coordinated trio, this pattern uses the same construction for all three pups, with simple color variations creating black & cream, chocolate & tan, or caramel & beige versions. Smooth shaping, clean color blocking, and careful assembly give each dog a cozy, display-ready finish.
All instructions are written in US crochet terms.
✨ Skill Level
Intermediate — this pattern includes shaping, flat appliqués, color changes, and precise assembly for realistic proportions.
📏 Finished Size
Approximately 18–20 cm (7–8 inches) long from nose to tail using DK yarn and a 2.5–3.0 mm hook.
🧶 Materials (per dog)
Yarn (DK weight cotton recommended)
- Body color
- Accent color (muzzle, paws, eye patches, optional chest)
- Dark brown or black (nose embroidery)
Color Ideas
- Black & Cream
- Chocolate Brown & Beige
- Caramel & Pale Beige
Other Supplies
- 10–12 mm safety eyes
- 2.5–3.0 mm crochet hook
- Fiberfill stuffing
- Yarn needle
- Stitch marker
✂️ Abbreviations (US Terms)
MR – magic ring
sc – single crochet
inc – increase (2 sc in same stitch)
dec – invisible decrease
sl st – slip stitch
ch – chain
( ) – stitch count
🐶 Head (Body Color)
- MR 6 (6)
- inc x6 (12)
- (1 sc, inc) x6 (18)
- (2 sc, inc) x6 (24)
- (3 sc, inc) x6 (30)
6–13. sc around (30)
Insert safety eyes between Rounds 9–10, approximately 6 stitches apart.
- (3 sc, dec) x6 (24)
- (2 sc, dec) x6 (18)
Stuff the head firmly, shaping it slightly elongated rather than round.
- (1 sc, dec) x6 (12)
- dec x6 (6)
Fasten off and close.
🐽 Muzzle Appliqué (Accent Color)
Worked flat in rows.
Row 1: ch 7, sc in 2nd ch from hook and across (6)
Row 2: ch 1, inc, sc 4, inc (8)
Row 3: ch 1, inc, sc 6, inc (10)
Row 4: ch 1, sc across (10)
Row 5: ch 1, sc across (10)
Row 6: ch 1, dec, sc 6, dec (8)
Fasten off, leaving a long tail.
Work one round of sc evenly around the entire edge of the muzzle to soften and round the shape.
Lightly stuff and sew centered on the lower front of the head.
Nose
Embroider a small rounded triangular nose at the tip of the muzzle and add a short vertical stitch beneath it.
👁️ Eye Patch Appliqués (Make 2 – Accent Color)
- MR 6 (6)
- inc x6 (12)
- (sc, inc) x6 (18)
sl st, fasten off.
Flatten slightly and sew above each eye to create the classic dachshund eyebrow markings.
👂 Ears (Make 2 – Body Color)
- MR 6 (6)
- inc x6 (12)
- (1 sc, inc) x6 (18)
4–11. sc around (18)
Do not stuff.
Before attaching, gently fold the ear lengthwise to encourage a natural drape.
Attach low and wide on the sides of the head near the jawline so the ears hang down past the muzzle.
🐕 Body (Elongated)
- MR 6 (6)
- inc x6 (12)
- (1 sc, inc) x6 (18)
- (2 sc, inc) x6 (24)
5–22. sc around (24)
Stuff firmly but shape the body long, low, and slightly flattened rather than round.
- (2 sc, dec) x6 (18)
24–25. sc around (18) - (1 sc, dec) x6 (12)
- sc around (12)
- dec x6 (6)
Fasten off and close.
🐾 Legs (Make 4)
Paws (Accent Color)
- MR 6 (6)
- inc x6 (12)
- BLO (sc, inc) x6 (18)
Change to body color.
4–7. sc around (18)
Lightly stuff the paw only.
Flatten the top and fasten off, leaving a long tail.
Placement
- Front legs: attach between body Rounds 6–8, positioned close together
- Back legs: attach between body Rounds 18–20, spaced wider apart
This placement creates the stable seated posture seen in the finished dogs.
🐕 Tail (Body Color)
- MR 6 (6)
- (1 sc, inc) x3 (9)
3–9. sc around (9) - (1 sc, dec) x3 (6)
Fasten off.
Do not stuff or stuff only lightly at the base.
Sew to the back of the body and angle gently upward.
🧩 Assembly Order
- Sew the muzzle appliqué to the head
- Attach eye patch appliqués
- Embroider the nose
- Sew ears to the head
- Attach the head to the front-top of the body with minimal neck visible, angling slightly downward
- Sew back legs to the body and check balance
- Sew front legs
- Attach the tail
🎀 Finishing Touches
- Keep color transitions crisp for a clean look
- Shape the muzzle gently so it lies flat and elongated
- Adjust ear folds so they drape naturally
- Ensure legs are evenly placed so the dog sits securely
These dachshund amigurumi come together with smooth curves, classic markings, and unmistakable breed character. Display them as a trio or enjoy them individually—either way, they bring warmth, personality, and timeless handmade charm. 🐾🧶