Hit the road with a hook and some yarn using this Amigurumi Wanderlust Camper Van crochet pattern! With its retro charm, cozy details, and adventurous spirit, this adorable camper van is ready to cruise straight into your heart. Whether you’re crafting for travel lovers, adding a playful touch to your decor, or simply enjoy creating nostalgic amigurumi, this pattern lets you stitch up a tiny home-on-wheels full of personality. It’s the perfect project to spark daydreams of open roads and sunny getaways—no packing required! 🚐🌞✨
Designed for customization, this pattern invites you to play with bold color combos, embroidered windows, and even tiny accessories like a surfboard or luggage rack for extra flair. Craft a classic vintage van, go pastel for a dreamy vibe, or create a whole convoy of camper cuties for a whimsical display! Whether gifted to a fellow wanderer, perched on a shelf, or made simply for the joy of crafting, this Amigurumi Wanderlust Camper Van is a fun and creative project—perfect for bringing a touch of handmade adventure to every stitch! 🧶💖🌈
🚌 Amigurumi Wanderlust Camper Van Crochet Pattern
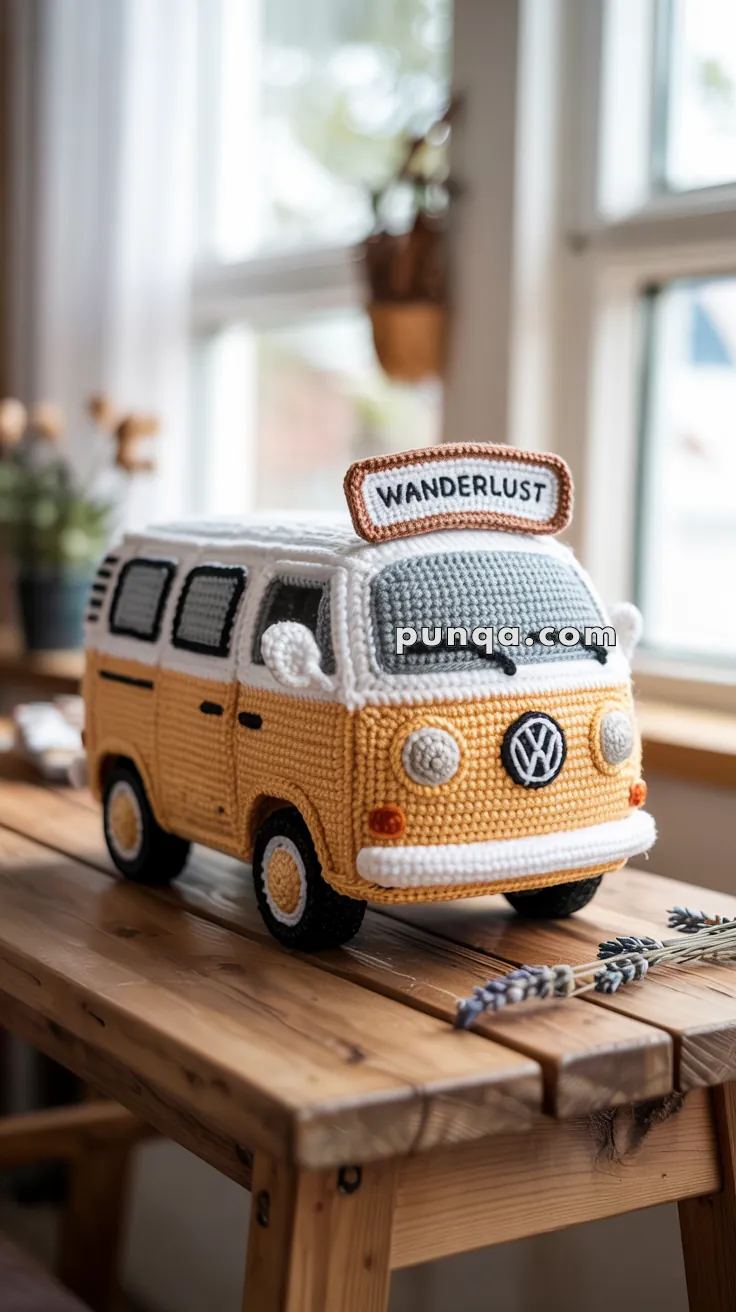
Hit the road in style with this delightful amigurumi camper van! Modeled after the iconic vintage VW bus, this soft and sturdy plush features classic two-tone coloring, cute wheels, and detailed windows—plus a whimsical “WANDERLUST” sign to top it off. It’s perfect for road trip lovers and retro decor fans alike.
✨ Skill Level
Advanced Intermediate
Includes structured panel assembly, precise color changes, appliqué details, wheel arch shaping, layered embellishments, and reinforced construction.
📏 Finished Size
Approximately 25 cm (10 in) long
13–14 cm (5–5.5 in) tall (including roof sign)
12 cm (4.5–5 in) wide
Worked with worsted weight yarn and a 3.0–3.5 mm hook.
🧶 Materials & Yarn Requirements
Worsted Weight Yarn:
Mustard Yellow – approx. 120 g
White – approx. 95 g
Light Gray – approx. 40 g
Black – approx. 40 g
Orange – small amount
Brown – small amount (roof sign border)
Polyester fiberfill – approx. 150 g
Plastic canvas (or thin craft foam/cardboard for reinforcement)
3.0–3.5 mm crochet hook
Tapestry needle
Stitch markers
Scissors
🧵 Abbreviations (US Terms)
MR – Magic Ring
sc – Single Crochet
inc – Increase (2 sc in same stitch)
dec – Invisible Decrease
ch – Chain
sl st – Slip Stitch
FO – Fasten Off
BLO – Back Loop Only
Panels are worked in rows unless otherwise stated.
🚐 Front Panel
Lower Body (Mustard)
Ch 31
Row 1: sc across (30)
Rows 2–11: sc across (30)
Upper Section (White)
Rows 12–23: sc across (30)
FO.
Lightly block edges so panel is perfectly square.
🚐 Back Panel
Work identical to Front Panel.
🚐 Side Panels (Make 2)
Lower Section (Mustard)
Ch 41
Row 1: sc across (40)
Rows 2–11: sc across (40)
Upper Section (White)
Rows 12–23: sc across (40)
FO.
Keep edges straight and firm.
🏠 Roof Panel (White)
Ch 41
Row 1: sc across (40)
Rows 2–13: sc across (40)
FO.
📦 Base Panel (Mustard)
Ch 41
Row 1: sc across (40)
Rows 2–9: sc across (40)
FO.
Cut plastic canvas slightly smaller than this panel to reinforce the bottom before final closure.
🛞 Wheel Arches (Make 4)
These are raised semicircular fenders placed on the mustard section of each side panel.
With Mustard:
Ch 11
Row 1: sc across (10)
Row 2: inc, sc 8, inc (12)
Row 3: inc, sc 10, inc (14)
Row 4: inc, sc 12, inc (16)
Row 5: sc evenly around entire piece to smooth curve.
FO leaving long tail.
Sew onto lower side panels, positioning slightly above bottom edge. Leave bottom of arch open so wheels appear recessed inside fender.
🛞 Wheels (Make 4)
With Black:
MR, 6 sc
Round 2: inc x6 (12)
Round 3: (1 sc, inc) x6 (18)
Round 4: (2 sc, inc) x6 (24)
Round 5: sc around (24)
Change to Mustard for hub:
Round 6: BLO sc around (24)
Round 7: sc around (24)
Lightly stuff or insert firm circular insert.
FO.
Sew wheels partially under arches for realistic depth.
🚘 Windshield (Light Gray)
Ch 21
Row 1: sc across (20)
Rows 2–11: sc across (20)
FO.
Surface stitch two short black windshield wipers at bottom edge.
Sew centered on white front section.
🪟 Side Windows (Make 4)
Ch 10
Row 1: sc across (9)
Rows 2–7: sc across (9)
FO.
Outline with black surface crochet.
Sew evenly spaced along upper white section of side panels.
🔆 Headlights (Make 2)
With Light Gray:
MR, 6 sc
Round 2: inc x6 (12)
Round 3: sc around (12)
FO.
Attach symmetrically on mustard front section.
🟠 Turn Signals (Make 2)
MR, 5 sc
sl st to close
FO.
Sew below headlights near bumper line.
🚘 Front Bumper (White)
Ch 21
Row 1: sc across (20)
Row 2: sc across
FO.
Sew slightly curved beneath headlights.
🚘 Rear Bumper
Ch 23
Row 1: sc across (22)
Row 2: sc across
FO.
Attach centered at back.
🪞 Side Mirrors (Make 2)
MR, 6 sc
Round 2: sc around
FO.
Attach to small ch 4 stem and sew to front corners of side panels.
🪧 Roof Sign
Base (White)
Ch 18
Row 1: sc across (17)
Rows 2–4: sc across
FO.
Border (Brown)
Attach brown yarn and sc evenly around entire piece.
Lightly steam shape into subtle upward curve.
Embroider lettering using black backstitch.
Sew centered on roof panel.
🧷 Assembly
- Sew side panels to front and back panels.
- Insert reinforced base panel and lightly stuff around edges.
- Close bottom securely.
- Attach roof panel.
- Sew wheel arches in place.
- Attach wheels so they sit slightly recessed.
- Add windshield, windows, mirrors, headlights, turn signals, and bumpers.
- Sew roof sign in centered position.
Keep corners gently rounded but edges defined.
🌟 Final Shaping Tips
• Do not overstuff — structure should stay boxy
• Ensure wheel arches are symmetrical
• Wheels must sit slightly inside arches
• Front bumper should protrude slightly
• Roof sign should maintain a soft curve
🚐 Finished Result
This retro camper van features clean two-tone color blocking, a wide curved windshield, layered bumpers, sculpted wheel arches, recessed wheels, and a charming rooftop sign. The reinforced structure ensures it holds its iconic silhouette beautifully while remaining soft and handcrafted.
A timeless crochet design that brings vintage road-trip nostalgia to life in yarn form. 🌍