Cowabunga, crochet fans! Bring the action-packed world of the Amigurumi Ninja Turtles to life with this fun and adventurous pattern! Inspired by the beloved heroes in a half shell, this design captures their signature masks, expressive faces, and tiny turtle shells, making them the perfect addition to any collection. Whether you’re crafting for nostalgic fans, adding a playful touch to your decor, or simply enjoy making character-inspired amigurumi, this pattern lets you stitch up a squad of turtles bursting with personality! Perfect for brightening up any space, these crochet creations bring a touch of handmade superhero magic to every stitch. 🐢✨
Designed for customization, this pattern allows you to experiment with different shades of green, embroidered details, or even tiny accessories like miniature pizza slices or ninja weapons for extra flair. Craft a classic set with bold comic-style colors, create a pastel version for a softer aesthetic, or even stitch up a full team of action-ready amigurumi for an epic display! Whether gifted as a thoughtful keepsake, displayed as a fun accent, or made simply for the joy of crafting, these Amigurumi Ninja Turtles are a creative and exciting project—perfect for bringing a touch of handmade turtle power to every stitch! 🧶💖✨
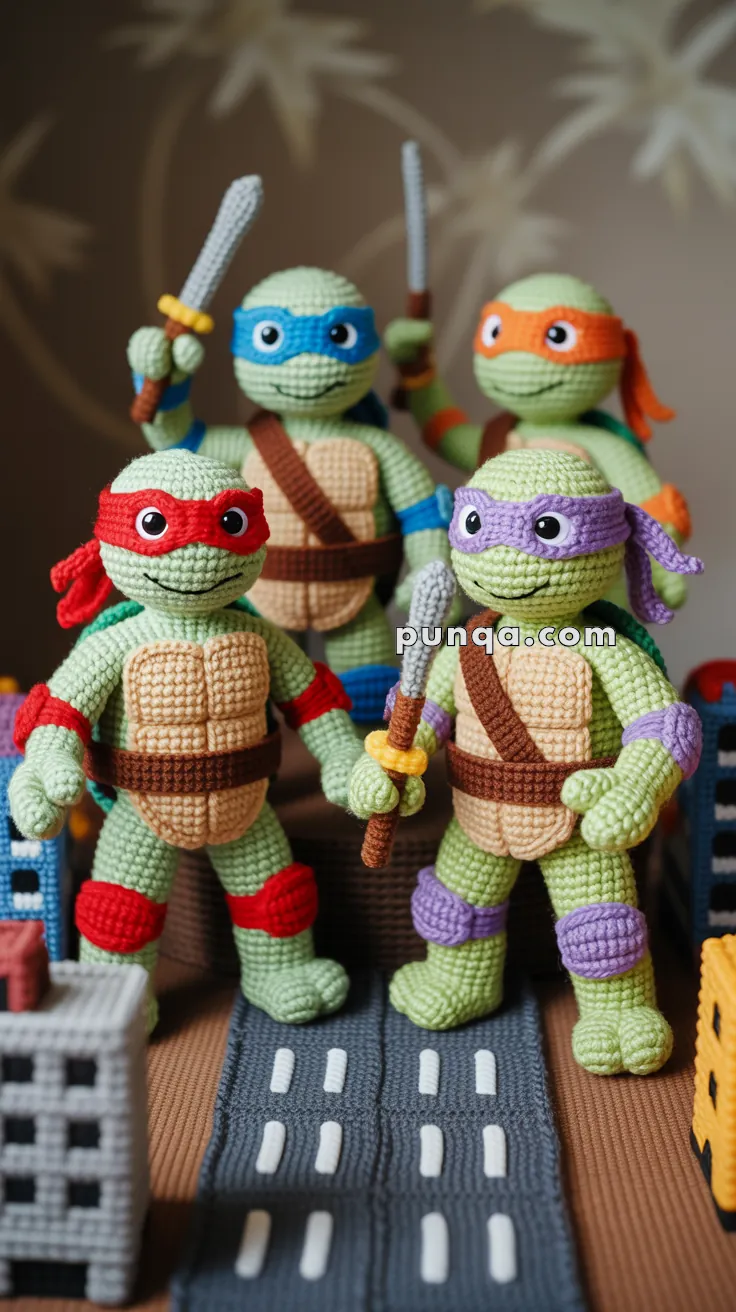
🐢 Amigurumi Ninja Turtles – Crochet Pattern
Make your own hero quartet in half-shells! Each turtle is made from the same base pattern and then customized with colors and accessories.
✨ Skill Level
Intermediate – includes color changes, shaping, attaching limbs, and simple accessories.
📏 Finished Size
Each turtle stands approx. 20–22 cm (8–9 in) tall using DK or worsted yarn and a 2.5–3.5 mm hook.
🧶 Materials
- Yarn:
- 2.5–3.0 mm hook
- Safety eyes (10 mm)
- Fiberfill stuffing
- Yarn needle, stitch markers
🧵 Abbreviations (US Terms)
MR – Magic Ring
sc – Single Crochet
inc – Increase
dec – Decrease
ch – Chain
sl st – Slip Stitch
FO – Fasten Off
🐢 BODY & HEAD (Work as one piece)
With light green yarn:
Round 1: MR, 6 sc
Round 2: inc × 6 (12)
Round 3: (1 sc, inc) × 6 (18)
Round 4: (2 sc, inc) × 6 (24)
Round 5: (3 sc, inc) × 6 (30)
Rounds 6–12: sc around (30)
Round 13: (3 sc, dec) × 6 (24)
Round 14: (2 sc, dec) × 6 (18)
Begin stuffing.
Round 15: (1 sc, dec) × 6 (12)
Round 16: inc × 6 (18)
Round 17: (2 sc, inc) × 6 (24)
Round 18: (3 sc, inc) × 6 (30)
Rounds 19–28: sc around (30)
Round 29: (3 sc, dec) × 6 (24)
Round 30: (2 sc, dec) × 6 (18)
Round 31: (1 sc, dec) × 6 (12)
FO, close and weave in end.
💪 ARMS (Make 2)
Round 1: MR, 6 sc
Rounds 2–10: sc around (6)
FO, lightly stuff and sew to sides of body.
Elbow pads:
With mask color, ch 6, join to form ring. Sl st around. Sew to middle of arms.
✋ Turtle Fingers (Make 2 hands per turtle)
Each hand has 3 fingers crocheted either separately and sewn on, or made directly from the arm. Here’s both methods so you can choose your preferred approach:
🧶 OPTION 1: Sewn-On Fingers (More defined)
Make 3 fingers per hand (6 per turtle)
Color: Light Green (same as body)
Finger (Make 6):
Round 1: MR, 5 sc
Rounds 2–3: sc around (5)
FO, leave a long tail.
- Sew 3 fingers side-by-side at the end of each arm.
- Slightly tilt the outer ones for a curved hand look.
🧶 OPTION 2: Crochet Fingers Directly (No sew)
This version is neater and easier if you prefer fewer pieces.
At the end of the arm (last round), do the following:
Finger 1:
Ch 4, sc in 2nd ch from hook, sc in next 2 ch, sl st to arm
Finger 2:
Repeat same: ch 4, sc back, sl st
Finger 3:
Same again. FO and weave end through base of fingers for tidiness
👉 This creates 3 “fingers” directly from the arm tip without separate sewing.
✍️ Optional Finger Shaping Tip:
- Slightly bend each finger inward with gentle steaming and hand-shaping
- Use black embroidery thread to outline finger separations if needed
Now your turtles will have classic 3-fingered ninja grip—perfect for holding weapons and pizza slices! 🍕🐢
🦵 LEGS (Make 2)
Round 1: MR, 6 sc
Round 2: inc × 6 (12)
Rounds 3–5: sc around
Round 6: (2 sc, dec) × 3 (9)
Rounds 7–10: sc
FO, stuff and sew under body.
Knee pads: Same as elbow pads.
🦶 Turtle Toes (Make 2 feet per turtle)
Each foot has 3 rounded toes, either crocheted separately and sewn on for a more defined look, or worked directly into the foot. Below are both methods:
🧶 OPTION 1: Sewn-On Toes (Most realistic)
Make 3 toes per foot (6 per turtle)
Color: Light Green
Toe (Make 6):
Round 1: MR, 5 sc
Rounds 2–3: sc around (5)
FO, stuff lightly, leave a long tail
Assembly:
- Sew 3 toes side-by-side on the front of each leg, at the base where it connects to the body.
- Position with slight outward curve to match natural foot shape
🧶 OPTION 2: No-Sew Toes (Crocheted from leg end)
At the bottom of the leg tube before finishing:
- Ch 3, sc back (first toe), sl st to base
- Repeat 2 more times
- FO and shape the 3 toes with your fingers
Tip: You can stuff the foot slightly before starting the toes to give it a rounded shape.
✨ Optional Detail Tip
- Use black thread or yarn to embroider a shallow line between toes to define shape further
- Steam-block or pinch shape gently if needed
With these added toes, your turtles now have the complete classic look from shell to soles—ready for action poses, pizza runs, or rooftop battles! 🐢💥
🐢 FRONT SHELL (Beige)
Ch 6
Row 1: sc in 2nd ch and across (5)
Rows 2–7: inc at both ends
Row 8–10: sc across
FO, shape into oval and sew to front torso.
Optional: Stitch vertical and horizontal shell lines.
🐢 BACK SHELL (Brown)
Round 1: MR, 6 sc
Round 2: inc × 6 (12)
Round 3: (1 sc, inc) × 6 (18)
Round 4: (2 sc, inc) × 6 (24)
Round 5: (3 sc, inc) × 6 (30)
Round 6: sc around
FO, flatten and sew to back.
Belt:
With brown yarn, ch long enough to wrap torso. Sl st or sc one row. Attach around waist.
🟣 MASK (Choose Color Per Turtle)
Ch 30
Row 1: sc back and forth (optional 2 rows for thickness)
Cut eye holes or stitch around safety eyes for mask look. Tie ends behind head.
Add 2 flowing mask tails:
Ch 10, sl st back, sew to side of mask knot.
🛠️ Weapons
Leonardo’s Swords (x2, Gray + Yellow Handles):
Ch 12
Row 1: sc back, add yellow handle (sc around short chain), FO
Glue or sew to hands or cross on back
Donatello’s Bo Staff:
Ch 20 in brown
sc 2 rounds for thickness
FO, stitch to hand or back harness
Michelangelo’s Nunchucks (x2):
Ch 4, sc 2 rows (make 2 orange sticks)
Ch 6 in gray, join both ends as chain
Sew as needed
Raphael’s Sais (x2):
Ch 8, sc back
Add side prongs using chain + sl st
Attach one to each hand
👣 Final Touches
- Add embroidery lines for shell detail
- Stitch small “knuckles” on fists if desired
- Use black yarn for smile or optional eyebrow lines
- Pose arms with thread or light wire inside if preferred
🧷 Customization Tips
- Sew all accessories firmly if making for kids
- Add magnets to hands for removable weapons
- Create a rooftop or manhole cover base for display
🐢 Turtle Power!
With this complete pattern, you can create your own heroic team of turtle brothers, each with unique colors and weapons. Display them together or give them as gifts to fans of the classic cartoon!
