Create a cozy and whimsical crochet piece with this Amigurumi Sweet Honey Hanging Bee Hive pattern! Inspired by the charm of a buzzing beehive, this delightful design captures the warmth of nature with its soft textures, intricate details, and cheerful golden hues. Whether you’re crafting for bee lovers, adding a playful touch to your decor, or simply enjoy making nature-inspired amigurumi designs, this pattern lets you stitch up a charming hanging beehive bursting with personality! Perfect for brightening up any space, this crochet piece brings a touch of handmade sweetness to your surroundings. 🐝✨
Designed for customization, this pattern allows you to experiment with different shades of honey gold, embroidered details, or even tiny accessories like miniature bees or flowers for extra flair. Craft a classic beehive with warm earthy tones, create a playful version with pastel hues, or even stitch up a full set of nature-inspired amigurumi for a delightful display! Whether gifted as a thoughtful keepsake, displayed as a cheerful accent, or made simply for the joy of crafting, this Amigurumi Sweet Honey Hanging Bee Hive is a fun and creative project—perfect for bringing a touch of handmade nature to every stitch! 🧶💖✨
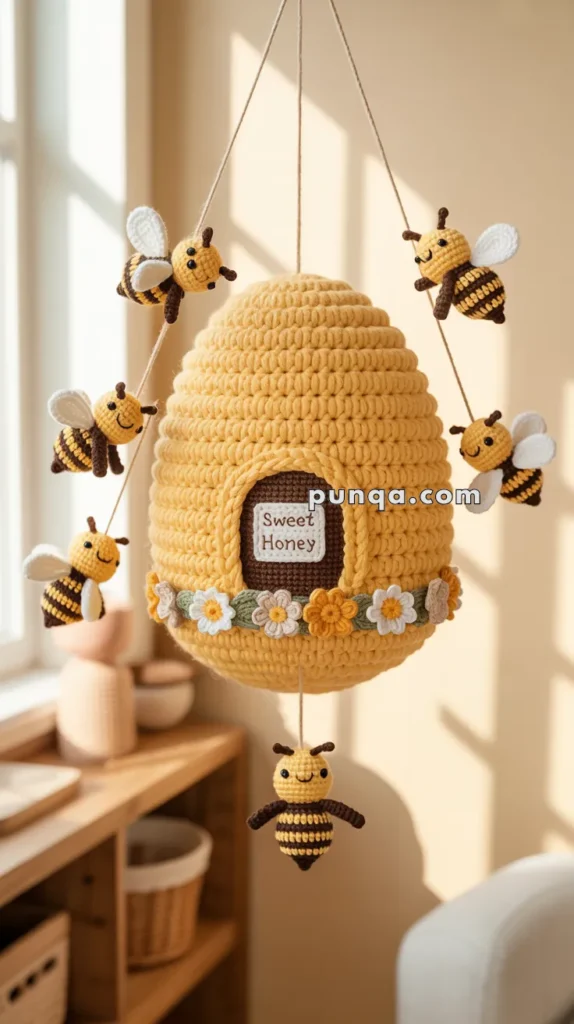
🐝 Amigurumi Sweet Honey Hanging Bee Hive Crochet Pattern
This charming hanging beehive brings a warm and whimsical touch to any room. The softly textured hive, friendly buzzing bees, and floral accents create a sweet decorative piece perfect for nurseries, play areas, and cozy home corners. With detailed striping on the bees, layered flowers, and a cheerful door appliqué, this is a delightful project for any amigurumi lover.
✨ Skill Level
Intermediate – involves shaping, frequent color changes, appliqué work, and structured assembly.
📏 Finished Size
Approximately 35–40 cm (14–16 in) tall from hanging loop to bottom bee.
🧶 Materials
Worsted weight yarn in:
• Golden yellow (hive)
• Brown (door, bee limbs, stripes)
• Black (bee stripes, eyes)
• White (wings)
• Yellow (bee heads and bodies)
• Cream, white, gold, green (flowers and leaves)
3.5 mm crochet hook
Polyfill stuffing
6 mm safety eyes
Black embroidery thread
Plastic canvas or thin foam board (for internal structure)
Sewing/embroidery needle
Invisible thread or thin cotton for hanging
Wooden ring (optional)
🧵 Abbreviations (US Terms)
MR – Magic Ring
sc – single crochet
inc – increase
dec – decrease
sl st – slip stitch
ch – chain
hdc – half double crochet
dc – double crochet
FO – fasten off
🍯 Hive Body (Golden Yellow)
Work in continuous rounds. Use BLO (Back Loop Only) every 3rd round to create the hive ridges.
Round 1: MR, 6 sc
Round 2: inc × 6 (12)
Round 3: (1 sc, inc) × 6 (18)
Round 4: (2 sc, inc) × 6 (24)
Round 5: (3 sc, inc) × 6 (30)
Round 6: (4 sc, inc) × 6 (36)
Round 7: (5 sc, inc) × 6 (42)
Round 8: (6 sc, inc) × 6 (48)
Rounds 9–33:
• sc around (48)
• Work every 3rd round in BLO for ridges
Begin decreases:
Round 34: (6 sc, dec) × 6 (42)
Round 35: (5 sc, dec) × 6 (36)
Round 36: (4 sc, dec) × 6 (30)
Round 37: (3 sc, dec) × 6 (24)
Round 38: (2 sc, dec) × 6 (18)
Round 39: (1 sc, dec) × 6 (12)
Attach hanging thread for the bottom bee at the center now.
Round 40: dec × 6 (6)
FO and close.
Internal Support
Cut:
• One disc matching bottom diameter
• One disc for mid-height support
Insert bottom disc first, stuff around it, add second disc around ⅔ height, and continue stuffing firmly.
🚪 Door Appliqué (Brown + Golden Yellow)
Door Interior (Brown)
ch 10
Row 1: sc in 2nd ch and across (9)
Rows 2–7: ch 1, sc across (9)
FO.
Door Frame (Golden Yellow)
Round 1: MR, 8 sc
Round 2: inc × 8 (16)
Round 3: (1 sc, inc) × 8 (24)
Round 4: (2 sc, inc) × 8 (32)
Round 5: sc around (32)
FO, leaving tail.
Sew the brown rectangle behind the yellow oval frame.
Embroider “Sweet Honey” in black thread.
Attach to the hive front.
🌼 Flowers
Small Daisy (Make 6–8)
Center: with gold/yellow
MR, 5 sc, join. FO.
Petals: attach white or cream
(ch 2, 2 dc, ch 2, sl st) in each center stitch (5 petals)
FO.
Leaves (Green)
ch 6
sl st in 2nd ch, sc next, hdc next, sc, sl st
FO.
Sew flowers and leaves around the hive’s lower edge.
🐝 Bees (Make 7 Total)
HEADS (Yellow)
Round 1: MR, 6 sc
Round 2: inc × 6 (12)
Round 3: (1 sc, inc) × 6 (18)
Rounds 4–6: sc around (18)
Round 7: (1 sc, dec) × 6 (12)
Round 8: dec × 6 (6)
FO.
Insert 6 mm safety eyes between Rounds 3–4.
Embroider tiny smiles.
BODIES (Yellow + Black Stripes)
To get horizontal stripes, alternate full rounds:
Round 1: join yellow, MR, 6 sc
Round 2: inc × 6 (12)
Round 3: (1 sc, inc) × 6 (18)
Stripe sequence:
Rounds 4–5: black, sc around
Rounds 6–7: yellow, sc around
Rounds 8–9: black, sc around
Round 10: (1 sc, dec) × 6 (12)
Round 11: dec × 6 (6)
Stuff and FO.
LIMBS (Brown – Make 4 per Bee)
ch 4
sl st in 2nd ch, sc, sl st
FO, leave tail.
Attach 2 to each side of body.
WINGS (White – Make 2 per Bee)
ch 6
Work around chain:
sc, hdc, dc, hdc, sc, 3 sc in last stitch
Continue other side: sc, hdc, dc, hdc, sc
FO.
Sew wings to upper back of bees.
🧵 Hanging Bees
Attach bees using invisible thread or thin cotton yarn.
Hang:
• 3 bees from the left string
• 3 bees from the right string
• 1 bee at the bottom (string anchored inside hive before closing)
Balance lengths for an even appearance.
🎀 Hanging Loop
ch 40 with golden yellow
Fold and secure to top of hive tightly
OR attach a wooden ring.
✂️ Finishing Touches
Weave in all ends
Adjust bees for visual balance
Add blush or sparkle to the wings if desired
Hang your hive in a sunny spot and enjoy its cheerful charm!
Your handmade Sweet Honey Drop will buzz with charm and brighten any space. It’s sweet, playful, and forever in bloom—just like your creativity! 🐝🍯🌼