Welcome the beauty of spring into your crochet collection with this Amigurumi Bunny Spring Garden pattern! Inspired by the charm of blooming gardens and playful bunnies, this delightful design captures the essence of the season with soft textures, bright colors, and adorable details. With its tiny paws, floppy ears, and cheerful expression, this crochet bunny is perfect for adding a fresh and whimsical touch to your handmade projects. Whether you’re crafting for Easter, decorating a cozy space, or simply enjoy making nature-inspired amigurumi designs, this pattern lets you stitch up a lovable bunny bursting with springtime joy! 🐰🌸✨
Designed for customization, this pattern allows you to experiment with different shades of pastel, embroidered details, or even tiny accessories like miniature flowers or a tiny watering can for extra charm. Craft a classic bunny with natural tones, create a vibrant version with bold hues, or even stitch up a full set of garden-inspired amigurumi for a lively display! Whether gifted as a cherished keepsake, displayed as a seasonal accent, or made simply for the joy of crafting, this Amigurumi Bunny Spring Garden is a fun and creative project—perfect for bringing a touch of handmade spring magic to every stitch! 🧶💖
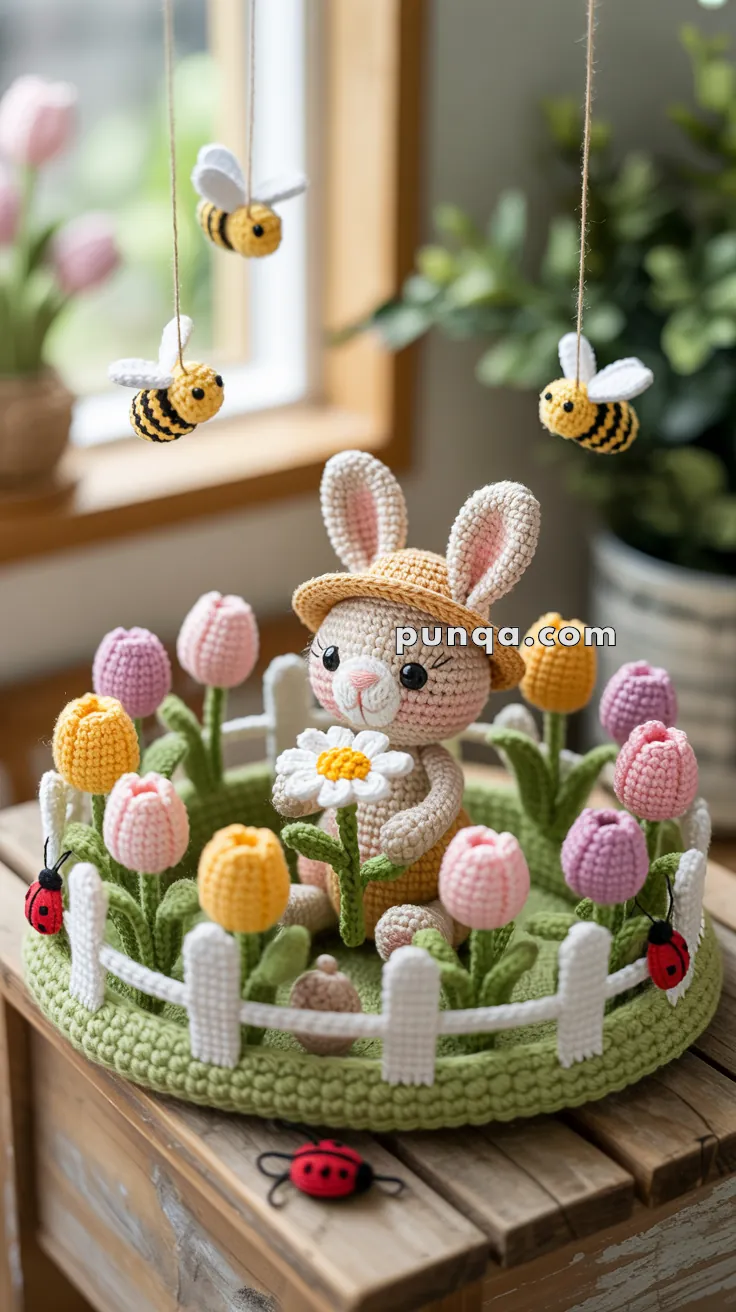
🌷 Amigurumi Bunny Spring Garden Scene Crochet Pattern
Welcome to the sweetest burst of spring you can crochet! This charming bunny garden scene features a soft beige bunny in a straw hat, surrounded by colorful tulips, buzzing bees, cheerful daisies, and tiny ladybugs—all nestled on a lush green base wrapped in a white picket fence.
It’s the perfect handmade centerpiece for Easter, nurseries, spring decorating, or gifting to someone who loves gentle, whimsical creations.
✨ Skill Level
Intermediate–Advanced – shaping, multi-part assembly, embroidery, and structural work.
📏 Finished Size
- Garden base: 23–25 cm (9–10 in) diameter
- Bunny: 13–14 cm (5–5.5 in)
- Tulips: 9–10 cm tall
🧶 Materials & Yarn Amount
- Beige (bunny): 35 g
- Soft pink (inner ears, blush): 10 g
- Light brown (hat): 20 g
- Green (base, stems, leaves): 75 g
- White (fence, daisy petals, bee wings): 40 g
- Yellow (flowers, bee accents): 25 g
- Pink, lavender, peach (tulips): 15 g each (≈45 g total)
- Red (ladybugs): 10 g
- Black (details): 5 g
Other supplies:
- 2.0–2.5 mm hook
- Fiberfill (~150 g)
- Thin wire for stems
- Sewing needle, stitch markers
- Thin thread/fishing line (for bees)
🧵 Abbreviations
MR – magic ring
sc – single crochet
inc – increase
dec – invisible decrease
sl st – slip stitch
ch – chain
FO – fasten off
🐰 Bunny (Large Head, Slim Body)
Head (Rounded but Slightly Flattened Face)
With beige:
R1: MR, 6
R2: inc ×6 (12)
R3: (1 sc, inc) ×6 (18)
R4: (2 sc, inc) ×6 (24)
R5: (3 sc, inc) ×6 (30)
R6–11: sc around (30)
Insert eyes between R8–9 (moderately spaced).
R12: (3 sc, dec) ×6 (24)
R13: (2 sc, dec) ×6 (18)
R14: (1 sc, dec) ×6 (12)
Stuff firmly, shaping slightly flat front.
R15: dec ×6 (6)
FO.
Body (Small, Rounded Bottom)
R1: MR, 6
R2: inc ×6 (12)
R3: (1 sc, inc) ×6 (18)
R4–6: sc around (18)
R7: (1 sc, dec) ×6 (12)
Light stuffing.
FO.
Arms (Forward Position)
R1: MR, 5
R2–6: sc around (5)
Light stuffing only at base.
FO.
➡️ Sew angled inward so paws meet at chest.
Legs (Tiny & Stable)
R1: MR, 6
R2: (1 sc, inc) ×3 (9)
R3–5: sc around
FO and attach slightly forward.
Ears (Tall, Softly Curved)
Outer (beige):
R1: MR, 6
R2: (1 sc, inc) ×3 (9)
R3: (2 sc, inc) ×3 (12)
R4–10: sc around (12)
Inner (pink):
Work same but stop at R8.
Sew inner to outer.
Flatten base slightly and attach upright.
Face Details
- Small triangular pink nose
- Short vertical stitch below
- Subtle curved smile
- Light blush
👒 Straw Hat (Flat Crown, Wide Brim)
Crown
R1: MR, 6
R2: inc ×6 (12)
R3: (1 sc, inc) ×6 (18)
R4: (2 sc, inc) ×6 (24)
R5–6: sc around
Brim
Work in FLO:
R7: (2 sc, inc) ×8 (32)
R8: (3 sc, inc) ×8 (40)
R9: sc around
R10: sl st around
FO.
➡️ Keep brim flat with slight natural curve
➡️ Sew slightly tilted
🌼 Daisy (Held Flower)
Center (yellow):
MR 6 → inc ×6 (12)
Petals:
(ch 2, 2 dc, ch 2, sl st) ×6
Stem:
Ch 14 → sc back
Add 1 leaf (ch 4 → sc, hdc, sl st)
🌷 Tulips (Closed, Oval Buds – Make 10–12)
Bud (Elongated)
R1: MR, 6
R2: (1 sc, inc) ×3 (9)
R3: (2 sc, inc) ×3 (12)
R4–7: sc around (12)
R8: (2 sc, dec) ×3 (9)
Light stuffing.
FO.
➡️ Keep narrow top, slightly tapered
Stem (Firm)
R1: MR, 6
R2–16: sc around (6)
Insert wire.
Leaves (Long & Slim)
Ch 14
sc, hdc, dc, dc, hdc, sc, sl st
Make 1–2 per flower.
Attach near base.
🐝 Bees (Small & Rounded – Make 3)
R1: MR, 6 (yellow)
R2: inc ×6 (12)
R3–5: alternate yellow/black stripes
R6: dec ×6 (6)
Light stuffing.
Wings
Ch 6 → sl st back
Make 2.
Attach angled outward.
Suspend using thread.
🐞 Ladybugs (Rounded with Flat Base – Make 3)
R1: MR, 6
R2: inc ×6 (12)
R3–4: sc around
Light stuffing.
FO.
Add:
- Black head
- Center line
- Small spots
- Tiny stitched legs
🪴 Garden Base (Thick & Raised)
R1: MR, 6
R2: inc ×6 (12)
Continue increasing evenly to 66 stitches
R?–?:
Work 5 rounds sc.
Insert cardboard for structure.
🚧 Fence (Even, Upright)
Posts (Make 12)
R1: MR, 5
R2–8: sc around
Round top slightly.
Rails
Ch long chain (fits around base)
sl st back for thickness
Attach two rails.
Sew posts evenly spaced.
🧩 Assembly
- Attach bunny securely at center
- Arrange tulips densely around bunny
- Vary angles slightly for natural look
- Attach leaves between stems
- Sew fence around base edge
- Add ladybugs on base and fence
- Suspend bees at different heights
✨ Final Touches
- Slightly bend stems for organic feel
- Keep tulips upright but varied
- Ensure bunny is centered and stable
- Maintain balanced spacing of flowers
🌸 Finished Scene
This handcrafted garden scene features:
✔ Soft bunny with natural proportions
✔ Wide straw hat and delicate daisy
✔ Slender tulips with realistic stems
✔ Floating bees and detailed ladybugs
✔ Thick green base with clean white fence
🌼 Final Touch
This Spring Garden Bunny scene radiates softness, charm, and joyful detail. Whether displayed for Easter, gifted to a loved one, or used to brighten a child’s room, it brings a delightful sense of renewal and sunlight to any space.