Step into the whimsical world of Wonderland with this Amigurumi Mad Hatter crochet pattern! Inspired by the eccentric and charming tea-loving character, this crochet creation captures the essence of playful chaos and creativity in every stitch. With his oversized hat, quirky outfit, and mischievous grin, this amigurumi Mad Hatter is sure to bring a touch of magic to your handmade collection. Whether you’re crafting for fairy tale lovers, adding a fun accent to your decor, or simply enjoy making unique amigurumi designs, this pattern lets you stitch up a delightful character bursting with personality! 🎩✨
Designed for customization, this pattern allows you to experiment with different shades of vibrant colors, embroidered details, or even tiny accessories like a miniature teacup or pocket watch for extra charm. Craft a classic Mad Hatter with his signature look, create a pastel version for a dreamy aesthetic, or even stitch up a full Wonderland-inspired set with matching characters! Whether gifted as a cherished keepsake, displayed as a playful accent, or made simply for the joy of crafting, this Amigurumi Mad Hatter is a fun and creative project—perfect for bringing a touch of handmade enchantment to every stitch! 🧶💖
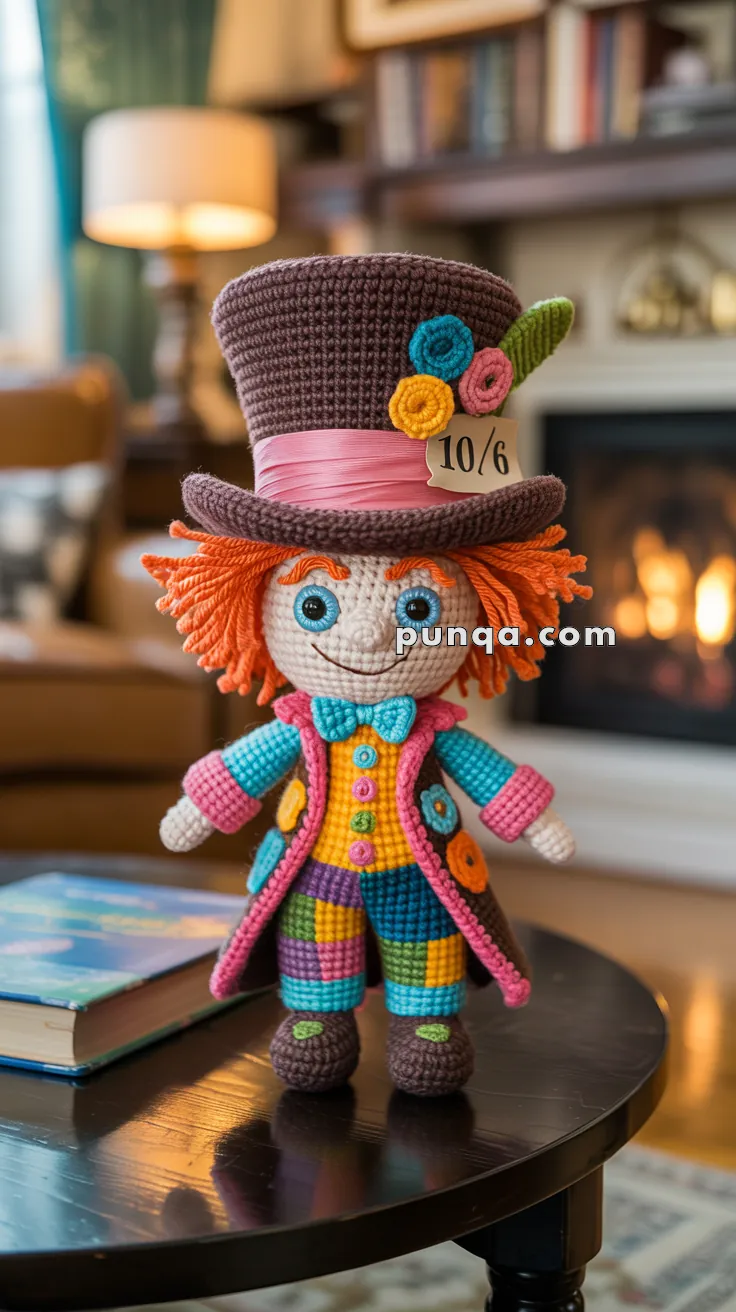
🎩 Whimsical Mad Hatter Amigurumi Doll Pattern
Step right into Wonderland with this enchanting Mad Hatter doll! Featuring wild orange curls, a towering top hat with the iconic 10/6 card, colorful patchwork pants, layered clothing with vest and tailcoat, this amigurumi captures pure whimsy and wonder. Perfect for Alice in Wonderland fans, tea party décor, or as a magical handmade gift! 🫖✨
✨ Skill Level
Advanced – This pattern includes colorwork, detailed clothing layers, small embellishments, facial features, and requires experience with amigurumi construction and assembly.
📏 Finished Size
Approximately 12–14 inches (30–35 cm) tall including hat, using DK weight yarn and 2.5–3.0 mm hook.
🧶 Materials You’ll Need
Yarn (DK weight / Light worsted #3):
- Skin tone (cream/light beige): 40g
- Bright orange: 30g (hair)
- Brown: 50g (hat and shoes)
- Light pink/cream: 30g (shirt)
- Teal/turquoise: 40g (shirt sleeves, bow tie, collar)
- Yellow/gold: 35g (vest/waistcoat)
- Hot pink/magenta: 55g (coat body)
- Purple: 30g (pants, accents)
- Blue: 30g (pants, accents)
- Green/lime: 25g (pants, shoe trim, flower)
- Small amounts: Orange, coral, rose for decorative flowers and buttons
Other Supplies:
- Crochet hook: 2.5 mm or 3.0 mm for tight, firm fabric
- 10mm safety eyes (bright blue/teal) or black embroidery thread
- Black embroidery thread for facial features
- Polyfill stuffing
- Yarn needle
- Stitch markers
- Thin cardboard or plastic canvas (for hat brim)
- Pink satin ribbon (6mm width, 10 inches)
- Cardstock (for 10/6 card)
- 6–8 small buttons (3–5mm) in various colors
- Optional: thin wire for poseable structure
📖 Abbreviations (US Terms)
- MR – Magic Ring
- ch – chain
- sc – single crochet
- hdc – half double crochet
- dc – double crochet
- inc – increase (2 sc in one stitch)
- dec – invisible decrease (sc2tog)
- sl st – slip stitch
- BLO – back loop only
- FLO – front loop only
- FO – fasten off
- ( ) – total stitch count
- [ ] – repeat instructions
🎯 Construction Overview
This doll is built in layers:
- Base body (skin tone) – nude form
- Shirt (light pink body, teal sleeves) – first clothing layer
- Vest (yellow) – second layer over shirt
- Coat (hot pink with tails) – outer layer
- Accessories (bow tie, collar details)
🧵 PART 1: BASE BODY PARTS
👤 HEAD (Cream/Skin Tone)
Round 1: MR, 6 sc (6)
Round 2: inc x6 (12)
Round 3: [sc, inc] x6 (18)
Round 4: [2 sc, inc] x6 (24)
Round 5: [3 sc, inc] x6 (30)
Round 6: [4 sc, inc] x6 (36)
Rounds 7–13: sc around (36) – Work 7 rounds
💡 Insert safety eyes between Rounds 10 and 11, spacing them about 8–9 stitches apart.
Round 14: [4 sc, dec] x6 (30)
Round 15: [3 sc, dec] x6 (24)
Round 16: [2 sc, dec] x6 (18)
Stuff head very firmly.
Round 17: [sc, dec] x6 (12)
Round 18: dec x6 (6)
FO, thread through remaining 6 stitches, pull tight to close. Weave in end.
😊 Facial Features
Embroider with black thread:
Eyebrows: Create curved arched brows above eyes (Rounds 8–9)
Smile: Embroider a wide, curved smile between Rounds 12–13 using backstitch. Make the smile extend up at the corners for a cheerful expression.
Optional blush: Add light pink circles on cheeks using embroidery or fabric markers
🧡 HAIR (Bright Orange)
Cut 55–65 strands of orange yarn, each 5–6 inches (13–15 cm) long.
Attachment area: Cover Rounds 7–12 of head completely
Method:
- Insert hook through stitch on head
- Fold one strand in half
- Pull loop through stitch
- Pull both ends through loop
- Tighten
- Repeat densely around head
Styling:
- Place strands close together (every stitch or every other stitch)
- Create wild, uneven lengths by trimming at different heights
- Pull strands outward and upward for volume
- Don’t make it neat – the wilder, the better!
- Leave longer pieces on top and sides
👕 BODY BASE (Skin Tone)
Round 1: MR, 6 sc (6)
Round 2: inc x6 (12)
Round 3: [sc, inc] x6 (18)
Round 4: [2 sc, inc] x6 (24)
Round 5: [3 sc, inc] x6 (30)
Rounds 6–9: sc around (30) – Work 4 rounds
Round 10: [4 sc, inc] x6 (36)
Rounds 11–22: sc around (36) – Work 12 rounds
Round 23: [4 sc, dec] x6 (30)
Round 24: sc around (30)
Stuff body very firmly.
FO, leaving long tail. Sew securely to head at neck.
💪 ARMS (Make 2 – Skin Tone)
Round 1: MR, 6 sc (6)
Round 2: [sc, inc] x3 (9)
Rounds 3–8: sc around (9) – Work 6 rounds (hand section)
Stuff hand lightly.
Round 9: [2 sc, inc] x3 (12)
Rounds 10–24: sc around (12) – Work 15 rounds (arm section)
Stuff arm moderately.
FO, leaving long tail. Flatten opening.
Sew arms to body at shoulder area (Rounds 11–12 of body), angling slightly downward.
🦵 LEGS WITH SHOES & PATCHWORK PANTS (Make 2)
Shoe (Brown):
Round 1: MR, 6 sc (6)
Round 2: inc x6 (12)
Round 3: [sc, inc] x6 (18)
Round 4: [2 sc, inc] x6 (24)
Round 5: BLO: sc around (24) – Creates shoe ridge
Rounds 6–7: sc around (24)
Round 8: sc 9, [dec] x3, sc 9 (21) – Toe shaping
Round 9: sc 8, [dec] x2, sc 9 (19)
Round 10: sc around (19)
Stuff shoe firmly.
Green shoe trim: With green yarn, surface crochet or embroider a decorative line around Round 9–10.
Patchwork Pants:
Color pattern: Blue (4 rounds) → Green (4 rounds) → Yellow (4 rounds) → Purple (4 rounds) → Pink (4 rounds)
Rounds 11–14 (Blue): sc around (19)
Rounds 15–18 (Green): sc around (19)
Rounds 19–22 (Yellow): sc around (19)
Rounds 23–26 (Purple): sc around (19)
Rounds 27–30 (Pink): sc around (19)
Continue stuffing as you work.
FO, leaving long tail. Flatten opening.
Sew legs to bottom of body, positioning them centered and angled slightly forward for balance.
🧵 PART 2: CLOTHING LAYERS
👔 SHIRT (Light Pink body with Teal sleeves)
Shirt Body (Light Pink):
Round 1: Ch 28, join with sl st to form ring, being careful not to twist (28)
Rounds 2–10: sc around (28) – Work 9 rounds
Round 11 (armhole division): sc 6, ch 6 (for armhole), skip 8 sts, sc 14, ch 6 (for second armhole), skip 8 sts, sc 8 (you now have 28 sts total plus the ch spaces)
Rounds 12–16: sc in each st and ch around (40) – Work 5 rounds
FO
Slip shirt onto body. The shirt should cover the body from neck to waist. Sew bottom edge to body at waist area (around Round 22 of body).
Shirt Sleeves (Teal) – Make 2:
Round 1: Join teal yarn at armhole opening on shirt, sc 14 evenly around armhole (14)
Rounds 2–13: sc around (14) – Work 12 rounds
Round 14: [5 sc, dec] x2 (12) – Taper at wrist
Rounds 15–16: sc around (12)
FO
Work sleeves directly onto the armholes of the shirt while shirt is on the body. Sleeves should fit over the doll’s arms snugly.
🌟 YELLOW VEST/WAISTCOAT
The vest is worked in rows to create a front-opening garment.
Ch 30
Row 1: sc in 2nd ch from hook, sc 28 (29), ch 1, turn
Rows 2–5: sc 29, ch 1, turn – Work 4 more rows (5 rows total)
Row 6 (armhole shaping – right front): sc 6, ch 1, turn (leave remaining sts unworked)
Rows 7–10: sc 6, ch 1, turn – Work 4 rows on these 6 sts only
FO
Row 6 (armhole shaping – back section): Skip 2 sts from where you left off, join yarn, sc 13, ch 1, turn
Rows 7–10: sc 13, ch 1, turn – Work 4 rows
FO
Row 6 (armhole shaping – left front): Skip 2 sts, join yarn in last 6 sts, sc 6, ch 1, turn
Rows 7–10: sc 6, ch 1, turn – Work 4 rows
FO
Assembly:
- Place vest on doll over shirt
- The vest should open at center front
- Sew shoulder seams
- Sew side seams under arms
- Sew 6–7 small colorful buttons down the center front in a vertical line using colors: purple, pink, orange, yellow, green, blue, teal (or any bright combination)
🎩 TOP HAT (Brown)
Hat Crown:
Round 1: MR, 6 sc (6)
Round 2: inc x6 (12)
Round 3: [sc, inc] x6 (18)
Round 4: [2 sc, inc] x6 (24)
Round 5: [3 sc, inc] x6 (30)
Round 6: [4 sc, inc] x6 (36)
Round 7: [5 sc, inc] x6 (42)
Hat Cylinder:
Round 8: BLO: sc around (42) – Creates ridge
Rounds 9–26: sc around (42) – Work 18 rounds for tall hat
Lightly stuff crown. You can insert a cardboard tube for structure.
Hat Brim:
Round 27: BLO: [6 sc, inc] x6 (48)
Round 28: [7 sc, inc] x6 (54)
Round 29: [8 sc, inc] x6 (60)
Round 30: [9 sc, inc] x6 (66)
Round 31: sc around (66)
Sl st to join, FO
Insert circular cardboard stiffener (5 inches diameter with 3-inch center hole) between hat cylinder and brim.
Hat Decorations:
Pink ribbon band: Wrap and sew ribbon around base of hat (Round 26)
10/6 card: Cut cardstock rectangle (1 x 0.7 inches), write “10/6”, tuck into ribbon at angle
Flowers (Make 3-4):
Rosette (in teal, yellow, orange):
- MR, 8 sc (8)
- [ch 3, 3 dc in same st, ch 3, sl st in same st] around for petals
- FO
Green leaf:
- Ch 6
- Sl st, sc, hdc, dc, hdc, sc back down chain
- FO
Sew flowers and leaf clustered near the 10/6 card on hat band.
Attach hat to head: Sew firmly around inner brim edge to top of head, positioning it straight.
🧥 COLORFUL TAILCOAT (Hot Pink with Teal accents)
Coat Back Panel (Hot Pink):
Ch 32
Row 1: sc in 2nd ch from hook, sc 30 (31), ch 1, turn
Rows 2–16: sc 31, ch 1, turn – Work 15 more rows (16 rows total)
Do not FO. Add border:
Work sc evenly around entire piece:
- Across top: 31 sc
- Down side: 16 sc
- Across bottom: 31 sc
- Up other side: 16 sc
- Join with sl st, FO
Coat Front Panels (Make 2 in Hot Pink):
Ch 13
Row 1: sc in 2nd ch from hook, sc 11 (12), ch 1, turn
Rows 2–16: sc 12, ch 1, turn – Work 15 more rows (16 rows total)
Border: Work sc around entire panel, FO
Coat Tails (Make 2 in Hot Pink):
Ch 11
Row 1: sc in 2nd ch from hook, sc 9 (10), ch 1, turn
Rows 2–10: sc 10, ch 1, turn – Work 9 more rows
Row 11: dec, sc 6, dec (8), ch 1, turn
Rows 12–14: sc 8, ch 1, turn
Row 15: dec, sc 4, dec (6), ch 1, turn
Rows 16–18: sc 6, ch 1, turn
FO
Teal Collar/Lapels (Make 2):
Ch 10
Row 1: sc in 2nd ch from hook, sc 8 (9), ch 1, turn
Rows 2–5: sc 9, ch 1, turn – Work 4 more rows (5 rows total)
FO
Coat Assembly:
- Sew coat tails to bottom edge of coat back panel (one on each side)
- Sew front panels to back panel at shoulders
- Sew teal collar pieces to top front edges of coat, creating lapels
- Place coat on doll over vest
- Sew coat at shoulders and under arms (leave front open to show vest)
- Add decorative circles: Crochet small circles (MR, 6 sc, sl st) in orange, yellow, green, blue. Sew randomly on coat as patches
🎀 BOW TIE (Teal)
Ch 14
Row 1: sc in 2nd ch from hook, sc 12 (13), ch 1, turn
Rows 2–5: sc 13, ch 1, turn – Work 4 more rows (5 rows total)
FO
Shape bow:
- Pinch center of rectangle
- Wrap teal yarn around center 10 times
- Tie tightly on back
- Trim ends
Sew bow tie to neck area at center front, just below chin where head meets body.
✨ FINAL ASSEMBLY & DETAILS
🎨 Decorative Elements:
Colorful circles for coat: Make 6–8 small circles in various colors
- MR, 6 sc, inc x6 (12), sl st, FO
- Sew randomly on coat body
Optional embroidery: Add swirls or decorative stitching on coat with embroidery thread
✅ Assembly Checklist:
- ✅ Head firmly attached to body
- ✅ Hair attached and styled wildly
- ✅ Arms attached at shoulders
- ✅ Legs attached at body base
- ✅ Shirt on body with teal sleeves
- ✅ Vest over shirt with buttons
- ✅ Coat over vest
- ✅ Bow tie at neck
- ✅ Hat secured on head with decorations
- ✅ All ends woven in
- ✅ Facial features complete
💡 Pro Tips for Success
Layering Order: Always work from innermost to outermost:
- Nude body (hidden)
- Shirt (partially visible)
- Vest (front visible)
- Coat (outermost)
Fit Check: As you add each clothing layer, make sure previous layer is secure and smooth
Stuffing: Very firm stuffing in body and head ensures doll stability
Color Selection: Use bright, saturated colors for maximum whimsy
Proportions: If something looks off:
- Too top-heavy? Add more stuffing to legs
- Hat won’t stay? Sew more securely in multiple spots
- Clothes too tight? Use larger hook for clothing pieces
Display:
- Doll can sit if legs are positioned properly
- For standing, create a base or use doll stand
- Wire armature through body/legs helps with posing
🫖 Your Mad Hatter is Complete!
You’ve created a truly magical character with incredible detail and personality! From the wild orange curls and towering top hat to the carefully layered clothing and colorful patchwork pants, this Mad Hatter brings Wonderland to life.
The key to this doll’s charm is in the layers – each clothing piece adds dimension and authenticity. The bright colors, whimsical details, and that characteristic eccentric style make this a show-stopping piece perfect for display, gifting, or imaginative play.
Time for a tea party! 🎩✨🍵☕🫖
Happy crocheting, and welcome to Wonderland! 🧶💜🎪