Bring a splash of floral charm to your crochet collection with this Amigurumi Blooming Watering Can pattern! Whether you’re crafting for garden-inspired decor, cheerful gifts, or simply love whimsical amigurumi designs, this free pattern lets you stitch up a delightful watering can overflowing with crocheted tulips and daisies. With its textured spout, cozy handle, and vibrant blooms, this crochet creation captures the essence of springtime in every stitch. Perfect for brightening up a windowsill, gifting to a fellow plant lover, or adding a touch of handmade magic to your space, this amigurumi watering can is a joyful way to celebrate nature—one stitch at a time! 🌷✨
Designed for customization, this pattern allows you to experiment with different flower colors, textured stitches, or even tiny accessories like embroidered leaves or a decorative ribbon for extra charm. Craft a classic garden watering can, create a pastel version for a dreamy aesthetic, or even stitch up a full floral arrangement with matching blossoms! Whether displayed as a charming accent, gifted as a thoughtful handmade keepsake, or made simply for the joy of crochet, this Amigurumi Blooming Watering Can is a bright and creative project—perfect for bringing a touch of garden beauty to every stitch! 🧶🌼
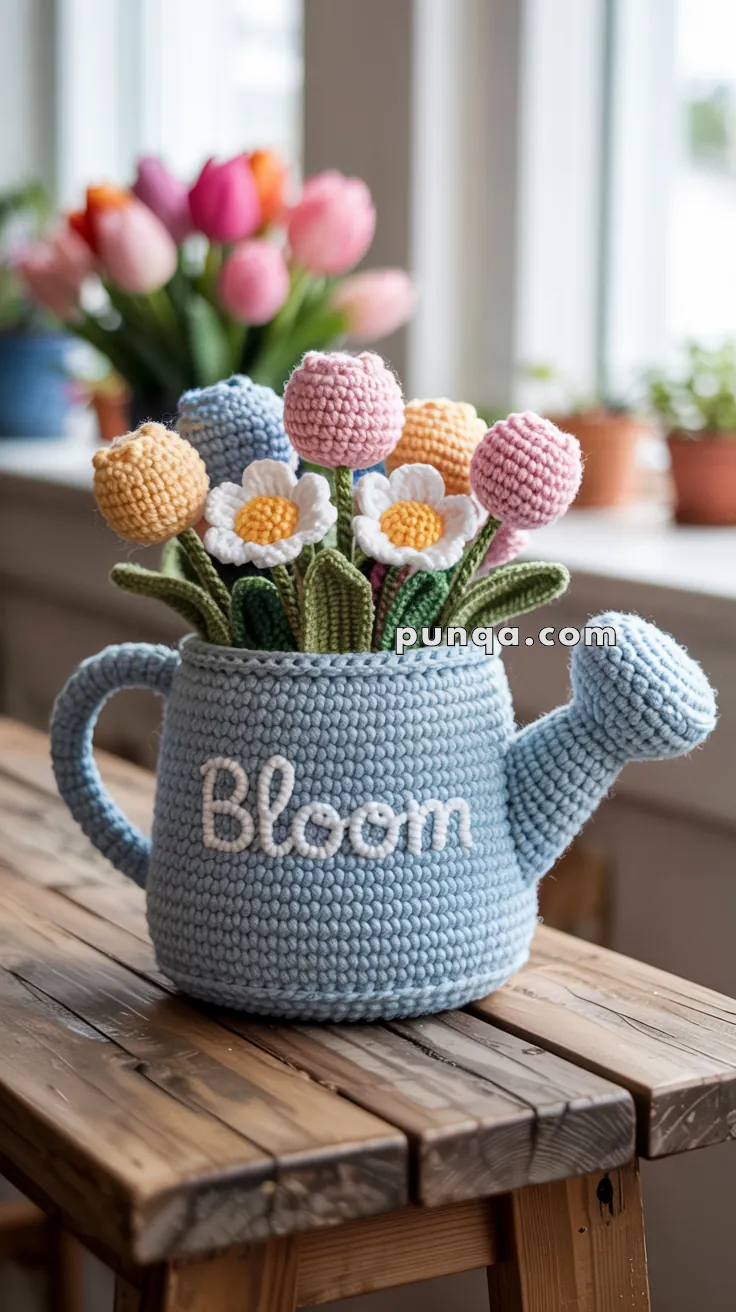
🌼 Amigurumi “Blooming Watering Can” Crochet Pattern
Brighten any room with this adorable crochet watering can filled with happy tulips and daisies! With cheerful pastel colors and a plush 3D “Bloom” on the front, it’s a beautiful addition to your handmade decor or a thoughtful gift for any plant lover. A fun, creative project to celebrate spring, flowers, and all things blooming!
✨ Skill Level
Intermediate – Involves basic shaping, color changes, and sewn assembly. Raised lettering is optional but beginner-friendly.
📏 Finished Size
Approx. 7 inches (18 cm) tall with flowers using worsted weight yarn and a 3.5 mm hook.
🧶 Materials
- Yarn (Worsted weight):
- Light Blue (Watering Can)
- White (Daisy petals + lettering)
- Yellow (Daisy centers + tulips)
- Pink, Peach, Lavender (Tulip flowers)
- Green (Leaves + stems)
- Crochet hook: 3.5 mm
- Tapestry needle
- Embroidery needle
- Polyfill stuffing
- Stitch markers
- Floral wire (optional, for stems)
- Pins (to arrange lettering)
- Scissors
🧵 Abbreviations (US Terms)
MR – Magic Ring
sc – Single Crochet
inc – Increase (2 sc in same stitch)
dec – Decrease (sc 2 together)
sl st – Slip Stitch
ch – Chain
FO – Fasten Off
blo – Back Loop Only
☕ Watering Can Body (Light Blue)
Work in continuous spiral unless noted.
- MR, 6 sc (6)
- inc x6 (12)
- (1 sc, inc) x6 (18)
- (2 sc, inc) x6 (24)
- (3 sc, inc) x6 (30)
- (4 sc, inc) x6 (36)
- (5 sc, inc) x6 (42)
- (6 sc, inc) x6 (48)
- (7 sc, inc) x6 (54)
- (8 sc, inc) x6 (60)
11. BLO: sc around (60) – creates edge for base
12–35. sc around (60) – 24 rounds to build height
FO and weave in ends.
🌀 Spout (Light Blue)
- MR, 6 sc (6)
- (1 sc, inc) x3 (9)
3–5. sc around (9) - (2 sc, inc) x3 (12)
7–9. sc around (12) - (3 sc, inc) x3 (15)
11–13. sc around (15)
Stuff lightly, FO with long tail.
Sew to side of can, angled upward.
🪝 Handle (Light Blue)
- ch 26, join to form ring
2–6. sc around (26)
FO, stuff lightly and shape into a curved handle.
Sew to sides of can (aligned across spout).
✍️ “Bloom” Text – Crochet Chain Lettering (White)
To match the raised 3D lettering in the photo, we’ll use a crocheted chain stitched onto the can.
🧵 Instructions:
- Make a chain:
With white yarn and 3.5 mm hook, chain approx. 85–100. (Better to make extra — you can trim later.) - Shape the word “Bloom”:
- Use sewing pins to form the chain into cursive-style letters on the front of the can.
- Shape each letter carefully:
- B – vertical line with two loops
- l – straight
- o o – small loops
- m – double hump
- Sew down:
- Use sewing thread or yarn and a tapestry needle.
- Tack down every few stitches using small whip stitches.
- Make sure it lies flat and curves smoothly.
- FO and weave in tails on inside of can.
✅ Tip: Use glue dots or washable fabric glue to help hold letters in place while stitching if needed.
🌷 Tulip Flowers (Make 5–6 in Mixed Colors)
Bulb:
- MR, 6 sc (6)
- inc x6 (12)
- (1 sc, inc) x6 (18)
4–8. sc around (18) - (1 sc, dec) x6 (12)
- dec x6 (6)
Stuff lightly, FO and weave shut.
Optional: Add 3 loose sl st “petal ridges” around the top edge to mimic tulip folds.
Stem:
- With green yarn, ch 18
- sc in 2nd ch from hook and across (17)
Roll up and sew to flower base.
🌼 Daisies (Make 3)
Center (Yellow):
- MR, 6 sc (6)
- inc x6 (12)
FO.
Petals (White – Make 6 per flower):
- ch 7
- sc in 2nd ch, hdc, dc, dc, hdc, sc, sl st
FO and sew around center evenly.
Stem:
Same as tulip: ch 18, sc back, sew to center.
🍃 Leaves (Green – Make 6–8)
- ch 8
- sc in 2nd ch, hdc, dc, dc, hdc, sc, sl st
FO, weave in ends.
Optional: make some larger by starting with ch 10.
🧺 Final Assembly
- Stuff watering can lightly to hold its shape.
- Arrange flowers inside the top opening.
- Optionally insert floral wire into stems to help them stand upright.
- Sew or glue flower bases securely into the can’s opening.
- Add leaves to fill gaps and give a natural look.
- Ensure “Bloom” lettering is secured, with all tails woven in neatly.
💡 Customization Ideas
- Swap “Bloom” with custom text like “Grow” or a name
- Use rainbow colors for flowers or add bees and butterflies
- Make mini versions for place settings or gifts
- Add weight to base for stability (small pebble bag)
This sweet Blooming Watering Can is the perfect way to crochet a little sunshine and nature into your life. Whether you place it in your craft room, gift it to a friend, or make one for every season—this handmade bouquet will never wilt. 🌸💧


Maravilhoso seu trabalho amo tudo isso eu gosto de fazer não posso trabalhar mais por problema de saúde isso é tão difícil ficar sem fazer nada então eu passo minhas horas muito obrigada.