Welcome to the cheerful and lovable world of amigurumi! 🐴✨ Today, I’m excited to share my free crochet pattern for an Amigurumi Happy Donkey—a playful and heartwarming creation perfect for farm animal lovers, whimsical décor enthusiasts, or anyone who enjoys crafting expressive and cuddly plush designs! 🧶 Whether you love stitching up adorable creatures, experimenting with textured details, or simply want to add a joyful donkey to your handmade lineup, this pattern will guide you through crafting a beautifully sculpted plush with floppy ears, a sweet smile, and a touch of countryside charm! 🌾
This design embraces soft grays, warm browns, and intricate shaping to bring a delightful and friendly presence to your crochet projects! 🧶✨ I’ve carefully outlined each step to ensure your Amigurumi Happy Donkey turns out just right—ready to brighten up your collection or become a treasured handmade gift! 🎁 So grab your hooks, pick out cozy hues, and let’s stitch up a fantastic happy donkey! 🐴
🐴 Amigurumi Happy Donkey Crochet Pattern
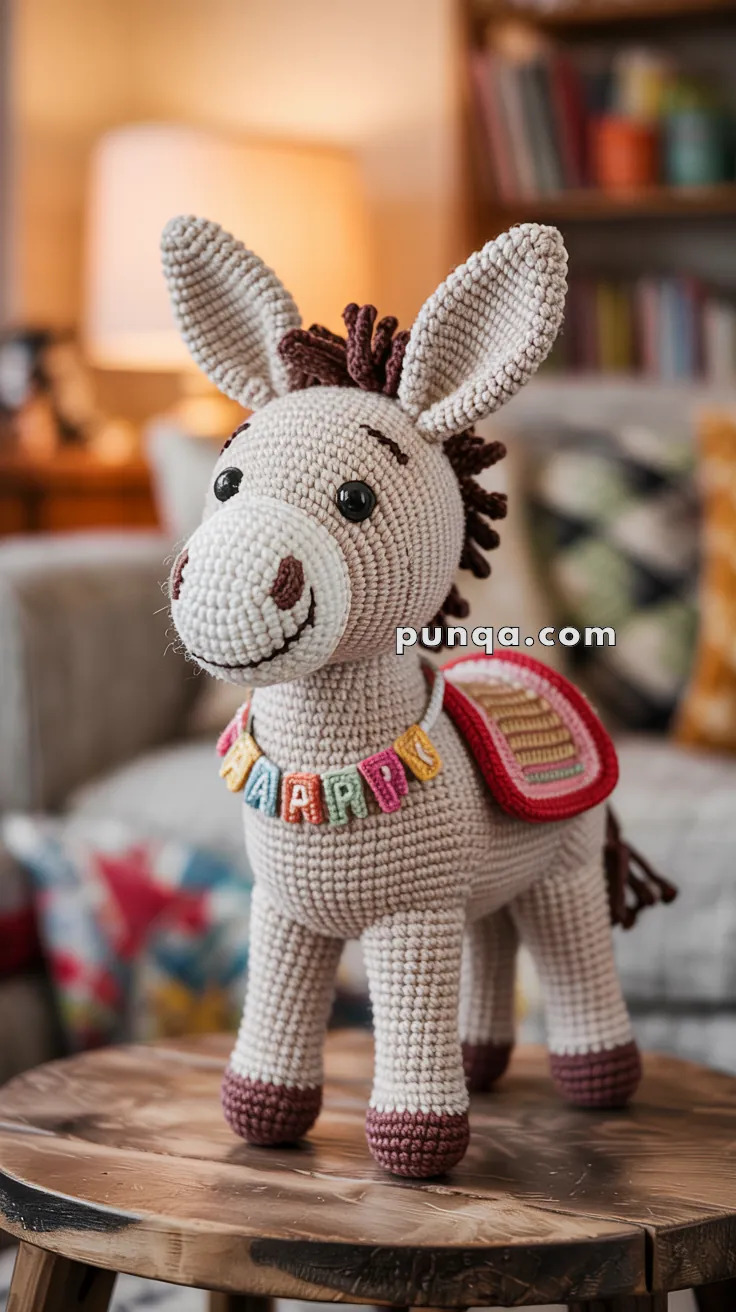
This joyful donkey amigurumi stands proudly on four sturdy legs, with tall upright ears, a softly sculpted muzzle, a short tufted mane, and a playful personality. Finished with a rounded saddle and colorful block-letter necklace, this design captures a friendly, storybook look that feels both sturdy and cuddly.
✨ Skill Level
Intermediate – includes shaping, multi-part assembly, surface embroidery, and small accessories.
📏 Finished Size
Approx. 27–29 cm (10.5–11.5 in) tall using DK yarn and a 3.0 mm hook.
🧶 Materials & Yarn Amounts
Yarn (DK / light worsted):
• Light beige – ~90 g (head, body, neck, legs, ears)
• White – ~18 g (muzzle, ear lining)
• Dark brown – ~30 g (hooves, mane, tail, nostrils)
• Red – ~18 g (saddle edging)
• Tan / mustard – ~10 g (saddle center panel)
• Assorted bright scraps – small amounts (necklace letters)
Other:
• 10–12 mm black safety eyes
• 3.0 mm crochet hook
• Polyester fiberfill
• Yarn needle, stitch marker, scissors
🔤 Abbreviations (US Terms)
MR – magic ring
sc – single crochet
inc – increase
dec – decrease
sl st – slip stitch
ch – chain
FO – fasten off
Worked in continuous rounds unless noted.
🐴 Head (Light Beige)
The head is softly oval, not oversized, with gentle facial shaping.
R1: MR, 6 sc
R2: inc ×6 = 12
R3: (sc, inc) ×6 = 18
R4: (2 sc, inc) ×6 = 24
R5: (3 sc, inc) ×6 = 30
R6: (4 sc, inc) ×6 = 36
R7: (5 sc, inc) ×6 = 42
R8–14: sc around (42)
Insert safety eyes between R10–11, spaced 7 sts apart.
R15: (5 sc, dec) ×6 = 36
R16: (4 sc, dec) ×6 = 30
R17: (3 sc, dec) ×6 = 24
Stuff firmly, shaping a smooth oval.
R18: (2 sc, dec) ×6 = 18
R19: (sc, dec) ×6 = 12
R20: dec ×6 = 6
FO and close.
🐽 Muzzle (White)
The muzzle is rounded and clearly raised.
R1: MR, 6 sc
R2: inc ×6 = 12
R3: (sc, inc) ×6 = 18
R4–6: sc around (18)
Stuff lightly and sew low on the face.
Embroider two small vertical nostrils and a gentle curved smile using dark brown yarn.
👀 Facial Details
• Short embroidered eyebrows angled slightly upward
• Expression kept soft and friendly
• No exaggerated eye shaping
👂 Ears (Make 2)
Tall, narrow, upright ears with visible inner lining.
Outer Ear (Light Beige)
R1: MR, 6 sc
R2: (sc, inc) ×3 = 9
R3: (2 sc, inc) ×3 = 12
R4–20: sc around (12)
FO.
Inner Ear (White)
R1: MR, 6 sc
R2: (sc, inc) ×3 = 9
R3–14: sc around (9)
FO.
Sew inner ear inside outer ear. Pinch base slightly and attach high on the head so ears stand upright and tilt gently inward.
🧠 Mane (Dark Brown)
The mane is short and tufted, not fringe.
Cut 8–10 strands, approx. 6–7 cm long.
Attach along the center top of the head using loop-through stitches only (no trimming into fringe).
Leave ends blunt for a chunky tufted look.
🦒 Neck (Light Beige)
R1: MR, 6 sc
R2: inc ×6 = 12
R3–13: sc around (12)
Stuff firmly. Sew head to one end and body to the other.
🧸 Body (Light Beige)
Compact body with gentle chest curve.
R1: MR, 6 sc
R2: inc ×6 = 12
R3: (sc, inc) ×6 = 18
R4: (2 sc, inc) ×6 = 24
R5: (3 sc, inc) ×6 = 30
R6: (4 sc, inc) ×6 = 36
R7–19: sc around (36)
R20: (4 sc, dec) ×6 = 30
R21: (3 sc, dec) ×6 = 24
R22–23: sc around (24)
Stuff firmly and FO. Attach neck centered on top.
🐾 Legs (Make 4)
Longer legs for standing posture.
Hooves (Dark Brown)
R1: MR, 6 sc
R2: inc ×6 = 12
R3: (sc, inc) ×6 = 18
R4–5: sc around (18)
Switch to light beige.
R6–17: sc around (18)
Stuff firmly, flatten top slightly, FO.
Sew two legs under the chest and two under the rear so the donkey stands evenly.
🧵 Tail (Dark Brown)
Cut 6 strands, approx. 9–10 cm long.
Attach at back of body and knot securely.
Leave ends blunt and slightly uneven.
🧺 Saddle
Rounded rectangular saddle with inner panel.
Center Panel (Tan):
Ch 14, sc in 2nd ch from hook (13)
Rows 2–6: sc across (13)
Border (Red):
Attach red yarn and sc evenly around, placing 2 sc at corners to keep rounded edges.
FO and sew centered on the donkey’s back.
🔤 Letter Necklace
The letters are small padded blocks, not flat shapes.
For each letter (H A P P Y):
R1: MR, 6 sc
R2: inc ×6 = 12
R3–4: sc around (12)
FO, flatten slightly.
Surface embroider each letter in contrasting yarn.
Thread onto a white chain cord and tie loosely around the neck.
✨ Final Assembly & Shaping
• Ears upright and slightly inward
• Legs evenly spaced for balance
• Saddle positioned slightly back from neck
• Necklace hangs freely, not tight
🎉 Finished Donkey
Your Happy Donkey is complete 🐴✨
With tall ears, a softly sculpted face, sturdy standing legs, tufted mane, rounded saddle, and playful necklace, this amigurumi now ready to brighten shelves, nurseries, or gift boxes with pure handmade joy.