Sweeten your stitches with the Amigurumi Strawberry, a juicy little crochet treat that’s bursting with charm! 🍓🧶 With its plump red body, leafy green top, and tiny embroidered seeds, this adorable berry is perfect for summer décor, playful gifts, or adding a fruity twist to your amigurumi collection. Whether you’re crafting a single strawberry or a whole basketful, this pattern is a delicious way to celebrate the joy of handmade.
Perfect for crocheters who love quick projects and vibrant colors, this pattern invites you to mix shades, add smiling faces, or even turn your strawberry into a keychain or charm. It’s a fun and satisfying make that’s great for beginners and seasoned stitchers alike. The Amigurumi Strawberry is a delightful way to stitch up sweetness—one loop at a time! 💚🧵
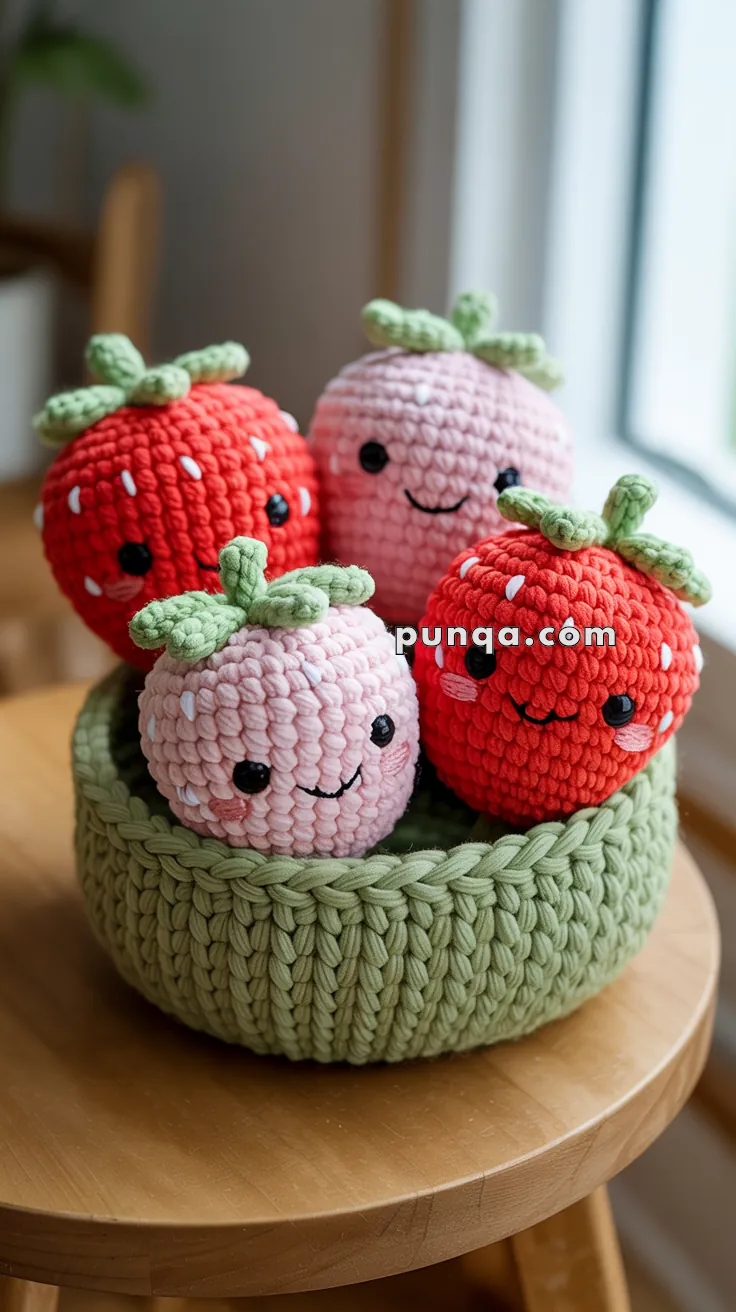
🍓 Amigurumi Strawberries & Basket Crochet Pattern
Nothing says summer sweetness like a basket of strawberries — and now you can crochet your own! This free amigurumi pattern includes plump little strawberries and a chunky green basket with a braided edge, just like the one in the photo. Perfect as play food, kitchen décor, or a cheerful handmade gift.
✨ Skill Level
Beginner to Intermediate – basic amigurumi stitches, some shaping, and finishing details.
📏 Finished Sizes
- Strawberries: ~4–5 cm tall
- Basket: ~12–14 cm wide × 6–7 cm tall
🧶 Materials
- Strawberries: Red (body), Green (leaves & tops) – DK cotton or acrylic
- Basket: Green – Chunky cotton cord or t-shirt yarn
- Crochet hook: 2.5–3 mm (for strawberries), 5–6 mm (for basket)
- Yarn needle & scissors
- Stitch marker
- Fiberfill stuffing (for strawberries)
🧵 Abbreviations (US Terms)
- MR = Magic Ring
- sc = single crochet
- inc = increase (2 sc in same stitch)
- dec = decrease (sc2tog)
- sl st = slip stitch
- ch = chain
- FLO = front loop only
- BLO = back loop only
- FO = fasten off
🍓 Strawberry Pattern
Strawberry Body (Red)
- MR, 6 sc (6)
- inc ×6 (12)
- (sc, inc) ×6 (18)
- (2 sc, inc) ×6 (24)
5–8. sc around (24) - (2 sc, dec) ×6 (18)
- (sc, dec) ×6 (12)
👉 Stuff firmly. - dec ×6 (6), FO. Weave closed.
Strawberry Top & Leaves (Green)
- Ch 5, sl st in 2nd ch, sc, hdc, dc → first point.
- Sl st into next base st.
- Repeat 5–6 points around.
FO with long tail, sew to top of strawberry.
🧺 Basket Pattern
Base (Green, chunky yarn)
- MR, 6 sc (6)
- inc ×6 (12)
- (sc, inc) ×6 (18)
- (2 sc, inc) ×6 (24)
- (3 sc, inc) ×6 (30)
- (4 sc, inc) ×6 (36)
👉 Adjust size by continuing the increase pattern.
Walls
- sc BLO around (36) → makes sharp base edge.
2–6. sc around (36).
Braided Edge
- Ch 1. Insert hook into FLO of next st, yo, pull loop (2 loops).
- Insert into next FLO, yo, pull loop (3 loops).
- Yo, pull through all 3 loops → braided stitch made.
- Repeat around. Sl st to first braid. FO.
✂️ Assembly & Finishing
- Make several strawberries and arrange them inside the basket.
- Use stiff cotton cord for the basket to keep it sturdy.
- For realism, embroider tiny white seed stitches onto strawberries with white or cream thread.
- Optionally, make the basket taller or wider by adding rounds.
🌟 Final Thoughts
This Amigurumi Strawberry Basket makes a delightful addition to play kitchens, market stands, or handmade gift sets. The chunky braided basket edge gives it a polished, rustic look — and the bright strawberries inside make it pop with charm.
Whether you’re crocheting for kids, home décor, or craft fairs, this set is quick, fun, and endlessly giftable. 🍓✨