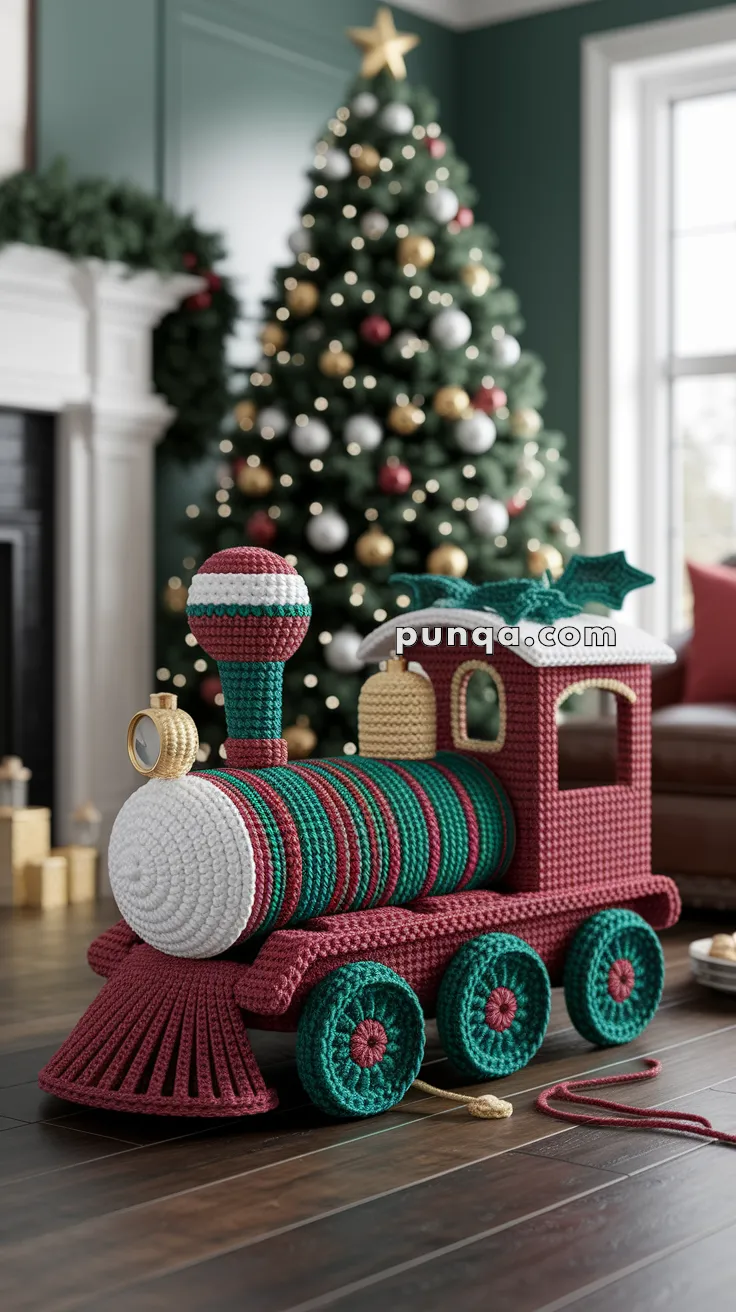
All aboard the holiday cheer express with the Christmas Train, a delightful crochet project that’s full of festive flair and nostalgic charm! 🚂🧶 With peppermint-striped colors, cozy stitched details, and a classic Christmas vibe, this handmade locomotive is ready to chug its way into your seasonal décor. Whether displayed as a centerpiece, tucked under the tree, or gifted as a whimsical toy, it’s sure to bring smiles and sparkle to your celebrations.
Perfect for crocheters who love playful shapes and joyful themes, this pattern invites you to stitch up a train that’s bursting with personality. Add tiny presents, stitch up a conductor elf, or create a full holiday scene with matching accessories. The Christmas Train is a joyful way to stitch up tradition, imagination, and a sprinkle of handmade holiday magic—one loop at a time! 🧵🎄✨
🚂 Amigurumi Christmas Train Crochet Pattern
Deck your holiday décor with this delightful Amigurumi Christmas Train, featuring bold peppermint stripes, festive wheels, and classic vintage detailing. Perfect as a handmade Christmas centerpiece or a keepsake toy, this pattern brings cheer to every corner of your home.
✨ Skill Level
Intermediate to Advanced – includes structured shaping, textural crochet, and assembly with color changes.
📏 Finished Size
Approx. 12 in (30 cm) long × 7 in (18 cm) tall using worsted yarn and a 3.5 mm hook.
🧶 Materials
- Worsted Weight Yarn
- Deep Red – 90 g (body, base, front grille)
- Dark Green – 80 g (body stripes, wheels, chimney base)
- Cream / White – 60 g (front panel, roof, wide stripes)
- Gold – 15 g (bell, lamp rim)
- Burgundy / Wine – 15 g (wheel centers)
- Black – small amount (wheel axle detail)
- 3.5 mm crochet hook
- Fiberfill stuffing
- Plastic canvas or cardboard for reinforcement
- Tapestry needle, scissors
- Optional: small jingle bell, thin gold thread for highlights
🧵 Abbreviations (US Terms)
MR – Magic Ring
sc – Single Crochet
inc – Increase (2 sc in one stitch)
dec – Decrease (sc 2 together)
sl st – Slip Stitch
ch – Chain
BLO – Back Loop Only
FLO – Front Loop Only
FO – Fasten Off
🎁 Main Engine Cylinder
Stripe Pattern:
Wide horizontal bands – 2 rounds red, 2 rounds white, 2 rounds red, 2 rounds green → repeat sequence.
- With white, MR 6 sc (6)
- inc × 6 (12)
- (1 sc, inc) × 6 (18)
- (2 sc, inc) × 6 (24)
- (3 sc, inc) × 6 (30)
- (4 sc, inc) × 6 (36)
- (5 sc, inc) × 6 (42)
8–40. Follow the wide-band color sequence above (42)
Stuff firmly as you go; line bottom with cardboard tube for structure.
FO, leaving long tail for sewing.
🏠 Cab (Rear Carriage Section)
Body (Red):
Ch 16, turn.
Rows 1–12: sc across (15). FO.
Texture for Checkered Walls:
Reattach yarn to Row 1 edge. Work front-post sc, back-post sc alternating for 3 rows to form a woven look.
Windows (Arched, 2):
Ch 9.
Row 1: sc 7, dec (8).
Row 2: sc across (8).
Row 3: sc 3, dec 2, sc 3 → arch.
Edge with slip st in white for window trim. Sew onto both sides.
Roof (White):
Ch 22.
Rows 1–6: sc across.
Rows 7–9: inc 1 at each end per row for gentle curve.
Edge with surface slip st in cream for a snow-frosted look.
Sew roof over cab with slight overhang.
🎩 Chimney (Candy-Stripe)
Base (Green & Red):
- MR 6 sc.
- inc × 6 (12).
- (1 sc, inc) × 6 (18).
4–7. 2 rounds green, 2 rounds red.
8–10. dec x6 (12). FO, stuff lightly.
Top Globe (Red – White – Green – White – Red):
- MR 6 sc.
- inc × 6 (12).
- (1 sc, inc) × 6 (18).
4–6. sc around (18), changing color each round. - (1 sc, dec) × 6 (12).
- dec × 6 (6). FO, close.
Sew to chimney top and attach chimney to engine front top.
🧲 Front Cowcatcher / Grille (Textured Fan)
To recreate the pleated ribbed look, use front-post stitches.
- With red, ch 26.
- Row 1: sc across (25).
- Rows 2–6: fpdc in next st, bpdc in next st repeat for ribbing.
- Row 7: dec every 4 st to taper slightly.
FO and shape into a semi-circle.
Steam-press lightly so ribs flare outward.
Sew centered under the front face of the train.
🎡 Wheels (Color Reversal Corrected)
**Outer – Green | Centers – Burgundy **
Large Wheels (×4)
- With green: MR 6 sc.
- inc × 6 (12).
- (1 sc, inc) × 6 (18).
- (2 sc, inc) × 6 (24).
- Switch to burgundy, sc around (24).
- In BLO, sc around (24) for a raised rim. FO.
Small Wheels (×2)
- MR 6 sc.
- inc × 6 (12).
- (1 sc, inc) × 6 (18).
- Switch to burgundy, sc around (18). FO.
Add black embroidered dots at centers as “axle caps.”
Sew 3 wheels per side — smaller ones higher near rear.
🔔 Bell (Gold)
- MR 6 sc.
- inc × 6 (12).
- (1 sc, inc) × 6 (18).
4–5. sc around. - (1 sc, dec) × 6 (12).
- dec × 6 (6). FO.
Add chain 1 loop to hang freely between chimney and cab.
💡 Front Lamp
Gold Rim + White Face
- Base (Gold): MR 6 sc, inc × 6 (12), (1 sc, inc) × 6 (18), 2 rounds sc. FO.
- Lens (White): MR 6 sc, inc × 6 (12). FO.
Sew white disc into gold rim.
Attach front-center above the cowcatcher.
🚪 Assembly
- Attach the engine cylinder horizontally to the base.
- Sew cab onto back of cylinder.
- Place roof atop cab, slightly curved.
- Attach chimney and striped globe to the front top.
- Add hanging bell between cab and chimney.
- Sew cowcatcher fan to the bottom front.
- Attach lamp centered on the front face.
- Position wheels evenly, ensuring stability.
- Line the interior bottom with plastic canvas for firmness.
🌿 Optional Decoration
The photographed model shows a clean roof without holly.
If desired, you can add one small holly cluster to the back corner of the cab:
- 2 dark green leaves (ch 7 pattern) and 3 red bobbles.
🎨 Finishing Touches
✔ Stuff evenly but firmly so the train keeps its cylindrical shape.
✔ Use invisible stitches for assembly.
✔ Add a twisted red cord as a pull string through the front grille.
✔ For a snow-kissed effect, dry-brush a bit of white yarn or fabric paint along roof edges.
🎄 All Aboard the Holiday Express!
Your photo-accurate Christmas Train is now ready to roll beneath the tree or brighten your mantle. The wide peppermint stripes, ribbed cowcatcher, and medallion wheels give it that vintage holiday toy feel that never goes out of style.
Crochet it once, and it will become a treasured family decoration for years to come.
Happy Crocheting & Merry Christmas! 🎅🚂✨