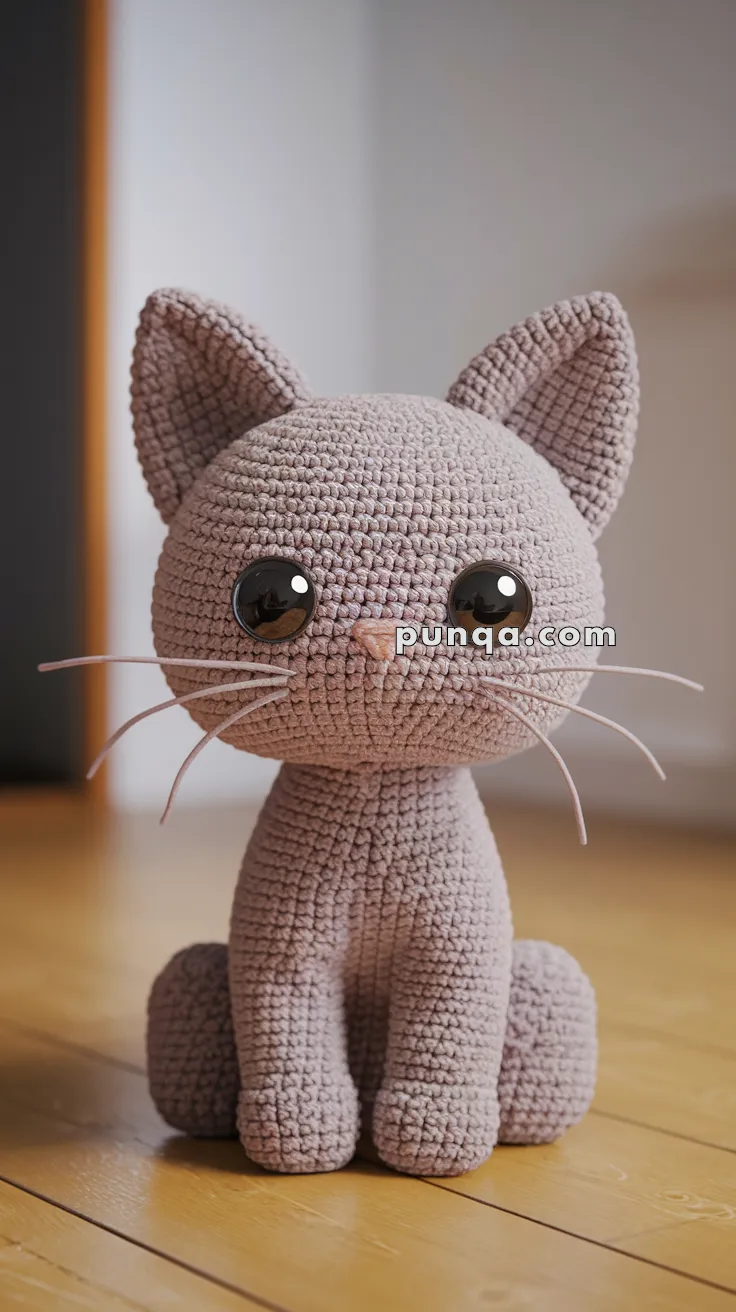
Bring the adorable charm of kawaii style to your crochet collection with this Amigurumi Kawaii Cat pattern! 🐱✨ With its round, cuddly shape, oversized eyes, and playful expression, this design captures the essence of a cute and lovable feline in yarn form. Whether you’re crafting for a whimsical décor piece, a heartfelt gift, or simply love character-inspired amigurumi, this FREE pattern is a delightful addition to your projects.
Designed for intermediate crocheters, this pattern allows for customization in fur textures, facial details, and even tiny accessories like a miniature bow or a cozy scarf to enhance its personality. Choose classic soft pastels for a gentle kawaii look or experiment with bold hues for a unique twist! Whether displayed as part of a charming setup or gifted to a fellow crochet enthusiast, this amigurumi kawaii cat is sure to bring smiles. Grab your hook, select your favorite yarn, and let’s bring this adorable little feline to life—one stitch at a time! 🧶✨
🐾 Kawaii Cat Amigurumi Crochet Pattern
This Kawaii Cat Amigurumi is the ultimate in cuteness! With its oversized round head, big sparkling eyes, tall ears, built-in front legs, round haunches, and long whiskers, this plushie looks just like a real-life cartoon kitty. Perfect for gifts, décor, or your own cuddly companion.
✨ Skill Level
Confident Beginner – you should be comfortable with increases, decreases, and crocheting in joined sections.
📏 Finished Size
-
~24–26 cm tall (depending on yarn & hook).
🧶 Materials
-
Worsted or plush yarn in taupe/beige (main cat color).
-
Pink yarn (nose).
-
Black yarn (optional embroidery).
-
18–20 mm glossy black safety eyes.
-
Nylon thread, fishing line, or plastic whiskers (~10–12 cm each).
-
Crochet hook: 4.0–5.0 mm.
-
Polyester fiberfill stuffing.
-
Yarn needle.
-
Scissors.
-
Stitch markers.
🪡 Abbreviations (US Terms)
MR – Magic Ring
sc – Single crochet
inc – Increase (2 sc in same st)
dec – Decrease (sc2tog)
ch – Chain
sl st – Slip stitch
st(s) – Stitch(es)
🧵 Pattern Instructions
🐱 Head (large & round)
-
MR 6 (6)
-
inc ×6 (12)
-
(sc, inc) ×6 (18)
-
(2 sc, inc) ×6 (24)
-
(3 sc, inc) ×6 (30)
-
(4 sc, inc) ×6 (36)
-
(5 sc, inc) ×6 (42)
-
(6 sc, inc) ×6 (48)
-
(7 sc, inc) ×6 (54)
10–20. sc around (54)
👉 Insert safety eyes at R10–R11, spaced widely apart (~12 sts).
👉 Embroider a tiny pink triangle nose centered between eyes.
-
(7 sc, dec) ×6 (48)
-
(6 sc, dec) ×6 (42)
-
(5 sc, dec) ×6 (36)
-
(4 sc, dec) ×6 (30)
-
(3 sc, dec) ×6 (24)
-
(2 sc, dec) ×6 (18)
-
(sc, dec) ×6 (12)
-
dec ×6 (6). FO.
Stuff firmly into a smooth oversized sphere.
🐱 Ears (make 2, tall triangles)
-
MR 4 (4)
-
(sc, inc) ×2 (6)
-
(2 sc, inc) ×2 (8)
-
(3 sc, inc) ×2 (10)
-
(4 sc, inc) ×2 (12)
-
(5 sc, inc) ×2 (14)
-
(6 sc, inc) ×2 (16)
8–11. sc around (16). FO.
👉 Leave long tail for sewing. Attach symmetrically to top of head.
🐱 Body with Built-in Front Legs
Base:
-
MR 6 (6)
-
inc ×6 (12)
-
(sc, inc) ×6 (18)
-
(2 sc, inc) ×6 (24)
-
(3 sc, inc) ×6 (30)
-
(4 sc, inc) ×6 (36)
-
(5 sc, inc) ×6 (42)
Front Leg Split:
8. Work 14 sc, then ch 1 and skip 14 sts, sc 14 (28 sc + 1 ch gap).
👉 This separates stitches for front legs.
Legs (worked one at a time on skipped sts):
Attach yarn in skipped sts (14).
1–10. sc around (14).
👉 Stuff lightly. FO. Repeat for second leg.
Continue Body Above Legs:
Rejoin yarn to full round (42 sts).
11–18. sc around (42).
19. (5 sc, dec) ×6 (36).
20–22. sc around (36). FO.
Stuff body firmly but keep legs shaped.
🐾 Back Legs / Haunches (make 2, half-spheres)
-
MR 6 (6)
-
inc ×6 (12)
-
(sc, inc) ×6 (18)
-
(2 sc, inc) ×6 (24)
5–7. sc around (24) -
(2 sc, dec) ×6 (18)
-
sc around (18). FO.
Stuff and sew to lower sides of body.
🐾 Tail (short & thick)
-
MR 6 (6)
-
inc ×6 (12)
3–10. sc around (12). FO.
Stuff firmly, sew to back of body.
🐽 Whiskers
-
Cut 6 strands of nylon thread/fishing line, each ~10–12 cm long.
-
Insert 3 whiskers on each side of nose with yarn needle, knotting inside.
👉 They should be head-width long and stiff.
🧩 Assembly
-
Sew head to body securely (use extra stitches for balance since head is oversized).
-
Attach ears tall and upright.
-
Secure back haunches at body base, tail at back.
-
Adjust front legs to sit flat on floor.
-
Add whiskers last.
🌟 Finishing Touches
-
Use oversized glossy eyes for maximum kawaii style.
-
Add a tiny bow or collar bell for extra personality.
-
Make different colors: grey, black, white, or ginger.
🎉 Final Words
Your Kawaii Cat Amigurumi is complete! With its seamless built-in front legs, oversized round head, huge shiny eyes, and sweet whiskers, it perfectly captures that cute and cuddly kawaii charm. A delightful project for both beginners and advanced crocheters, and an adorable gift for cat lovers everywhere.