Step into a peaceful countryside scene with this Amigurumi Windmill & Sheep Meadow crochet pattern! Featuring a charming windmill surrounded by fluffy little sheep, this delightful design captures the cozy magic of a pastoral landscape. Whether you’re crafting for a farm-themed nursery, creating a whimsical display, or simply love storytelling through amigurumi, this pattern lets you stitch up a serene meadow full of character and charm. It’s a heartwarming way to bring a touch of handmade tranquility to your space. 🌾🐑🌬️
Designed for customization, this pattern invites you to play with soft greens, warm neutrals, and textured stitches to bring the meadow to life. Add embroidered flowers, a tiny fence, or even a little path leading to the windmill for extra detail. Whether you go for a classic countryside palette or a playful, colorful twist, this Amigurumi Windmill & Sheep Meadow is a joyful and creative project—perfect for bringing a touch of handmade storybook charm to every stitch! 🧶💖✨
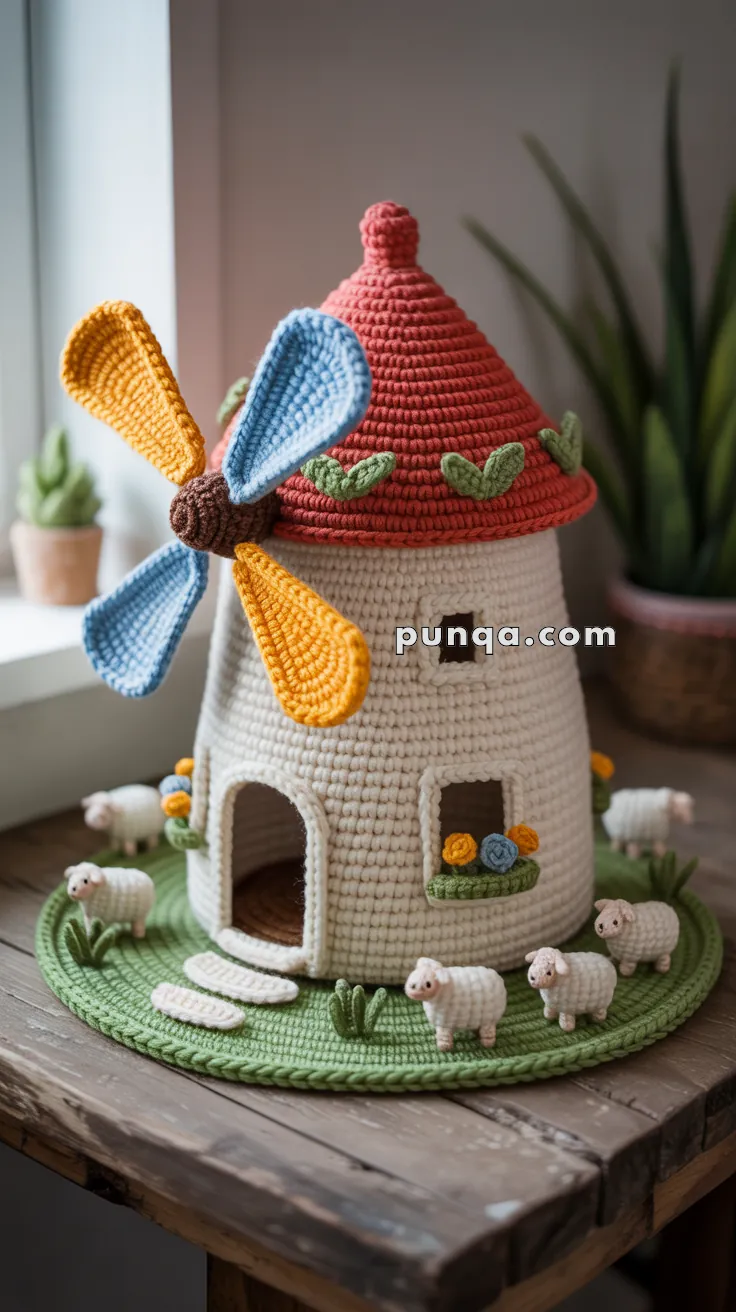
🌾 Amigurumi Windmill & Sheep Meadow Crochet Pattern
Bring the peaceful charm of a countryside meadow into your home with this cozy windmill scene! With a flared roof, detailed windows, spinning blades, and fluffy sheep grazing below, this project makes a delightful display or gift for handmade decor lovers. 🐑🌿
✨ Skill Level
Intermediate – includes shaping, texture stitches, and light assembly.
📏 Finished Size
Approx. 10–12 in (25–30 cm) tall when made with worsted-weight yarn and a 3.0–3.5 mm hook.
🧶 Materials
- Worsted-weight yarn
- Beige / Light Tan – 40 g (lower windmill body)
- Cream – 40 g (upper body + window frames)
- Red / Terracotta – 40 g (roof)
- Brown – 10 g (hub + finial)
- Yellow – 20 g (2 blades)
- Blue – 20 g (2 blades)
- Green – 35 g (grass base, leaves, flower boxes)
- Accent colors (yellow, orange, blue) – 10 g total (flowers)
- White – 15 g (path stones)
- Black – scraps (eyes)
- Hook: 3.0–3.5 mm
- Fiberfill stuffing
- Plastic canvas or cardboard (for structure)
- Yarn needle, stitch markers, scissors
- Optional: pipe cleaners (for blades and legs), glue gun
🧵 Abbreviations (US Terms)
MR – Magic Ring
sc – Single Crochet
inc – Increase (2 sc in same stitch)
dec – Decrease (sc2tog)
sl st – Slip Stitch
ch – Chain
BLO – Back Loop Only
BOB – Bobble Stitch (4 dc together in one stitch)
FO – Fasten Off
🏠 Windmill Body
Lower Half (Beige)
Round 1 – MR, 6 sc (6)
Round 2 – inc × 6 (12)
Round 3 – (1 sc, inc) × 6 (18)
Round 4 – (2 sc, inc) × 6 (24)
Round 5 – (3 sc, inc) × 6 (30)
Round 6 – (4 sc, inc) × 6 (36)
Round 7 – (5 sc, inc) × 6 (42)
Rounds 8–14 – sc around (42)
Upper Half (Cream)
Rounds 15–29 – sc around (42)
🚪 Doorway
Mark an 8–10 stitch gap centered on Round 20.
Row 1 – sc across gap (8–10 sts).
Rows 2–5 – dec 1 st each side per row.
Rows 6–8 – sc across remaining 2–3 sts.
FO and work 1 round of sc around door edge for reinforcement.
🪟 Windows & Flower Boxes
Create three 5 × 5 stitch openings between Rounds 18–22.
Work 1 round of sc in cream around each window to form a neat frame.
Space windows evenly around the body (~14 sts apart).
Flower Boxes
Row 1 – ch 8
Row 2 – sc in 2nd ch and across (7)
Row 3 – ch 1, sc across (7)
FO. Sew under each window.
Flowers
Wrap accent yarn around finger 6–8×, tie in middle, cut loops, trim round, and sew 3–4 per box.
Stuff body firmly and insert plastic mesh or cardboard wall if needed.
🔺 Roof (Red or Terracotta)
Work all rounds in BLO for texture.
Round 1 – MR, 6 sc (6)
Round 2 – (1 sc, inc) × 3 (9)
Round 3 – sc around (9)
Round 4 – (2 sc, inc) × 3 (12)
Round 5 – sc around (12)
Round 6 – (3 sc, inc) × 3 (15)
Round 7 – sc around (15)
Round 8 – (4 sc, inc) × 3 (18)
Round 9 – sc around (18)
Round 10 – (5 sc, inc) × 3 (21)
Round 11 – sc around (21)
Round 12 – (6 sc, inc) × 3 (24)
Round 13 – sc around (24)
Round 14 – (7 sc, inc) × 3 (27)
Round 15 – sc around (27)
Round 16 – (8 sc, inc) × 3 (30)
Round 17 – sc around (30)
Round 18 – (9 sc, inc) × 3 (33)
Round 19 – sc around (33)
Round 20 – (10 sc, inc) × 3 (36)
Round 21 – sc around (36)
Round 22 – (11 sc, inc) × 3 (39)
Round 23 – sc around (39)
Round 24 – (12 sc, inc) × 3 (42)
Rounds 25–30 – sc around (42)
Stuff lightly and FO.
Attach before sewing to body for easier access to seam line.
🎯 Roof Finial (Brown)
Round 1 – MR, 6 sc (6)
Round 2 – inc × 6 (12)
Rounds 3–4 – sc around (12)
Round 5 – (1 sc, dec) × 4 (8)
Round 6 – dec × 4 (4)
Stuff lightly and sew to top of roof.
🍃 Leaf Trim
Ch 4
Row 1 – sc in 2nd ch, hdc in next, dc in next, hdc in next, sc in last.
Make 6–8 leaves.
Sew around roof base where cream meets terracotta.
🌬️ Windmill Blades + Hub
Hub (Brown)
Round 1 – MR, 6 sc (6)
Round 2 – inc × 6 (12)
Rounds 3–4 – sc around (12)
FO, leaving long tail for sewing.
Paddle Blades (2 Yellow, 2 Blue)
Ch 30
Row 1 – sc 7 across, turn (7 sts)
Rows 2–4 – ch 1, sc across (7)
Row 5 – ch 1, inc, sc 5, inc (9)
Row 6 – ch 1, inc, sc 7, inc (11)
Rows 7–8 – ch 1, sc across (11)
Round Tip – work 3 sc in corner, continue evenly down opposite side, then FO.
Lightly stuff and insert pipe cleaner for shaping.
Attach blades evenly around hub in a “+” (cross) formation.
🌿 Meadow Base (Green)
Round 1 – MR, 6 sc (6)
Round 2 – inc × 6 (12)
Round 3 – (1 sc, inc) × 6 (18)
Round 4 – (2 sc, inc) × 6 (24)
Round 5 – (3 sc, inc) × 6 (30)
Continue increasing evenly until approximately 120 sts (≈9 in diameter).
Work final 2 rounds in BLO for a ridge edge.
🪨 Path Stones (White or Cream)
Round 1 – MR, 6 sc (6)
Round 2 – (1 sc, inc) × 3 (9)
Rounds 3–5 – sc around (9)
FO. Make 3–4 stones.
Arrange stones in a gentle S-curve from base edge to doorway.
🌱 Grass Tufts
Ch 8
(sc back 3, ch 5, sc back 3) repeat across to form spikes.
Make several and sew upright to base.
🐑 Little Sheep (Cream)
Body
Round 1 – MR, 6 sc (6)
Round 2 – inc × 6 (12)
Round 3 – (1 sc, inc) × 6 (18)
Rounds 4–8 – BOB stitch around (18)
Round 9 – (1 sc, dec) × 6 (12)
Round 10 – dec × 6 (6)
FO and stuff firmly.
Head
Round 1 – MR, 6 sc (6)
Rounds 2–3 – sc around (6)
FO and stuff lightly.
Sew head to front of body.
Legs (Make 4)
Round 1 – MR, 5 sc (5)
Round 2 – sc around (5)
FO and attach evenly under body for stability.
Ears (Make 2)
Ch 3
sl st in 2nd ch, sc in next, FO.
Attach to sides of head.
Eyes
Use tiny black embroidery stitches or 3 mm safety eyes.
🧱 Assembly
1️⃣ Sew roof to top of body.
2️⃣ Attach hub and blades front-center beneath roof.
3️⃣ Mount windmill securely to green base.
4️⃣ Add leaves, grass tufts, flower boxes, and path stones.
5️⃣ Arrange sheep around the meadow at playful angles.
6️⃣ Optional – place a coin or washer under base for added stability.
💡 Finishing Touches
✨ Add a tea light inside for a warm evening glow.
🌿 Embroider vines up the tower.
🐑 Create a companion barn or more sheep for a full playset.
🌾 Final Thoughts
Your countryside windmill and its flock of sheep are now complete! 🐑✨ This peaceful little scene captures the cozy essence of rural life — from the sturdy red-roofed tower to the spinning paddle blades and bobbly sheep grazing in the meadow.
Whether you display it as a handmade centerpiece, use it as nursery décor, or gift it to someone who adores charming handmade creations, it’s sure to bring warmth and joy to any home. 🌿💛
Each detail — the arched doorway, flower boxes, winding stone path, and textured sheep — adds personality and charm, reminding you that every stitch builds a story. So take a moment to admire your work and let your imagination wander through this tiny, tranquil world you’ve created. 💕