Welcome to the bright and cheerful world of amigurumi! 🌻✨ Today, I’m excited to share my free crochet pattern for an Amigurumi Sunflower In The Pot—a vibrant and uplifting creation perfect for plant lovers, cozy décor, or anyone who enjoys crafting adorable and textured plush designs! 🧶 Whether you love stitching up miniature greenery, experimenting with layered textures, or simply want to add a sunny sunflower to your handmade lineup, this pattern will guide you through crafting a beautifully sculpted plush with golden petals, a sturdy pot, and a touch of handmade charm! 🌿
This design embraces warm colors, rounded shaping, and delightful details to bring a fresh and joyful presence to your crochet projects! 🧶✨ I’ve carefully outlined each step to ensure your Amigurumi Sunflower In The Pot turns out just right—ready to brighten up your space or become a treasured handmade gift! 🎁 So grab your hooks, pick out sunny yellows, rich browns, and soft greens, and let’s stitch up a radiant sunflower! 🌻
🌻 Amigurumi Sunflower in Pot Crochet Pattern
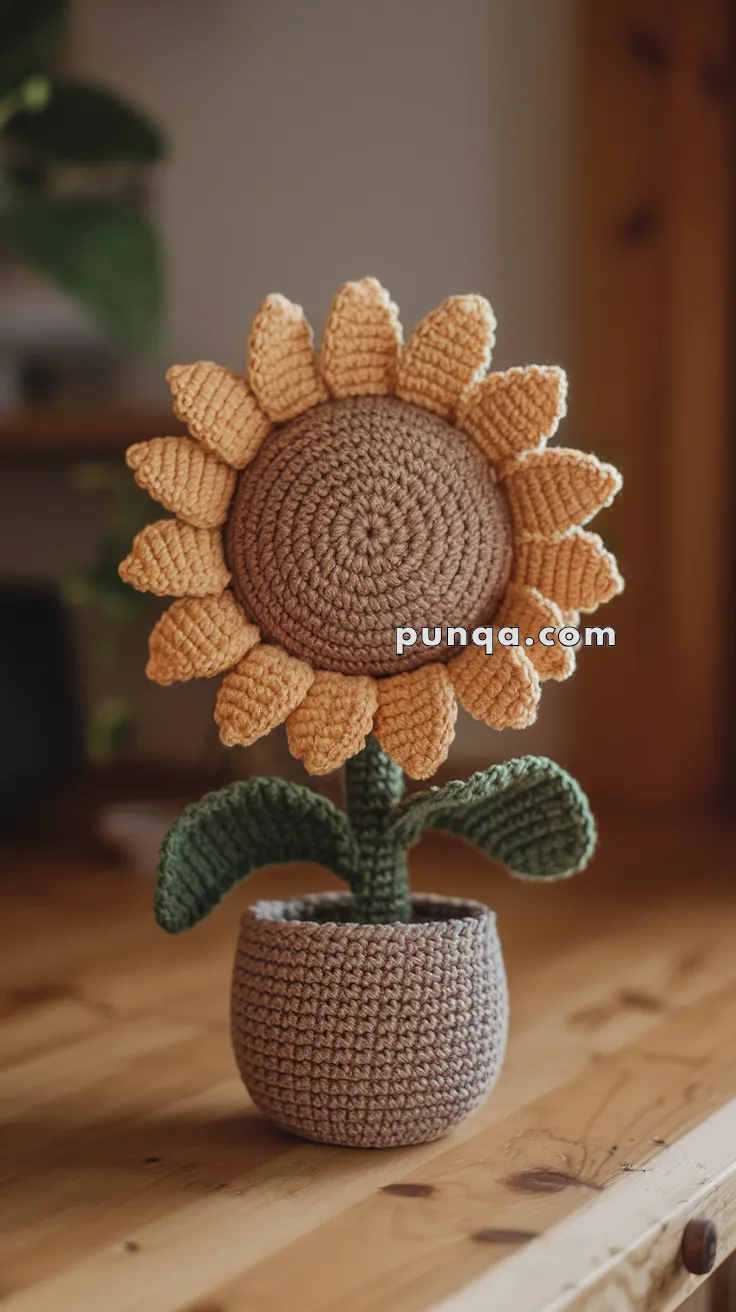
Bring sunshine indoors with this charming amigurumi sunflower! With its plump brown center, padded golden petals, thick stem, curved leaves, and squat little pot, this sunflower will bloom forever — no watering required.
✨ Skill Level
Intermediate – includes shaping petals, leaves, and structural support with wire.
📏 Finished Size
Approx. 22–25 cm (9–10 in) tall when worked with DK cotton yarn and a 2.5–3.0 mm hook.
🧶 Materials
-
Yarn (cotton DK):
-
Brown (flower center, pot)
-
Yellow (petals)
-
Green (stem, leaves)
-
-
Crochet hook: 2.5–3.0 mm
-
Polyester fiberfill stuffing
-
Floral/craft wire (stem & leaves)
-
Small pebbles or pellets (for pot weight)
-
Yarn needle, scissors, stitch markers
🔤 Abbreviations (US terms)
MR – magic ring
sc – single crochet
inc – increase (2 sc in same st)
dec – invisible decrease
sl st – slip stitch
ch – chain
hdc – half double crochet
dc – double crochet
FO – fasten off
🧩 Pattern Instructions
🌼 Flower Center (Brown, Make 2)
R1: MR 6 (6)
R2: inc x6 (12)
R3: (sc, inc) x6 (18)
R4: (2sc, inc) x6 (24)
R5: (3sc, inc) x6 (30)
R6: (4sc, inc) x6 (36)
R7: (5sc, inc) x6 (42)
R8: (6sc, inc) x6 (48)
R9: (7sc, inc) x6 (54)
R10: (8sc, inc) x6 (60)
Make 2 identical discs.
Sew together around edges, adding only light stuffing to keep them flat but slightly padded.
🌼 Petals (Yellow, Make 14–16)
Ch 8.
Row1: sc in 2nd ch, hdc, dc x4, hdc, sc. (7 sts)
Row2: ch 1, turn, sc, hdc, dc x4, hdc, sc.
Row3: repeat once more for thickness. FO.
Make 14–16 petals.
Sew around edge of flower center, slightly overlapping each petal for fullness.
🌿 Stem (Green)
R1: MR 6 (6)
R2: inc x6 (12)
R3: (sc, inc) x6 (18)
R4–30: sc around (18) FO.
Insert floral wire and stuff lightly. Sew securely to back of flower center.
🌿 Leaves (Green, Make 2)
Ch 15.
Row1: sc in 2nd ch, hdc, dc x10, hdc, sc. Continue around the other side of chain: sc, hdc, dc x10, hdc, sc. (work oval)
Row2: sc around entire leaf. FO.
Optional vein: surface crochet or sl st down the center of leaf.
Insert thin wire if desired, sew leaves onto stem about 1/3 down. Curve slightly outward.
🪴 Pot (Brown)
Base:
R1: MR 6 (6)
R2: inc x6 (12)
R3: (sc, inc) x6 (18)
R4: (2sc, inc) x6 (24)
R5: (3sc, inc) x6 (30)
R6: (4sc, inc) x6 (36)
R7: (5sc, inc) x6 (42)
Sides:
R8: sc BLO (42)
R9–18: sc around (42)
R19: (5sc, dec) x6 (36) → narrows top slightly. FO.
Fill pot base with stuffing + pellets for stability.
🧵 Assembly
-
Sew petals evenly around flower center.
-
Attach stem to bottom center of flower.
-
Sew leaves to stem and bend gently outward.
-
Insert stem into pot center, securing firmly with stitches.
-
Add stuffing tightly around stem inside pot for stability.
-
Close pot top neatly with sewing.
🌟 Finishing Touches
-
Slightly bend stem for a natural curve.
-
Angle leaves outward with a gentle twist.
-
Adjust petals so they fan out evenly in a circle.
-
Add weight (pebbles or pellets) inside pot to keep it from tipping.
🎉 Result
Your Amigurumi Sunflower in Pot is complete! With its bright padded petals, sturdy stem, textured leaves, and squat pot, this handmade sunflower will always stay in bloom. 🌻 Perfect for gifts, cheerful home décor, or craft fairs.