Create a buzzing haven with this Amigurumi Sunflower Bee Hut crochet pattern! This delightful design combines the warmth of a sunflower with the charm of a cozy bee home, making it the perfect addition to any nature-inspired collection. Whether you’re crafting for garden lovers, adding a whimsical touch to your decor, or simply enjoy making cheerful amigurumi designs, this pattern lets you stitch up a sunflower hut bursting with personality! With bright petals, a sturdy base, and tiny buzzing bees, this crochet creation brings a touch of handmade sunshine to every stitch. 🌻🐝✨
Designed for customization, this pattern allows you to experiment with different shades of yellow, embroidered details, or even tiny accessories like miniature bees or leaves for extra charm. Craft a classic sunflower hut with vibrant hues, create a pastel version for a softer aesthetic, or even stitch up a full set of garden-inspired amigurumi for a charming display! Whether gifted as a thoughtful keepsake, displayed as a cheerful accent, or made simply for the joy of crafting, this Amigurumi Sunflower Bee Hut is a fun and creative project—perfect for bringing a touch of handmade nature magic to every stitch! 🧶💖✨
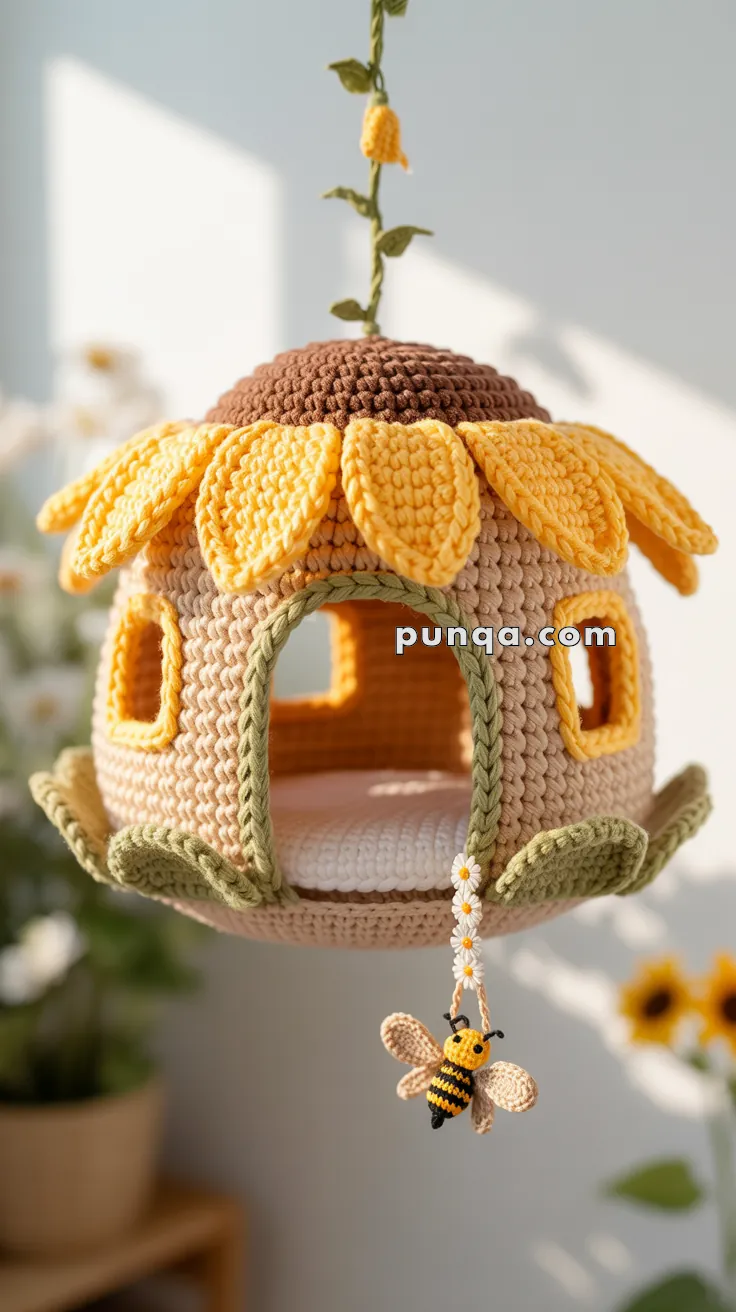
🌻 Amigurumi Sunflower Bee Hut Crochet Pattern
Bring a burst of sunshine to your home with this adorable hanging sunflower hut! With layered yellow petals, leafy trim, and a cute little bee dangling on a daisy chain, this cozy hut is perfect as a springtime ornament, plant room accent, or woodland-themed nursery piece. You can even tuck a tiny plush friend inside.
✨ Skill Level
Adventurous Beginner to Intermediate – Basic shaping, simple color changes, and small appliqué construction involved.
📏 Finished Size
Approximately 6 inches (15 cm) tall (excluding the vine) and 5 inches (13 cm) wide when using DK weight cotton yarn and a 3 mm hook.
🧶 Materials
- DK cotton yarn:
- Beige – hut walls (~25 g)
- Brown – roof (~15 g)
- Yellow – petals (~20 g)
- Olive – leaves, doorway trim, vine (~20 g)
- White – cushion, daisies (~10 g)
- Black & Golden Yellow – bee (small amounts)
- Crochet hook: 3.0 mm (2.75 mm for roof if you crochet loosely)
- Tapestry needle
- Stitch marker
- Fiberfill
- Plastic canvas or felt (optional for base support)
- Floral wire (optional for vine & bee wings)
🔤 Abbreviations (US Terms)
MR – Magic Ring
sc – single crochet
inc – increase (2 sc in one stitch)
dec – decrease (sc2tog)
hdc – half double crochet
dc – double crochet
tr – treble crochet
sl st – slip stitch
ch – chain
FO – fasten off
🧱 Base (Beige)
R1: MR, 6 sc (6)
R2: inc ×6 (12)
R3: (sc, inc) ×6 (18)
R4: (2 sc, inc) ×6 (24)
R5: (3 sc, inc) ×6 (30)
R6: (4 sc, inc) ×6 (36)
R7: (5 sc, inc) ×6 (42)
R8: sc around in BLO (42)
R9–R10: sc around (42)
FO and weave ends.
Optional: Insert stiff felt or plastic base circle inside for stability.
🏠 Hut Walls (Beige – One Arched Opening)
Join yarn to any stitch on R10.
R11–R15: sc around (42)
Front Arched Opening
Mark the center 18 stitches. Work over remaining 24 sts.
R16: sc 24, turn (24)
R17–R19: sc 24, turn (24)
Arch Bridge
R20: sc 6, ch 18 (skip the 18 opening sts), sc 6 (30)
R21: sc 6, 18 sc along ch arch, sc 6 (30)
R22: sc around, dec twice at arch curve to soften (28)
R23: sc around (28)
FO and weave ends.
Doorway Trim (Olive)
Join olive at right base of arch. Surface-sl st up, 1 sc in each arch st, sl st down left side.
Optional: Work 1 round of reverse-sc (crab stitch) for raised leafy texture.
🍯 Roof Dome (Brown – Smooth & Dense)
💡 Use firm tension or a 2.75 mm hook for tight, smooth stitches.
R1: MR, 6 sc (6)
R2: inc ×6 (12)
R3: (sc, inc) ×6 (18)
R4: (2 sc, inc) ×6 (24)
R5: (3 sc, inc) ×6 (30)
R6: (4 sc, inc) ×6 (36)
R7: (5 sc, inc) ×6 (42)
R8–R10: sc around (42)
R11: (5 sc, dec) ×6 (36)
R12: (4 sc, dec) ×6 (30)
R13: (3 sc, dec) ×6 (24)
R14: sc around (24)
Lightly stuff. FO leaving long tail.
Do not close — this edge is where petals attach.
🌼 Sunflower Petals (Yellow – Make 9)
R1: ch 12
R2: sc in 2nd ch, hdc, dc, dc, tr, tr, dc, dc, hdc, sc, 3 sc in last, continue opposite side: sc, hdc, dc, dc, tr, tr, dc, dc, hdc, sc (oval)
R3: ch 1, BLO sc around, inc at both tips (adds width)
R4: ch 1, sc 3, hdc 3, dc 4, tr 4, dc 4, hdc 3, sc 3, sl st to join
R5: ch 1, sc halfway along inner curve only (creates droop edge), FO long tail.
Attachment:
Sew petals evenly around the roof rim (9 total).
👉 Angle each petal downward at ~45° before sewing so they droop naturally, overlapping slightly for fullness.
🍃 Rounded Pad Leaves (Olive – Make 6)
R1: ch 9
R2: sc in 2nd ch, sc 6, 3 sc in last, turn, sc 6 on opposite side, 2 sc in first ch (18)
R3: ch 1, BLO sc around, inc at both tips (22)
R4: ch 1, sc 4, hdc 3, dc 4, dc 4, hdc 3, sc 4
R5: ch 1, reverse-sc (crab st) around for a rounded edge
FO, long tail.
Positioning:
👉 Sew leaves to R8 or base of R11 (very bottom edge of walls) for accuracy — leaves should cup slightly downward as in the photo.
☁️ Cushion / Floor Pad (White – Puffy Interior Pillow)
R1: MR, 6 sc (6)
R2: inc ×6 (12)
R3: (sc, inc) ×6 (18)
R4: (2 sc, inc) ×6 (24)
R5: (3 sc, inc) ×6 (30)
R6: (4 sc, inc) ×6 (36)
R7: (5 sc, inc) ×6 (42)
R8–R10: sc around (42)
FO one disc.
Make a second disc.
Join both discs with sl st around through both loops.
👉 Stuff generously while closing (aim for 2–3 cm thick) for a plump, puffy cushion visible through the opening.
🌱 Hanging Vine with Bud (Olive & Yellow)
R1: ch 70 (for shorter version, ch 60)
R2: sl st back along chain. FO.
Optional: crochet around floral wire for stability.
Leaves (4x)
R1: ch 6
R2: sc 4, 3 sc in last, rotate, sc 4 on opposite side (11)
FO and sew to vine at intervals.
Bud (Yellow)
R1: MR, 5 sc (5)
R2: inc ×5 (10)
R3: sc around (10)
FO, stuff lightly, sew to tip of vine.
Attachment:
👉 Sew vine to the exact center apex of the roof dome so it hangs naturally from the middle.
🌼 Daisy Chain & Bee
Daisy Chain (White)
R1: ch 12–15 (shorter for realism)
R2: (sl st, ch 3, 5 dc in same st, sl st) = 1 daisy
Repeat ×3, spacing 5–6 ch apart
FO.
Sew one end inside the top of the arch so it dangles midway through the opening.
Bee (Black & Yellow)
R1: MR, 6 sc (6)
R2: inc ×6 (12)
R3: (sc, inc) ×6 (18)
R4: sc around (18) – yellow
R5: sc around (18) – black
R6: sc around (18) – yellow
R7: (sc, dec) ×6 (12)
Stuff lightly.
R8: dec ×6 (6)
FO and close.
Wings (White – 2x)
R1: ch 5
R2: sc 4, 2 hdc in last, rotate, sc 4 back, sl st.
FO and sew to top.
Add antennae from black thread.
Attach bee to the bottom of daisy chain.
🧷 Final Assembly
1️⃣ Sew roof onto hut body (petal bases meet wall top).
2️⃣ Attach leaves to R8/base edge.
3️⃣ Insert and secure puffy cushion inside.
4️⃣ Attach vine at roof apex.
5️⃣ Sew daisy chain with bee to center of arch opening.
6️⃣ Adjust petals to droop evenly and leaves to curve outward.
🌟 Finishing Touches
✔ Petals angled downward ~45°
✔ Thick white cushion (2–3 cm puff) visible through entrance
✔ Leaves sewn to bottom edge (R8/R11 join)
✔ Daisy chain ~12–15 ch long
✔ Vine attached to exact roof apex
💡 Customization Ideas
- Add tiny fairy lights inside for a magical nightlight.
- Replace the bee with a ladybug, butterfly, or even a tiny gnome!
- Use gradient yarn for the petals for a sunset-inspired sunflower look.
This cheerful hut brings warm floral vibes and a splash of fun to any space. Happy stitching! 🌻🐝


So beautiful! Thank you very-very much!!