Celebrate individuality and stitch up some Seussian charm with this Amigurumi Sneetch crochet pattern! Inspired by the whimsical creatures from Dr. Seuss’s classic tale, this design brings both Star-Bellied and Plain-Bellied Sneetches to life with playful shapes, expressive features, and a whole lot of heart. Whether you’re crafting for a storybook fan, teaching a lesson in kindness, or simply love quirky characters, these Sneetches are ready to march into your handmade world—one loop at a time. 🧶⭐🐾
Designed for storytelling and flair, this pattern invites you to explore bold colorwork, sculpted shaping, and fun extras like stars, hats, or even a tiny beach scene. Customize your Sneetches to reflect their personalities or create a whole community to spark conversation and smiles. Whether perched on a shelf, nestled in a gift basket, or starring in a handmade tribute to Dr. Seuss, this Sneetch Amigurumi is a joyful and satisfying project—perfect for stitching up a little handmade harmony, one loop at a time! 💖✨📚
⭐ Amigurumi Sneetch Crochet Pattern
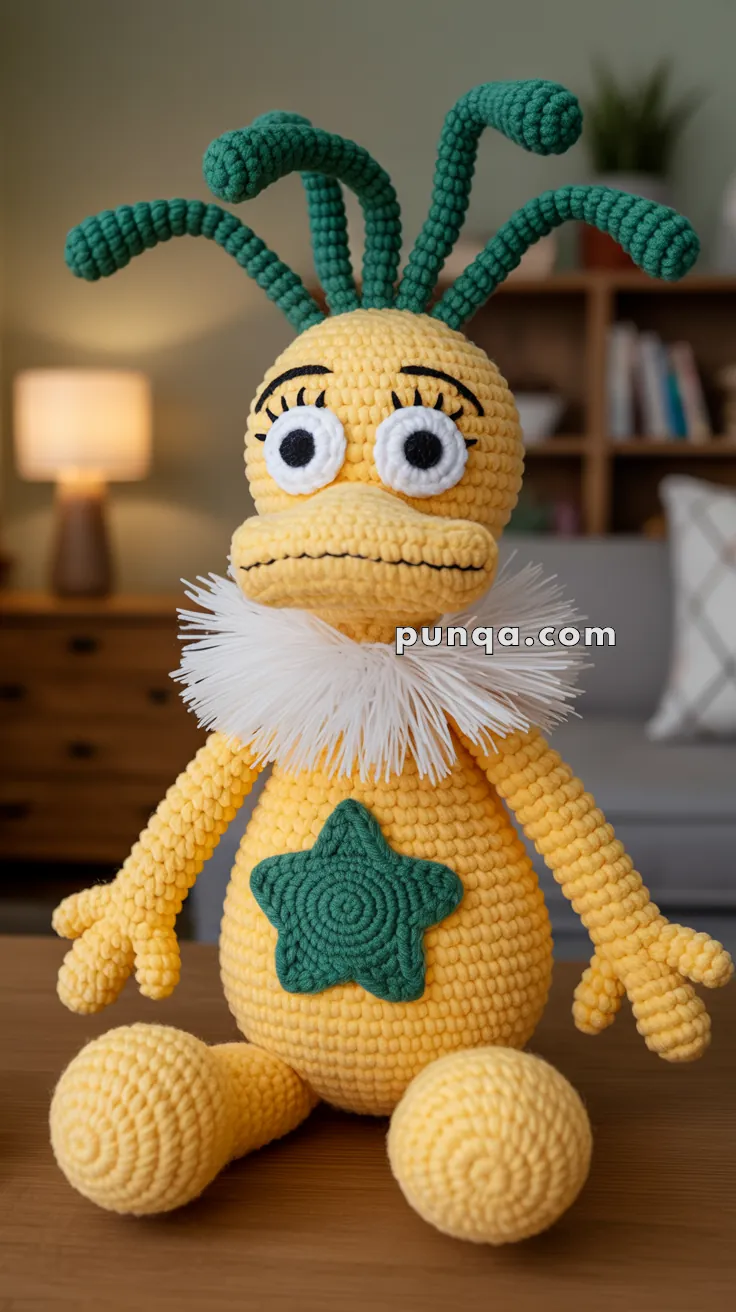
Bring a touch of whimsical fun to your crochet collection with this lovable yellow Sneetch-inspired amigurumi! 💛 With his oversized oval eyes, expressive eyebrows, long bendable antennae, fluffy feather-like collar, and signature green belly star, this charming character is instantly recognizable. His long limbs, oversized feet, and cheerful expression make him a delightful project for fans of classic storybook characters and unique handmade décor.
This pattern creates a large, cuddly display doll with carefully sculpted features and plenty of personality. The head, muzzle, body, and limbs are worked separately before assembly, creating smooth shaping and accurate proportions.
✨ Skill Level
Intermediate
This pattern includes:
- ⭐ Separate sculpted muzzle
- 👀 Layered crocheted eyes
- 🌿 Stuffed bendable antennae
- 🤍 Feather-style neck collar
- ✋ Hands with thumb and fingers
- 🦶 Oversized rounded feet
- 🧵 Multi-piece assembly
📏 Finished Size
Using DK chenille or plush yarn with a 3.5 mm hook, the finished doll measures approximately:
34–36 cm (13½–14 in) tall while seated.
🧶 Yarn Requirements
Yellow (body, head, muzzle, arms, legs, hands, feet) – 220 g
Dark Green (antennae & belly star) – 45 g
White (eyes & collar base) – 35 g
Black (pupils & embroidery) – 10 g
Optional:
White eyelash yarn or brushable acrylic for an extra fluffy collar.
🧵 Materials
- 3.5 mm crochet hook
- 10 mm black safety eyes (optional if not crocheting pupils)
- Polyester fiberfill
- Tapestry needle
- Stitch markers
- Floral wire or pipe cleaners (5 pieces, approximately 18 cm each)
- White brushable acrylic yarn or fringe yarn for the collar
- Scissors
🔤 Abbreviations (US Terms)
MR – Magic Ring
sc – Single Crochet
inc – Increase
dec – Invisible Decrease
hdc – Half Double Crochet
sl st – Slip Stitch
ch – Chain
BLO – Back Loop Only
FO – Fasten Off
Work in continuous rounds unless otherwise noted.
💛 Head
The head is almost perfectly round with a slightly flattened top to support the antennae.
Using yellow yarn:
R1
MR 6
(6)
R2
inc x6
(12)
R3
(1 sc, inc) ×6
(18)
R4
(2 sc, inc) ×6
(24)
R5
(3 sc, inc) ×6
(30)
R6
(4 sc, inc) ×6
(36)
R7
(5 sc, inc) ×6
(42)
R8
(6 sc, inc) ×6
(48)
R9–18
sc around
(48)
Do not insert eyes yet.
R19
(6 sc, dec) ×6
(42)
R20
(5 sc, dec) ×6
(36)
Stuff firmly.
R21
(4 sc, dec) ×6
(30)
R22
(3 sc, dec) ×6
(24)
R23
(2 sc, dec) ×6
(18)
R24
(1 sc, dec) ×6
(12)
R25
dec ×6
(6)
Fasten off.
The head should remain smooth and firmly stuffed.
👄 Muzzle
The muzzle is a separate stuffed oval that projects forward from the face.
Using yellow yarn:
R1
Ch 8.
Starting in the second chain:
6 sc
3 sc in last chain.
Continue along opposite side:
5 sc
inc
(16)
R2
inc
5 sc
3 inc
5 sc
2 inc
(22)
R3
sc around
R4
inc
9 sc
inc
9 sc
(24)
R5–7
sc around
(24)
Lightly stuff.
Flatten the opening.
Fasten off with a long sewing tail.
When sewn to the face, the muzzle should sit directly beneath the eyes and extend outward noticeably.
👀 Eyes (Make 2)
The eyes are oversized crocheted circles that create the character’s playful expression.
Using white yarn:
R1
MR 6
R2
inc around
(12)
R3
(1 sc, inc) ×6
(18)
R4
(2 sc, inc) ×6
(24)
Fasten off.
Pupils (Make 2)
Using black yarn:
R1
MR 6
R2
inc around
(12)
Fasten off.
Sew each pupil slightly above the center of the white eye.
Attach the completed eyes close together above the muzzle.
😊 Face Details
Using black embroidery thread:
🖤 Embroider a long straight mouth across the center of the muzzle.
🖤 Stitch long curved eyelashes above each eye.
🖤 Add thick curved eyebrows positioned high above the eyes for an expressive look.
🌿 Antennae (Make 5)
Each antenna is thick, gently curved, and finishes with a rounded bulb.
Using green yarn:
Stem
R1
MR 6
R2–18
sc around
(6)
Insert floral wire before closing.
Rounded Tip
R19
inc around
(12)
R20–22
sc around
R23
dec around
(6)
Lightly stuff the bulb.
Fasten off.
Create five identical antennae.
Arrange them in a fan shape across the top of the head.
The center antenna should stand nearly upright while the outer antennae curve outward naturally.
💛 Body
The body is pear-shaped with a wide rounded base and narrower shoulders.
Using yellow yarn:
R1
MR 6
(6)
R2
inc x6
(12)
R3
(1 sc, inc) ×6
(18)
R4
(2 sc, inc) ×6
(24)
R5
(3 sc, inc) ×6
(30)
R6
(4 sc, inc) ×6
(36)
R7
(5 sc, inc) ×6
(42)
R8
(6 sc, inc) ×6
(48)
R9
(7 sc, inc) ×6
(54)
R10–22
sc around
(54)
Stuff firmly as you work.
R23
(7 sc, dec) ×6
(48)
R24
(6 sc, dec) ×6
(42)
R25
(5 sc, dec) ×6
(36)
Continue stuffing until the body feels solid and keeps its pear shape.
Leave the opening unclosed for attaching the head later.
💪 Arms (Make 2)
The arms are long, slim cylinders that hang naturally beside the body. Each hand features three fingers and one thumb, giving the finished character its signature expressive look.
Using yellow yarn.
Upper Arm
R1
MR 6
(6)
R2
inc around
(12)
R3–24
sc around
(12)
Stuff only the upper half of the arm.
Leave the wrist slightly soft so the fingers can be posed naturally.
✋ Hand
Continue from the arm.
Thumb
Ch 4.
Starting in the second chain:
sl st
sc
sl st into the arm.
Finger One
Ch 5.
Starting in the second chain:
sl st
sc
sc
sl st into next stitch.
Finger Two
Repeat Finger One.
Finger Three
Repeat Finger One.
Fasten off.
Arrange the fingers slightly apart before sewing the arm to the body.
🦶 Legs (Make 2)
The legs are short compared to the body, ending in oversized rounded feet that allow the doll to sit comfortably.
Using yellow yarn.
Foot
R1
MR 6
(6)
R2
inc around
(12)
R3
(1 sc, inc) ×6
(18)
R4
(2 sc, inc) ×6
(24)
R5
(3 sc, inc) ×6
(30)
R6–10
sc around
(30)
Stuff firmly.
The foot should become a plump oval.
Leg
R11
(3 sc, dec) ×6
(24)
R12
(2 sc, dec) ×6
(18)
R13
(1 sc, dec) ×6
(12)
R14–26
sc around
(12)
Stuff lightly.
Flatten the opening.
Fasten off.
Make a second identical leg.
⭐ Belly Star
The belly star is a thick appliqué with softly rounded points instead of sharp, thin points.
Using green yarn.
Center
R1
MR 6
R2
inc around
(12)
R3
(1 sc, inc) ×6
(18)
R4
(2 sc, inc) ×6
(24)
Star Points
Work five points evenly around the circle.
For each point:
Ch 5
Starting in the second chain:
sl st
sc
hdc
sc
sl st into the next stitch of the center.
Repeat five times.
Fasten off.
Lightly steam the star so each point curves gently outward.
Sew to the center of the tummy.
🤍 Feather Collar
One of the most distinctive features is the fluffy white collar surrounding the neck.
Collar Base
Using white yarn.
R1
Chain 28.
Join carefully without twisting.
R2
sc around
(28)
R3
sc around
Fasten off.
Adding the Fringe
Cut approximately 120–140 strands of white yarn measuring 9–10 cm each.
Attach every strand using a lark’s head knot around both rows of the collar.
Once all strands are attached:
- Trim evenly.
- Separate the yarn plies with a tapestry needle.
- Brush gently using a pet slicker brush until the collar becomes soft and feather-like.
Sew the completed collar around the neck after attaching the head.
🌿 Positioning the Antennae
Arrange the five antennae before sewing.
The layout should resemble a fan:
- 🌿 One antenna centered vertically.
- 🌿 Two slightly behind the center.
- 🌿 Two sweeping outward toward each side.
Because each antenna contains floral wire, gently bend them into relaxed curves.
The rounded tips should point in different directions for a playful expression.
🧵 Preparing for Assembly
Before joining all the pieces together:
- Check that both arms are identical in length.
- Make sure both feet sit flat.
- Confirm the star is centered.
- Test the antenna arrangement before stitching permanently.
- Brush the collar once more after trimming.
At this stage you should have:
✅ Head
✅ Muzzle
✅ Body
✅ Two arms
✅ Two legs
✅ Five antennae
✅ Two eyes
✅ Belly star
✅ Feather collar
Everything is now ready for final assembly.
🪡 Assembly
Now it’s time to bring your whimsical character to life! Take your time during assembly, pinning each piece in place before sewing. Small adjustments make a big difference in the finished expression.
Step 1 – Attach the Muzzle
Center the muzzle directly beneath the eyes.
The top edge should slightly overlap the lower edge of the eye circles, creating the characteristic protruding face.
Lightly stuff once more before closing the final stitches if needed.
Step 2 – Attach the Eyes
Position the two oversized eyes close together above the muzzle.
The inner edges should almost touch.
Before sewing permanently, check that both pupils point in the same direction for a balanced expression.
Step 3 – Attach the Head
Sew the head securely onto the narrow top of the body.
The head should sit perfectly centered without leaning.
Because the body is pear-shaped, the neck should appear short and almost hidden beneath the fluffy collar.
Step 4 – Attach the Arms
Position the arms just below the collar line.
Allow them to angle naturally downward.
The fingertips should rest slightly forward rather than hanging straight beside the body.
This relaxed pose matches the character’s gentle personality.
Step 5 – Attach the Legs
Sew both legs near the front underside of the body.
The oversized feet should extend forward, allowing the doll to sit comfortably without additional support.
Angle the feet outward slightly for a playful appearance.
Step 6 – Attach the Belly Star
Center the green star on the widest part of the tummy.
Take tiny invisible stitches around the outside edge only.
Do not stitch through the center of the star, allowing it to lift slightly for extra dimension.
Step 7 – Add the Collar
Wrap the feather-style collar completely around the neck.
Sew the inside edge to the neckline using matching white yarn.
Fluff the fringe again after sewing so it completely hides the neck seam.
The finished collar should look soft, full, and cloud-like.
Step 8 – Attach the Antennae
Arrange the five antennae across the top of the head.
Position them as follows:
🌿 One centered vertically
🌿 Two slightly behind the center
🌿 One curving toward the left
🌿 One curving toward the right
Gently bend each wire until the antennae form relaxed flowing curves.
Their rounded tips should point in slightly different directions, giving the character a lively appearance.
😊 Facial Embroidery
Using black embroidery thread:
🖤 Stitch a long straight mouth across the center of the muzzle.
🖤 Embroider thick curved eyebrows above each eye.
🖤 Add several long eyelashes sweeping upward from the upper edge of each eye.
Keep all embroidery bold and clean to maintain the playful cartoon style.
✨ Final Shaping
Before weaving in the final ends, spend a few minutes shaping the finished doll.
💛 Massage the stuffing inside the body until it forms a smooth pear shape.
👄 Gently press the sides of the muzzle so it projects evenly.
👀 Rotate the eyes slightly if needed to improve the expression.
🌿 Bend each antenna into a slightly different curve.
🦶 Turn the feet outward just a little so the doll sits comfortably.
🤍 Fluff the collar one last time with your fingers or a soft brush.
These finishing touches give the doll its cheerful personality.
💡 Designer Tips
A few small details will make your finished project look especially polished.
- Stuff the body more firmly than the head to keep the pear shape.
- Leave the wrists lightly stuffed so the fingers remain flexible.
- Sew the star on only after attaching the arms to ensure perfect placement.
- Brush the collar after assembly rather than before.
- Shape the antennae gradually to avoid sharp bends in the wire.
🎁 Display Ideas
This whimsical character makes a delightful addition to many settings.
📚 Display on a bookshelf with favorite storybooks.
🧸 Add to a child’s reading corner.
🎉 Include in themed party decorations.
🎁 Give as a handmade birthday or holiday gift.
🪴 Place beside houseplants for a playful touch of color.
Its oversized feet and rounded body allow it to sit securely on shelves, desks, or display cabinets.
🧼 Care Instructions
To keep your handmade creation looking its best:
🧽 Spot clean with a damp cloth when needed.
☀️ Allow to air dry completely.
🚫 Do not machine wash, as the collar and antennae may lose their shape.
📦 Store away from direct sunlight to preserve the bright colors.
If the collar becomes flattened, gently brush it with a pet slicker brush or fine comb to restore its fluffy appearance.
🌟 Final Thoughts
Congratulations on finishing your adorable Sneetch-inspired amigurumi! 💛⭐
With its expressive oversized eyes, cheerful smile, playful antennae, fluffy white collar, and signature green star, this whimsical character is full of personality and charm. The carefully sculpted proportions and thoughtful details make it a delightful display piece that’s sure to bring smiles wherever it goes.
Whether you’re creating it for your own collection, surprising a fellow crochet enthusiast, or making a heartfelt handmade gift, this charming project is one you’ll be proud to display for years to come.
Thank you for crocheting along! 🧶✨
May every stitch bring joy, creativity, and a little extra whimsy to your handmade world.
Happy Crocheting! 💛🌿⭐