Welcome to the cheerful and colorful world of amigurumi! 🐝✨ Today, I’m excited to share my free crochet pattern for an Amigurumi Rainbow Bee—a vibrant and whimsical creation perfect for nature lovers, playful décor, or anyone who enjoys crafting expressive and eye-catching plush designs! 🌈 Whether you love stitching up adorable insects, creating textured and detailed figures, or simply want to add a bright and joyful bee to your handmade lineup, this pattern will guide you through crafting a beautifully sculpted plush with bold rainbow stripes, tiny wings, and a touch of buzzing charm! 💖
This design embraces vivid colors, rounded shapes, and delightful details to bring a fun and uplifting presence to your crochet projects! 🧶✨ I’ve carefully outlined each step to ensure your Amigurumi Rainbow Bee turns out just right—ready to brighten up your space or become a treasured handmade gift! 🎁 So grab your hooks, pick out fiery reds, sunny yellows, cool blues, and lush greens, and let’s stitch up a dazzling bee! 🐝
🌈🐝 Amigurumi Rainbow Bee Crochet Pattern
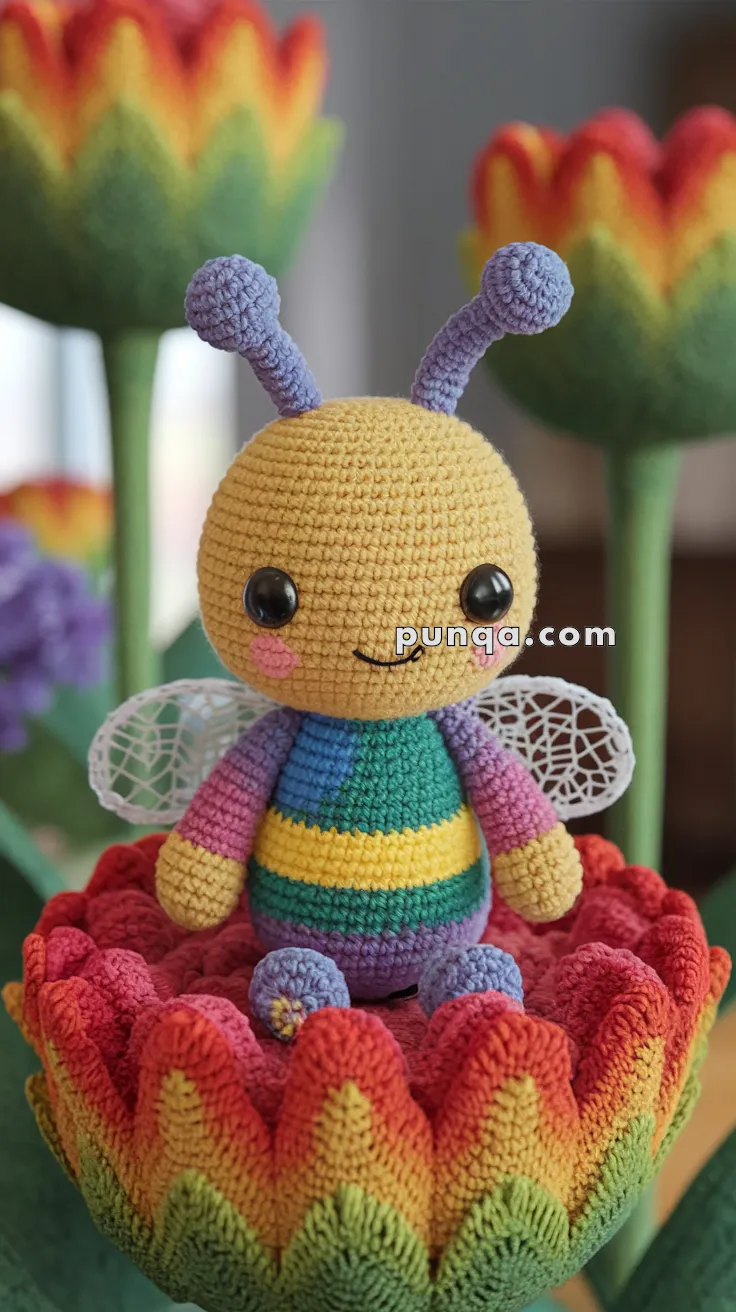
This sweet Rainbow Bee is buzzing with charm! With a cheerful yellow head, rainbow-striped body, pastel antennae, and delicate lace-like wings, it’s the perfect handmade friend to brighten up any room.
✨ Skill Level
Intermediate – involves color changes, amigurumi shaping, and light detail work.
📏 Finished Size
Approx. 18–20 cm (7–8 in) tall when made with DK yarn and a 2.5–3 mm hook.
🧶 Materials
-
Yarn (DK cotton or acrylic):
-
Yellow (head, arms, one stripe)
-
Teal (upper body stripe)
-
Green (lower body stripe)
-
Purple (base, feet, antennae)
-
-
Crochet hook: 2.5–3.0 mm
-
2 Safety eyes (12 mm black)
-
Fiberfill stuffing
-
Fine white thread or lace yarn (for wings)
-
Yarn needle, scissors, stitch markers
-
Blush or pink felt (cheeks)
🔤 Abbreviations (US terms)
MR – magic ring
sc – single crochet
inc – increase (2 sc in same st)
dec – invisible decrease
sl st – slip stitch
ch – chain
FO – fasten off
🧩 Pattern Instructions
🟡 Head (Yellow)
R1: MR 6 (6)
R2: inc x6 (12)
R3: (sc, inc) x6 (18)
R4: (2sc, inc) x6 (24)
R5: (3sc, inc) x6 (30)
R6: (4sc, inc) x6 (36)
R7–14: sc around (36)
👉 Place safety eyes between R10–11, about 7–8 sts apart.
👉 Embroider a small black smile and add blush circles on cheeks.
R15: (4sc, dec) x6 (30)
R16: (3sc, dec) x6 (24)
R17: (2sc, dec) x6 (18)
Stuff firmly. FO, leaving tail to sew to body.
🌈 Body
Stripe sequence (top → bottom):
-
R1–6: Teal
-
R7–12: Yellow
-
R13–18: Green
-
R19–20: Purple base
R1: MR 6 (6)
R2: inc x6 (12)
R3: (sc, inc) x6 (18)
R4: (2sc, inc) x6 (24)
R5: (3sc, inc) x6 (30)
R6–20: Work in color stripes as above (30)
R21: (3sc, dec) x6 (24)
R22: (2sc, dec) x6 (18)
R23: (sc, dec) x6 (12)
R24: dec x6 (6) FO.
Stuff firmly, making sure color transitions are smooth.
💜 Antennae (Make 2, Purple)
R1: MR 6 (6)
R2–4: sc around (6) → forms ball tip
R5–12: sc around (6) → stalk
Stuff lightly, FO.
Sew symmetrically to top of head.
🌸 Arms (Make 2, Yellow)
R1: MR 6 (6)
R2–6: sc around (6)
FO, stuff lightly.
Sew to body at sides (R9–10).
💜 Feet (Make 2, Purple with Yellow dot)
R1: MR 6 (6)
R2: inc x6 (12)
R3: sc around (12)
R4: (sc, dec) x4 (8)
R5: sc around (8), FO.
Stuff, sew to bottom of body. Optionally embroider or surface-stitch a tiny yellow circle on top of each foot as in photo.
🪽 Wings (Make 4, White thread)
Each Wing:
Ch 10.
Row 1: sc in 2nd ch, hdc, dc x5, hdc, sc (oval shape).
Row 2: Continue working around chain with same sts to mirror shape.
FO.
👉 Make 4 wings total (2 per side).
Sew in pairs to back of body at R10–11.
For a delicate look, use fine thread or attach lace motifs.
🧵 Assembly
-
Sew head securely to body.
-
Attach arms at mid-body, legs at bottom sides.
-
Place antennae on head, angled slightly outward.
-
Sew wings symmetrically at back.
-
Embroider smile and blush cheeks if not already done.
🌟 Finishing Touches
-
Firm stuffing is key for the round head and body.
-
Curve wings outward for a lively, fluttering effect.
-
Use soft pastel shades for the rainbow effect to match the photo.
🎉 Result
Your Amigurumi Rainbow Bee is complete! 🐝🌈 With its happy face, striped pastel body, tiny purple feet, and lacey wings, this bee is as cute as it is colorful — ready to buzz into your handmade collection.