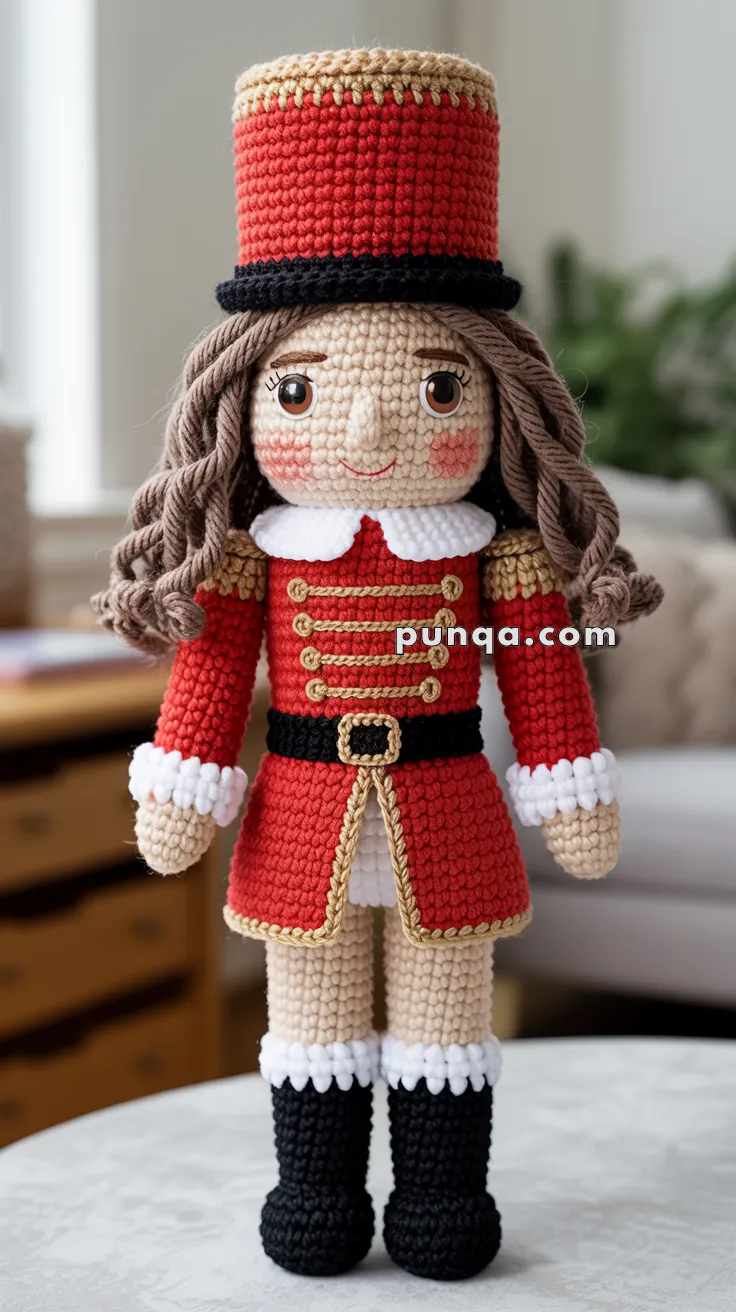
Step into the magic of the holidays with the Amigurumi Nutcracker Doll, a crochet project that’s as elegant as it is festive! 🎄🧶 Inspired by the timeless holiday figurine, this design features a tall red hat, a detailed military-style coat, and soft curled yarn hair that brings classic charm to life. With sturdy black boots and a regal silhouette, this Nutcracker is ready to stand guard as a cheerful centerpiece in your seasonal décor.
Perfect for gifting, displaying on a mantel, or adding to your handmade holiday collection, this doll captures the spirit of tradition with a cozy, handmade twist. Fun to stitch and delightful to showcase, the Amigurumi Nutcracker Doll is a joyful way to crochet elegance, character, and a sprinkle of handmade magic—one loop at a time! ✨🎁🧵
🎄Nutcracker Amigurumi Doll – Crochet Pattern
Bring timeless holiday charm to your crochet collection with this elegant Nutcracker amigurumi. Designed with clean proportions and thoughtful construction, this doll features a tailored split-front coat, softly cascading corded curls, sculpted boots, and rich decorative details that give it a refined, collectible look. Every element is worked with structure and balance in mind, resulting in a standing figure that feels polished and intentional from every angle—perfect for festive décor, gifting, or a cherished handmade keepsake.
All instructions are written in US crochet terms and formatted for smooth, enjoyable stitching.
✨ Skill Level
Intermediate — this pattern involves working in both rounds and rows, shaping garments with a split front, creating corded hair, adding surface embellishments, and assembling layered pieces for a structured finish.
📏 Finished Size
Approximately 30–32 cm (12–12.5 inches) tall
(Size may vary depending on yarn choice and tension.)
🧶 Materials
- DK or Sport weight cotton yarn:
- Skin tone (head, hands, upper legs)
- Red (hat, coat)
- Black (hat band, belt, boots)
- White (collar, cuffs, inner panel, sock trim)
- Beige/Tan (pants)
- Gold/Mustard (braids, trim, epaulettes, buckle)
- Light brown (hair cords)
- 2.5–3.0 mm crochet hook
- Safety eyes (10–12 mm)
- Fiberfill stuffing
- Yarn needle
- Stitch marker
- Optional: thin cardboard circle for hat structure
✂️ Abbreviations (US Terms)
MR – magic ring
sc – single crochet
inc – increase (2 sc in same stitch)
dec – decrease (sc2tog)
sl st – slip stitch
ch – chain
BLO – back loop only
FLO – front loop only
( ) – stitch count
🧵 Head (Skin Tone)
- MR 6
- inc x6 (12)
- (sc, inc) x6 (18)
- (2 sc, inc) x6 (24)
- (3 sc, inc) x6 (30)
- (4 sc, inc) x6 (36)
7–12. sc around (36)
Insert safety eyes between Rounds 9–10, about 7 stitches apart.
- (4 sc, dec) x6 (30)
- (3 sc, dec) x6 (24)
- (2 sc, dec) x6 (18)
Stuff firmly - (sc, dec) x6 (12)
- dec x6 (6)
Fasten off and close.
Face Details
Embroider gently arched eyebrows in brown, a small curved smile in pink or red, and lightly blush the cheeks.
💇 Hair Cords (Light Brown)
Create 8–10 uniform cords.
- ch 65–80
- sl st in each chain back to the start
- Allow each cord to twist naturally into a spiral
Attachment
Form two side bundles using 2–3 cords each. Attach each bundle at two points—one near the hat line and one near the jawline—so the cords drape past the shoulders and frame the face. Attach remaining cords at the back center of the head, leaving the front face area clear.
🎩 Hat
Hat Top (Red)
- MR 6
- inc x6 (12)
- (sc, inc) x6 (18)
- (2 sc, inc) x6 (24)
- (3 sc, inc) x6 (30)
6–14. sc around (30)
Hat Band (Black)
15–16. Change to black, sc around (30)
Fasten off. The black band forms the lower edge of the hat.
Optional: insert a thin cardboard circle inside the top for extra structure.
👕 Upper Torso (Skin Tone)
- MR 6
- inc x6 (12)
- (sc, inc) x6 (18)
- (2 sc, inc) x6 (24)
5–6. sc around (24)
Do not fasten off.
🤍 Inner White Panel (Worked in Rows)
Attach white yarn at the center front of the torso.
Row 1: ch 1, sc across 6 sts, turn
Rows 2–14: ch 1, sc across 6 sts, turn
Fasten off.
The panel extends from the neckline to just below the belt line and remains visible between the coat flaps.
🧥 Coat (Red, Worked in Rows)
Attach red yarn at the right shoulder edge.
Upper Coat
Row 1: ch 1, sc across 18 sts, turn
Rows 2–12: ch 1, sc across, turn
Coat Skirt (Split Front)
Row 13: ch 1, inc, sc to last st, inc, turn (20)
Row 14: ch 1, inc, sc across, inc, turn (22)
Row 15: ch 1, inc, sc across, inc, turn (24)
Row 16: ch 1, inc, sc across, inc, turn (26)
Fasten off. The straight inner edges form the two front coat flaps.
🎖 Decorative Details
Gold Chest Braids
Using gold yarn, add five raised horizontal braids across the chest, evenly spaced between the collar and belt. Finish each end with a small rounded knot for a buttoned look.
Collar (White)
Attach white yarn around the neckline.
(sl st, 5 sc in next stitch) repeat evenly around. Fasten off.
Epaulettes (Make 2)
- MR 5
- sc around (5)
Fasten off, lightly pad, and set aside.
🪢 Belt (Black with Gold Buckle)
- ch 30, sc across
- Sew around the waist slightly below the chest braids
- Embroider a raised gold rectangle at the center front for the buckle
🧤 Arms (Make 2)
Hands (Skin Tone)
- MR 6
- inc x6 (12)
3–5. sc around (12)
Cuff (White)
- Change to white, sc around (12)
Sleeve (Red)
7–14. Change to red, sc around (12)
Stuff lightly.
🦵 Legs (Make 2)
Upper Leg (Skin Tone)
- MR 6
- inc x6 (12)
3–8. sc around (12)
Pants (Beige/Tan)
9–13. Change to beige/tan, sc around (12)
Sock Trim (White)
- Change to white: (sl st, 3 sc in next st) repeat around
Boots (Black)
- Change to black, sc around (12)
- (2 sc, inc) x4 (16)
- sc around (16)
- dec x4, sc 8 (12)
19–21. sc around (12)
Stuff firmly. Pinch the final 3–4 rounds flat and stitch through both layers to form a stable sole. Fasten off.
🧩 Assembly
- Sew legs to the bottom of the torso, evenly spaced.
- Pin the coat to the torso, aligning the front opening with the white panel.
- Stitch coat at the shoulders and along the sides, stopping above the waist.
- Insert arms through the coat openings and stitch them from inside the coat.
- Sew the head securely to the torso.
- Attach epaulettes to the coat shoulders.
- Position and stitch the hat in place.
- Arrange hair cords evenly around the shoulders.
🎀 Finishing Touches
Using gold yarn, work surface slip stitches along the front edges of the coat, down the inside edges of the coat tails where they meet at the bottom center, and around the hem. Make sure the white inner panel remains visible and the coat drapes freely.
Your Nutcracker amigurumi is now complete, showcasing tailored layers, graceful curls, and classic decorative details. This timeless figure brings a festive elegance to any space and makes a truly special handmade heirloom. 🧶🎄


Очень понравился сайт.