Welcome to the adventurous and playful world of amigurumi! 🚁✨ Today, I’m excited to share my free crochet pattern for an Amigurumi Helicopter—a fun and dynamic creation perfect for aviation enthusiasts, toy collectors, or anyone who enjoys crafting unique and detailed plush designs! 🧶 Whether you love stitching up vehicles, creating textured and lifelike figures, or simply want to add a charming helicopter to your handmade lineup, this pattern will guide you through crafting a beautifully sculpted plush with spinning rotors, sturdy skids, and a touch of airborne excitement! 💨
This design embraces bold shapes, vibrant colors, and intricate details to bring a lively and adventurous presence to your crochet projects! 🧶✨ I’ve carefully outlined each step to ensure your Amigurumi Helicopter turns out just right—ready to soar into your collection or become a treasured handmade gift! 🎁 So grab your hooks, pick out bright reds, cool blues, or classic grays, and let’s stitch up a high-flying helicopter! 🚁
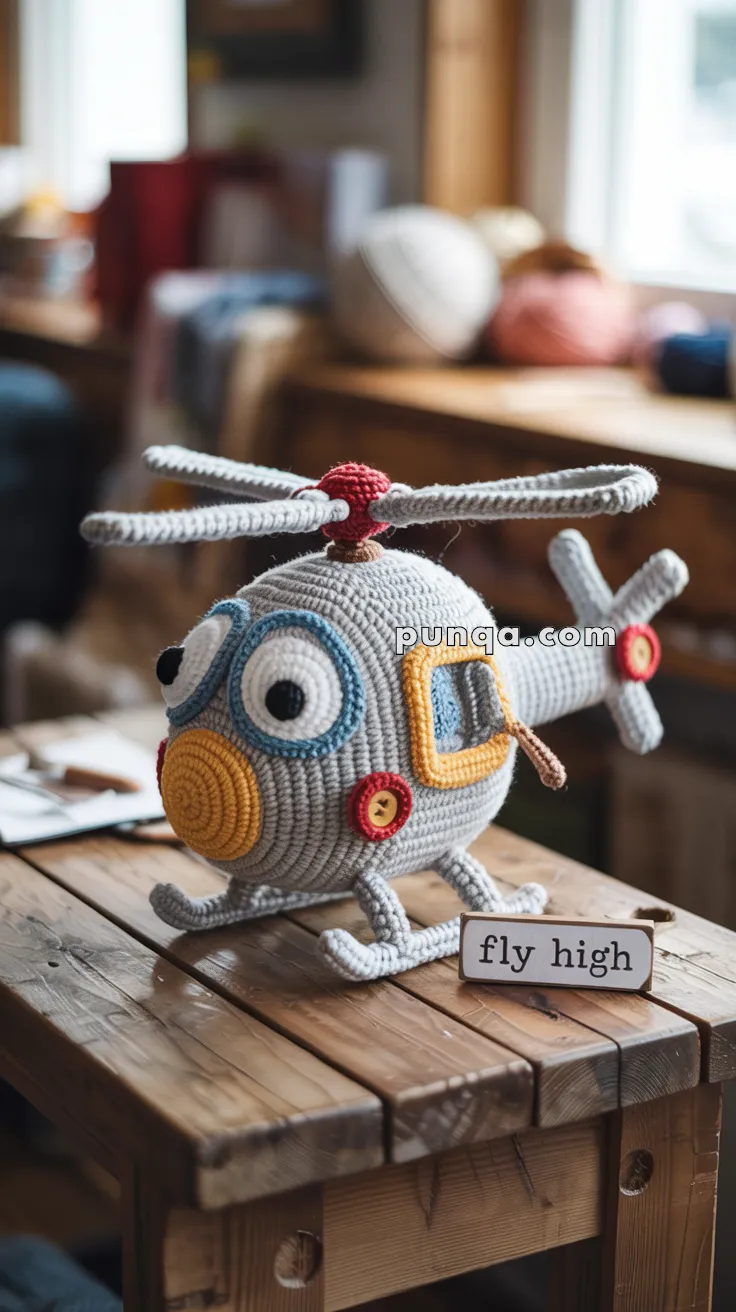
🚁 Amigurumi Helicopter Crochet Pattern
Soar into creativity with this adorable Amigurumi Helicopter! With its round body, bright windows, cheerful eyes, and spinning rotors, this pattern brings charm and motion to any handmade collection. Whether for a nursery, aviation fan, or simply to brighten your workspace, this helicopter will lift your spirits sky-high! 🌤️
✨ Skill Level
Intermediate – involves shaping, color changes, and assembling multiple 3D parts.
📏 Finished Size
Approximately 25–28 cm long × 18–20 cm tall (with blades), made with worsted-weight yarn and a 3.5 mm hook.
🧶 Materials
- Worsted weight yarn in:
- Light Gray – main body, tail, skids
- Red – rotor hubs, side button
- Yellow – nose cone, tail medallion center, window frame
- Blue – eye outlines, side window glass
- White – eyes
- Black – pupils
- Tan – washer under rotor hub
- Brown – door handle
- 3.5 mm crochet hook
- Polyester fiberfill stuffing
- Tapestry needle
- Stitch markers
- Optional: wire or pipe cleaners (for rotor and skid stiffness)
- Optional: small wooden buttons (for extra side detailing)
🧵 Abbreviations (US Terms)
MR – Magic Ring
sc – Single Crochet
inc – Increase (2 sc in one stitch)
dec – Decrease (sc2tog)
sl st – Slip Stitch
ch – Chain
BLO – Back Loop Only
FO – Fasten Off
✈️ Main Body (Gray)
- MR, 6 sc (6)
- inc ×6 (12)
- (sc, inc) ×6 (18)
- (2 sc, inc) ×6 (24)
- (3 sc, inc) ×6 (30)
- (4 sc, inc) ×6 (36)
- (5 sc, inc) ×6 (42)
8–25. sc around (42) — this forms the long fuselage. - (5 sc, dec) ×6 (36)
- (4 sc, dec) ×6 (30)
- (3 sc, dec) ×6 (24)
- (2 sc, dec) ×6 (18)
- (sc, dec) ×6 (12)
- dec ×6 (6)
FO and close. Stuff firmly.
🌕 Nose Cone (Yellow – Ribbed)
- MR, 6 sc (6)
- BLO inc ×6 (12)
- BLO (sc, inc) ×6 (18)
- BLO (2 sc, inc) ×6 (24)
5–7. BLO sc around (24)
FO, stuff lightly, and sew to the front of the fuselage.
Tip: working in BLO creates the perfect spiral ridges like in the photo.
👀 Eyes (Make 2)
White Domes:
- MR, 6 sc (6)
- inc ×6 (12)
- (sc, inc) ×6 (18)
- (2 sc, inc) ×6 (24)
FO.
Blue Outlines:
- MR, 6 sc (6)
- inc ×6 (12)
- (sc, inc) ×6 (18)
- (2 sc, inc) ×6 (24)
FO.
Black Pupils:
MR, 5 sc (5), FO.
Sew pupils to white domes slightly upward for an expressive look.
Then attach blue outlines around each white dome and sew both eyes slightly tilted at the front, just above and beside the yellow nose.
🪟 Side Window (Yellow Frame + Blue Pane)
Blue Pane:
CH 10.
R1: sc across (9).
R2–3: sc around edges with slight increases in corners for a rounded rectangle. FO.
Yellow Frame:
CH 12.
R1: sc across, 3 sc in last st, rotate and continue along other side, 2 sc in last. (24)
R2: sc around, inc at corners for smooth shaping. FO.
Assembly:
Sew blue pane to side of helicopter, then attach yellow frame on top.
Brown Handle:
CH 8, sl st back along chain to form a firm strip. FO and sew horizontally across one edge of the frame so it sticks out like a small handle.
🌪️ Main Rotor (Top)
Blade Tubes (Make 4, Gray):
- MR, 6 sc (6)
- (1 sc, inc) ×3 (9)
3–38. sc around (9) – approx. 14–15 cm long
Lightly stuff as you go. FO.
Red Rotor Hub:
- MR, 6 sc (6)
- inc ×6 (12)
- (sc, inc) ×6 (18)
- sc around (18)
- (sc, dec) ×6 (12)
FO, stuff lightly.
Tan Washer (Sits Under Hub):
- MR, 6 sc (6)
- inc ×6 (12)
- (sc, inc) ×6 (18)
FO.
Sew the four gray blades evenly into an “X” on top of the red hub.
Attach the tan washer to the helicopter’s top center, then sew the red hub firmly over it.
🌀 Tail and Rear Details
Tail (Gray):
- MR, 6 sc (6)
2–15. sc around (6)
16–22. increase by 2 evenly each round until you reach 12 sts.
Lightly stuff and sew to back of fuselage.
Tail Rotor (Gray Cross):
Blades (Make 2): CH 13, sc back (12), FO.
Center nub: MR, 6 sc (6), FO.
Sew blades into a “+” shape with nub at center and attach to tail tip.
Red-Yellow Medallion (Side of Tail):
Red disk: MR, 6 sc (6), inc ×6 (12), FO.
Yellow dot: MR, 6 sl sts (tight), FO.
Sew yellow dot into red disk and attach to the side of tail, just before the rotor.
🔴 Side Button (with Yellow Center)
Red disk: MR, 6 sc (6), inc ×6 (12), FO.
Yellow center: MR, 6 sl sts, FO.
Sew yellow dot to red disk and attach under window on fuselage side.
🛬 Landing Skids (Gray)
Long Bars (2):
CH 28, sc in 2nd ch from hook and across (27).
R2: sc across (27). FO and shape into gentle curves.
Leg Supports (4):
MR, 4 sc (4).
R2–5: sc around (4). FO.
Attach two supports per skid.
Position skids under the body — front supports slightly leaning forward, rear ones slightly backward — to mimic the real angle.
✂️ Final Assembly
- Attach nose cone to front.
- Sew eyes just above nose.
- Attach side window and brown handle.
- Sew top rotor with tan washer base.
- Attach tail and rear rotor.
- Add red side button and tail medallion.
- Sew landing skids securely.
- Adjust shape, stuffing, and angles for symmetry.
💡 Customization Tips
- Use safety eyes instead of crocheted ones for a different expression.
- Add felt windows for a smoother look.
- Make a hanging loop on top for a mobile or baby room display.
- Stitch a smiling mouth under the nose for extra personality!
🎉 All Done!
Your amigurumi helicopter is now complete — cheerful, colorful, and perfectly photo-accurate! 🧶✨
It’s the ideal project for crafters who love detail and structure, or as a thoughtful handmade gift for aviation enthusiasts.
No matter where it lands, this happy chopper will always fly high! 🚁💙