Embrace the charm of the forest with this Amigurumi Fox crochet pattern! 🦊✨ With its fluffy tail, perky ears, and mischievous expression, this design captures the playful spirit of foxes in yarn form. Whether you’re crafting for a woodland-themed décor piece, a heartfelt gift, or simply love animal-inspired amigurumi, this FREE pattern is a delightful addition to your collection.
Designed for intermediate crocheters, this pattern allows for customization in fur textures, ear shapes, and even tiny accessories like a miniature acorn or a cozy scarf to enhance its personality. Choose classic orange and white for a realistic look or experiment with pastel hues for a whimsical twist! Whether displayed as part of a nature-inspired setup or gifted to a fellow crochet enthusiast, this amigurumi fox is sure to bring smiles. Grab your hook, select your favorite yarn, and let’s bring this adorable little fox to life—one stitch at a time! 🧶✨
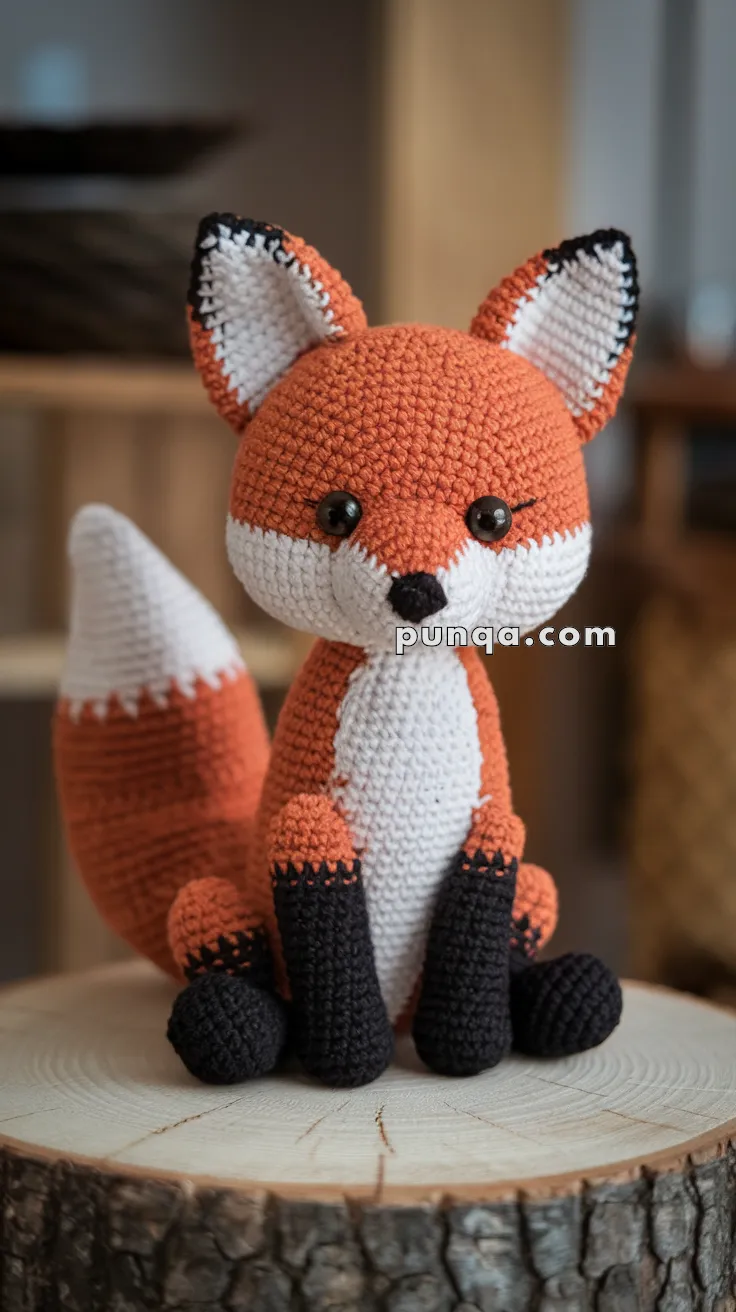
🦊 Amigurumi Fox Crochet Pattern
Bring cozy woodland charm into your home with this sweet amigurumi fox. Featuring a rounded head, wide snowy face mask, long black stockings, pointed ears, and a softly curved tail with a white tip, this fox sits naturally and looks adorable from every angle. Perfect for woodland nurseries, handmade gifts, or simply for fox lovers who enjoy detailed amigurumi projects.
✨ Skill Level
Intermediate
Suitable for crocheters comfortable with color changes, shaping, and neat assembly.
📏 Finished Size
Approximately 23–26 cm (9–10¼ in) tall in a seated position
(using DK / light worsted yarn and a 3.0 mm hook)
🧶 Materials
Yarn
-
🧡 Orange – head, body, ears, tail
-
🤍 White – face mask, belly panel, tail tip, inner ears
-
🖤 Black – legs, paws, nose
Notions
-
10–12 mm black safety eyes
-
Polyester fiberfill
-
Yarn needle
-
Stitch markers
-
Scissors
🔤 Abbreviations (US Terms)
MR – Magic Ring
sc – Single Crochet
inc – Increase (2 sc in same stitch)
dec – Invisible Decrease
sl st – Slip Stitch
ch – Chain
FO – Fasten Off
📝 Notes Before You Begin
-
Work in continuous rounds unless stated otherwise.
-
Stuff firmly for smooth shaping, but keep the lower body slightly softer so the fox sits naturally.
-
The white face and belly are sewn-on panels to create the crisp, clean edges seen on the finished fox.
🧠 Head (Orange)
R1: MR 6 (6)
R2: inc ×6 (12)
R3: (1 sc, inc) ×6 (18)
R4: (2 sc, inc) ×6 (24)
R5: (3 sc, inc) ×6 (30)
R6: (4 sc, inc) ×6 (36)
R7: (5 sc, inc) ×6 (42)
R8: (6 sc, inc) ×6 (48)
R9–R16: sc around (48)
Chin & Lower Face Shaping
R17: (6 sc, dec) ×6 (42)
R18: sc around (42)
R19: (5 sc, dec) ×6 (36)
R20: sc around (36)
R21: (4 sc, dec) ×6 (30)
R22: (3 sc, dec) ×6 (24)
Insert safety eyes between R14–15, about 8 stitches apart.
Stuff firmly.
R23: (2 sc, dec) ×6 (18)
R24: (1 sc, dec) ×6 (12)
R25: dec ×6 (6)
FO and close.
🤍 Face Mask (White – Appliqué)
Ch 16
Row 1: sc 15, ch 1, turn
Row 2: inc, sc 13, inc (17), ch 1
Row 3: inc, sc 15, inc (19), ch 1
Row 4: inc, sc 17, inc (21), ch 1
Row 5–7: sc 21
FO.
Pin to the front of the head so it covers the lower half of the face and sew neatly around the edge.
🖤 Nose
R1: MR 6
R2: (sc, inc) ×3 (9)
R3–4: sc around (9)
FO, flatten slightly and sew centered on the face mask.
🦊 Body (Orange)
R1: MR 6 (6)
R2: inc ×6 (12)
R3: (1 sc, inc) ×6 (18)
R4: (2 sc, inc) ×6 (24)
R5: (3 sc, inc) ×6 (30)
R6: (4 sc, inc) ×6 (36)
R7: (5 sc, inc) ×6 (42)
R8–R16: sc around (42)
Seat Shaping
R17: (5 sc, dec) ×6 (36)
R18: sc around (36)
R19: (4 sc, dec) ×6 (30)
R20: sc around (30)
R21: (3 sc, dec) ×6 (24)
Stuff firmly, keeping the base slightly softer.
FO and leave a long tail for attaching the head.
🤍 Belly Panel (Appliqué)
Ch 14
Row 1: sc 13, ch 1, turn
Row 2: inc, sc 11, inc (15), ch 1
Row 3: inc, sc 13, inc (17), ch 1
Row 4–10: sc 17
FO.
Sew centered from chest to lower belly.
🐾 Front Legs (Make 2 – Black Stockings)
R1: MR 6
R2: inc ×6 (12)
R3–R10: sc around (12)
Stuff lightly.
Switch to orange:
R11–R14: sc around (12)
FO and leave a long tail for sewing.
🐾 Back Feet (Make 2 – Compact)
Using black yarn:
R1: MR 6
R2: inc ×6 (12)
R3–R6: sc around (12)
Switch to orange:
R7–R12: sc around (12)
Stuff lightly and flatten slightly.
FO and leave a long tail.
🦊 Tail (White Tip + Orange Body)
White tip:
R1: MR 6
R2: inc ×6 (12)
R3–R5: sc around (12)
Switch to orange:
R6: (sc, inc) ×6 (18)
R7–R18: sc around (18)
Lightly stuff and curve gently.
FO.
👂 Ears (Make 2)
Outer Ear (Orange)
R1: MR 6
R2: (sc, inc) ×3 (9)
R3: (2 sc, inc) ×3 (12)
R4: (3 sc, inc) ×3 (15)
R5–R7: sc around (15)
FO.
Inner Ear (White)
R1: MR 6
R2: inc ×6 (12)
R3–R4: sc around (12)
FO.
Sew inner ear inside outer ear and add a thin black outline stitch along the top edge if desired.
🧩 Assembly
-
Sew head to body, aligning face mask with belly panel.
-
Attach front legs just under the head seam, angled slightly forward.
-
Attach back feet low and wide for a stable seated pose.
-
Sew ears to the top of the head, angled gently outward.
-
Attach tail slightly off-center so it curves naturally along the side.
✨ Final Touches
-
Lightly steam and shape ears and tail.
-
Adjust leg angles so the fox sits comfortably on its own.
-
Add a tiny embroidered mouth stitch if desired.
🌲 Finished Fox
Your woodland fox is now complete — sweet, soft, and full of personality. With its snowy face mask, tall ears, cozy black stockings, and fluffy tail, this little fox is ready to brighten any handmade collection or become a treasured gift. 🧡🦊