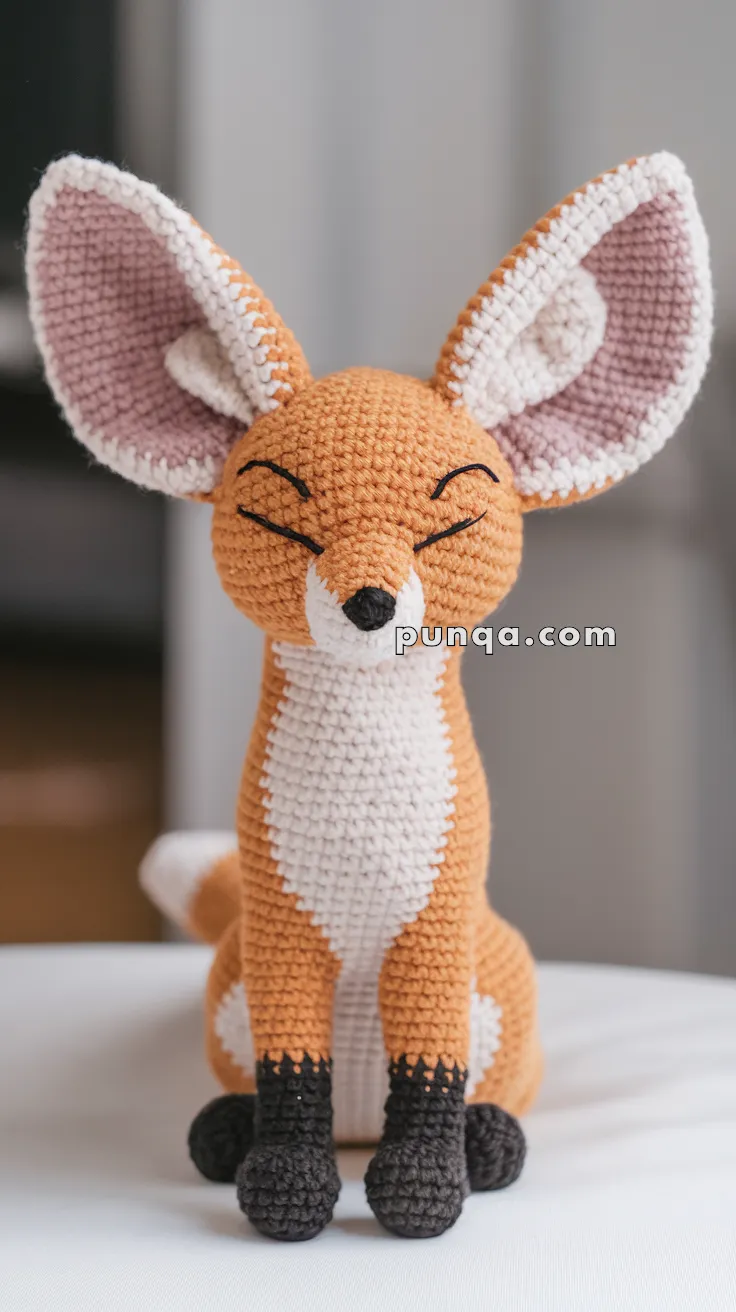
Say hello to the Amigurumi Fennec Fox, a tiny desert dweller with oversized charm and ears to match! 🦊🧶 With its perky ears, and petite body, this crochet cutie captures all the magic of the real-life fennec fox in a soft, snuggly form. Whether you’re crafting for an animal lover, adding to a safari-themed collection, or just looking for a unique handmade friend, this little fox is sure to delight.
Perfect for crocheters who love playful proportions and whimsical details, this pattern invites you to explore warm tones, delicate shaping, and a sprinkle of desert magic. Add a tiny scarf, stitch on a cactus buddy, or customize the colors for a fantasy twist. The Amigurumi Fennec Fox is a joyful way to stitch up curiosity, cuteness, and a whole lot of handmade heart—one loop at a time! 🧵🌵
🦊 Amigurumi Fennec Fox Crochet Pattern
If you’ve ever admired the charm of a Fennec Fox with its oversized ears and playful look, this amigurumi pattern will bring one to life! This version includes extra-tall ears, long white chest patch, solid dark paws, and a long fluffy tail so your fox matches the look you see here.
✨ Skill Level
Intermediate – includes structural shaping, integrated color changes, sculpted muzzle construction, and tall ear assembly.
📏 Finished Size
Approx. 25–28 cm (10–11 inches) tall
Slim, upright seated posture with elongated neck
🧶 Materials & Yarn Amount
DK weight yarn:
Sandy Orange (head, body, outer ears, tail base): 95 g
White (chest panel, muzzle underside, ear border, tail tip): 45 g
Soft Pink (inner ear panels): 15 g
Black (paws, nose, embroidery): 15 g
3.0 mm crochet hook
Polyester fiberfill (approx. 120 g)
Tapestry needle
Stitch marker
Optional: thin plastic canvas or craft wire for ear support
🧵 Abbreviations (US Terms)
MR – magic ring
sc – single crochet
inc – increase
dec – invisible decrease
sl st – slip stitch
ch – chain
FO – fasten off
Work in continuous rounds unless stated.
🧠 Head with Structured Snout
Color: Sandy Orange
Crown of Head
Round 1: MR 6 (6)
Round 2: inc ×6 (12)
Round 3: (1 sc, inc) ×6 (18)
Round 4: (2 sc, inc) ×6 (24)
Round 5: (3 sc, inc) ×6 (30)
Round 6: (4 sc, inc) ×6 (36)
Rounds 7–11: sc around (36)
🐽 Snout Shaping Section
The muzzle extends forward from the lower front only.
Round 12: 15 sc, inc ×6, 15 sc (42)
Round 13: 15 sc, (1 sc, inc) ×6, 15 sc (48)
Round 14: sc around (48)
Round 15: 15 sc, (1 sc, dec) ×6, 15 sc (42)
Round 16: (5 sc, dec) ×6 (36)
Begin stuffing muzzle firmly and shape forward.
Round 17: (4 sc, dec) ×6 (30)
Round 18: (3 sc, dec) ×6 (24)
Continue stuffing.
Round 19: (2 sc, dec) ×6 (18)
🧍 Neck Separation
To create a visible neck (preventing a rounded “potato” look):
Round 20: (1 sc, dec) ×6 (12)
Round 21–23: sc around (12)
This narrow cylinder forms the neck and clearly separates head from body.
FO and leave long tail for sewing to body later.
The head should now have:
• A rounded top
• A clearly projecting snout
• A slim defined neck section
🖤 Nose & Facial Details
Using black yarn:
• Embroider a small rounded triangular nose at snout tip
• Add short vertical stitch under nose
• Embroider gently curved closed eyes
• Add subtle upward eyebrow flicks
Keep expression soft and peaceful.
👂 Tall Oversized Ears (Make 2)
Outer Ear – Sandy Orange
Round 1: MR 6
Round 2: inc ×6 (12)
Round 3: (1 sc, inc) ×6 (18)
Round 4: (2 sc, inc) ×6 (24)
Round 5: (3 sc, inc) ×6 (30)
Round 6: (4 sc, inc) ×6 (36)
Rounds 7–18: sc around (36)
Do not overstuff — only lightly at base.
Inner Ear Panel
Start Pink:
Round 1: MR 6
Round 2: inc ×6 (12)
Round 3: (1 sc, inc) ×6 (18)
Round 4: (2 sc, inc) ×6 (24)
Round 5: (3 sc, inc) ×6 (30)
Switch to White:
Round 6: sc around (30)
FO and sew inside outer ear.
Attach ears high on head and angle slightly outward.
Optional: Insert thin support to maintain upright height.
🧍 Body
Color: Sandy Orange
Round 1: MR 6 (6)
Round 2: inc ×6 (12)
Round 3: (1 sc, inc) ×6 (18)
Round 4: (2 sc, inc) ×6 (24)
Round 5: (3 sc, inc) ×6 (30)
Rounds 6–20: sc around (30)
🤍 Long White Chest Panel
From Round 8–20:
Work 12 centered front stitches in White each round.
The white panel should be long and narrow, tapering slightly at top.
Lower Body Shaping
Round 21: (3 sc, dec) ×6 (24)
Round 22: (2 sc, dec) ×6 (18)
Round 23: (1 sc, dec) ×6 (12)
Stuff firmly for stable sitting shape.
Round 24: dec ×6 (6)
FO and close.
💪 Front Legs (Make 2)
Start Black:
Round 1: MR 6
Round 2: inc ×6 (12)
Rounds 3–9: sc around (12)
Switch to Sandy Orange:
Rounds 10–20: sc around (12)
Stuff lightly and keep straight.
Attach close together at front for upright posture.
🦵 Back Legs (Make 2)
Start Black:
Round 1: MR 6
Round 2: inc ×6 (12)
Round 3: (1 sc, inc) ×6 (18)
Rounds 4–10: sc around (18)
Switch to Sandy Orange:
Rounds 11–18: sc around (18)
Stuff firmly and attach slightly wider than front legs.
🦊 Tail
Color: Sandy Orange
Round 1: MR 6
Round 2: inc ×6 (12)
Round 3: (1 sc, inc) ×6 (18)
Rounds 4–12: sc around (18)
Switch to White:
Rounds 13–20: sc around (18)
Lightly stuff and sew so tail curves gently behind body.
🧵 Assembly
- Sew neck securely to top of body
- Attach front legs close together
- Attach back legs wider apart
- Position tail low and curved
- Sew ears high and angled outward
✨ Final Shaping Tips
• Push stuffing forward into muzzle
• Keep neck slim and cylindrical
• Gently pinch cheeks for natural contour
• Ensure chest panel stays centered
• Adjust ears so they stand tall and wide
🦊 Finished Fox
The completed fox features a clearly defined snout, visible neck separation, tall dramatic ears, elongated white chest patch, dark lower legs, and a balanced seated silhouette. The proportions create a graceful woodland companion with a serene expression and refined structure.
Happy crocheting 🧶✨


Hi! Love this pattern. Thank you.