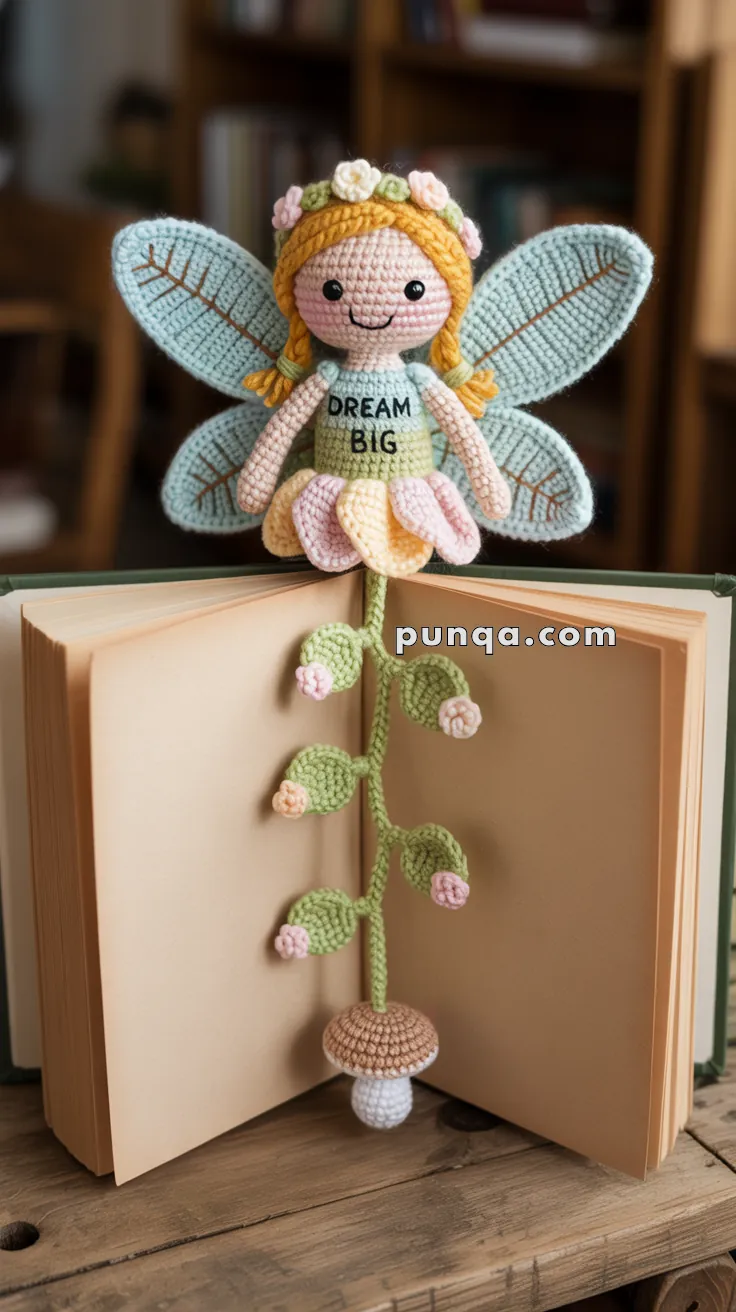
Add a sprinkle of enchantment to your reading routine with this Amigurumi Fairy Bookmark crochet pattern! Inspired by the magic of fairies, this whimsical design captures delicate wings, a flowing dress, and a charming expression in every stitch. Whether you’re crafting for book lovers, adding a touch of fantasy to your collection, or simply enjoy making miniature amigurumi designs, this pattern lets you stitch up a delightful fairy bookmark bursting with personality! Perfect for marking your place in a favorite story, this crochet fairy brings a touch of handmade magic to every page. 📖✨
Designed for customization, this pattern allows you to experiment with different colors, embroidered embellishments, or even tiny accessories like a miniature wand or floral accents for extra charm. Craft a classic fairy bookmark with soft pastels, create a vibrant version with bold hues, or even stitch up a full set of fantasy-inspired amigurumi for a magical display! Whether gifted as a thoughtful keepsake, displayed as a whimsical accent, or made simply for the joy of crafting, this Amigurumi Fairy Bookmark is a fun and creative project—perfect for bringing a touch of handmade fairy tale magic to every stitch! 🧶💖✨
🧚 Amigurumi Fairy Bookmark – Free Crochet Pattern
Bring magic to your reading adventures with this delicate fairy bookmark that rests between your pages while her vine trails gracefully down to a charming mushroom. This design perfectly matches the photo, featuring a sweet fairy with long blonde braids, a soft pink and yellow petal skirt, a leafy green vine, light blue wings, and a tiny mushroom at the end. Optional embroidered text like “DREAM BIG” lets you personalize your fairy’s outfit. 🌸📚✨
✨ Skill Level
Intermediate – Involves shaping, color changes, and simple assembly.
📏 Finished Size
Approx. 10–12 inches (25–30 cm) total length using DK or light worsted yarn and a 2.5–3.0 mm hook.
🧶 Yarn Amounts (approx.)
- Light Pink – 10 g
- Pale Yellow – 8 g
- Green – 15 g
- Light Blue – 8 g
- Brown – 6 g
- White – 6 g
- Peach / Skin Tone – 5 g
- Yellow (for hair) – 6 g
- Black (for embroidery / smile) – small amount
- Optional: tiny scraps of pink & white for flower crown
🧵 Materials
2.5–3.0 mm crochet hook
Fiberfill stuffing (small amount for head and mushroom)
6 mm black safety eyes
Tapestry needle
Stitch marker
Scissors
Embroidery thread (optional for phrase)
Small flower appliqués or crochet mini flowers
🔤 Abbreviations (US)
MR – Magic Ring
sc – Single Crochet
inc – Increase (2 sc in same st)
dec – Decrease
sl st – Slip Stitch
ch – Chain
hdc – Half Double Crochet
dc – Double Crochet
FO – Fasten Off
Work continuously in rounds unless noted. Stuff lightly as you go. Stitch counts are in ( ).
🪄 HEAD (Peach / Skin Tone)
R1: MR 6 sc (6)
R2: inc x6 (12)
R3: (1 sc, inc) x6 (18)
R4: (2 sc, inc) x6 (24)
R5: (3 sc, inc) x6 (30)
R6–R10: sc around (30)
R11: (3 sc, dec) x6 (24)
R12: (2 sc, dec) x6 (18)
R13: (1 sc, dec) x6 (12)
Stuff firmly.
R14: dec x6 (6) — FO and close.
Attach 6 mm safety eyes between R6 and R7, about 5 sts apart. Embroider a small smile with black yarn.
💛 HAIR CAP (Yellow)
R1: MR 6 sc (6)
R2: inc x6 (12)
R3: (1 sc, inc) x6 (18)
R4: (2 sc, inc) x6 (24)
R5: (3 sc, inc) x6 (30)
R6–R8: sc around (30)
FO leaving tail for sewing.
Sew to the head so the front hairline sits just above the eyes.
BRAIDS
Make 2 chains of 20 using yellow yarn. Twist or braid each and sew to the sides of the head.
FLOWER CROWN
With pink and white yarn, make 3–4 tiny flowers (ch 4, sl st to first ch).
Attach them across the top of the hair cap with small green leaves stitched between them. 🌼🌿
🌸 BODY / TORSO (Green for top, Pink & Yellow for skirt)
Top:
Ch 13, join to form a ring.
R1–R4: sc around (13)
Stuff lightly, FO.
Skirt (Pink and Yellow alternating):
Attach pink yarn to base of top.
(Ch 3, dc in next st, sl st in next st) repeat around.
Switch to yellow yarn and repeat the same sequence between petals to alternate colors.
FO and weave ends.
Optional: Embroider “DREAM BIG” or any short phrase across the green top with black thread.
🪽 WINGS (Light Blue, Make 2)
Ch 12.
Row 1: sc in 2nd ch, hdc, dc x6, hdc, sc.
Turn and mirror stitches down the other side of the chain.
FO and weave in ends.
Embroider delicate veins with brown yarn.
Sew both wings to the upper back of the torso, slightly angled outward.
🌿 VINE STEM (Green)
Ch 50 or desired length.
sc back along chain (49).
FO leaving tail for sewing.
Attach one end to the base of the fairy’s body.
🍃 LEAVES & 🌸 BUDS (4–5 Sets)
Leaves (Green):
Ch 7.
sc in 2nd ch, hdc, dc, dc, hdc, sc.
FO and sew along the vine at intervals.
Buds (Light Pink):
MR 5 sc (5).
FO and gather to form a small bud.
Sew next to leaves along the vine.
🍄 MUSHROOM END
Cap (Light Brown):
R1: MR 6 sc (6)
R2: inc x6 (12)
R3: (1 sc, inc) x6 (18)
R4: (2 sc, inc) x6 (24)
R5: sc around (24)
R6: (6 sc, dec) x3 (21)
FO and lightly stuff.
Stem (White):
R1: MR 6 sc (6)
R2–R5: sc around (6)
FO, stuff, and sew to underside of cap.
Sew mushroom securely to the end of the vine.
✂️ FINISHING TOUCHES
- Sew the vine firmly to the fairy’s lower back so it trails naturally downward.
- Adjust the wings to curve gently outward.
- Shape the vine slightly with your hands for a curling effect.
- Ensure all ends are neatly woven and secure.
- Optionally add a dab of blush to the cheeks for extra charm.
🌟 CUSTOMIZATION IDEAS
- Make multiple fairies in different outfits or hair colors.
- Use sparkly yarn for the wings.
- Add a loop to hang it as a decoration when not in use.
- Embroider unique phrases or names on the top for gifting.
Your magical fairy bookmark is ready to sprinkle charm into your reading adventures! 🌷📖🧚♀️