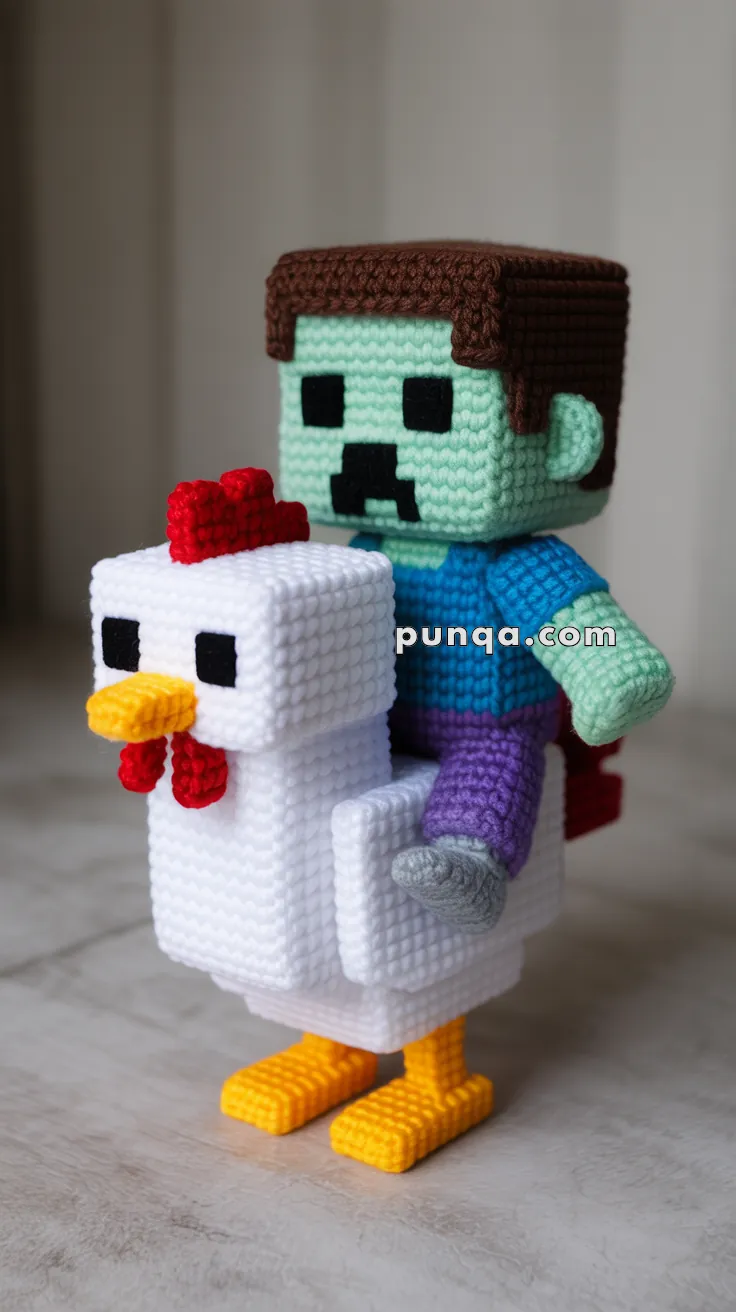
Get ready for a quirky adventure in yarn with this Amigurumi Chicken Jockey crochet pattern! Inspired by the playful chaos of pixelated worlds, this hilarious duo features a tiny rider perched atop a plucky chicken—bringing a touch of gaming fun to your amigurumi collection. Whether you’re crafting for a Minecraft fan, adding a whimsical twist to your decor, or just love creating unexpected characters, this pattern lets you stitch up a scene that’s full of personality and charm. 🐔🧶🎮
Designed for fun and flair, this pattern invites you to play with bold colors, expressive details, and clever construction to bring both the chicken and its pint-sized rider to life. Add tiny accessories like a helmet, reins, or even a little saddle for extra storytelling magic. Whether it’s a gift for a gamer or a playful addition to your handmade menagerie, this Amigurumi Chicken Jockey is a joyful and satisfying project—perfect for bringing a touch of handmade mischief to every stitch! 💖🌟🐣

🐔 Amigurumi Chicken Jockey Crochet Pattern
Inspired by the Minecraft Chicken Jockey, this blocky amigurumi creation features a mini zombie character riding a pixel-style chicken. This pattern keeps true to the cube-based aesthetic, working primarily in rectangular panels and boxy shaping. Written in US terms.
✨ Skill Level
Intermediate to Advanced – involves cube construction, piece alignment, and clean joins for sharp edges.
📏 Finished Size
Approx. 22–25 cm (8.5–10 in) tall using worsted-weight yarn and a 3.0 mm hook.
🧶 Materials
Yarn (Worsted Weight, Acrylic or Cotton)
- White (80 g) – chicken body, wings, neck, head
- Red (20 g) – comb, wattles, tail feathers
- Yellow (25 g) – beak and feet
- Black (10 g) – eyes, zombie face details
- Light Mint Green (40 g) – zombie skin
- Dark Brown (20 g) – hair
- Medium Blue (20 g) – shirt
- Purple (20 g) – pants
- Gray (10 g) – shoes
- Dark Red (15 g) – saddle pad
Extras
Polyfill stuffing
Yarn needle
Stitch markers
3.0 mm hook
Optional – Plastic canvas (for sturdy feet)
Optional – Hot glue (for securing cubes)
🧵 Abbreviations (US Terms)
MR = Magic Ring
ch = Chain
sc = Single Crochet
inc = Increase (2 sc in same st)
dec = Decrease (sc 2 together)
sl st = Slip Stitch
FO = Fasten Off
BLO = Back Loop Only
🐔 CHICKEN CONSTRUCTION
Body (White – Rectangular)
ch 14
sc 14 for 8 rows (14×8 rectangle)
Make 6 panels, sew into a rectangular box (14×8×8).
Stuff firmly and close.
Neck (White – Thin Cube)
ch 3
sc 3 for 3 rows (3×3 square)
Make 6 panels and assemble into cube.
Attach centered on front top of body.
Head (White – 8×8 Cube)
ch 8
sc 8 for 8 rows
Make 6 panels, sew into cube, lightly stuff, and attach to top of neck.
Beak (Yellow)
ch 4
sc 4 for 4 rows (4×4 square)
Make 2 panels, sew into cube, and attach to center front of head.
Wattles (Red – Dangling Flaps)
ch 4
sc 4 for 2 rows (4×2 rectangle)
Make 2 flat panels (no assembly).
Sew under beak so they hang slightly downward.
Comb (Red)
ch 5
Row 1: sc across (5)
Row 2: (ch 2, sl st next) × 3 to create points
Attach centered on top of head.
Eyes (Black)
ch 2
sc 2 for 2 rows (2×2 square)
Make 2 and sew beside beak at equal height.
Wings (White – Vertical Rectangles)
ch 3
sc 3 for 5 rows (3×5 rectangle)
Make 4 panels.
Option 1: Sew 2 together for each wing (double layer).
Option 2: Assemble 4 per wing into thin rectangular prism.
Attach vertically near top sides of body, angled slightly outward.
Legs (Yellow – Short Columns)
ch 3
sc 3 for 4 rows (3×4 rectangle)
Make 4 panels per leg, assemble into rectangular prisms.
Attach directly under body corners.
Feet (Yellow – Thick Forward Blocks)
ch 6
sc 6 for 3 rows (6×3 rectangle)
Make 4 per foot, assemble into two blocks.
Sew each foot to leg base, angled slightly forward for balance.
Tail Feathers (Red Cluster)
ch 2
sc 2 for 3–4 rows (2×3 or 2×4 rectangles)
Make 3–4 and cluster upward at rear top edge of body.
🧟 ZOMBIE RIDER
Head (Mint Green – 10×10 Cube)
ch 10
sc 10 for 10 rows (10×10 square)
Make 6 panels and assemble into cube.
Stuff firmly.
Face Details (Black)
Eyes – 2×2 squares
Nose – 1×2 rectangle centered between eyes and mouth
Mouth – 2×6 horizontal rectangle below nose
Hair Cap (Dark Brown)
Top panel: 10×10 brown
Back panel: 10×10 brown
Front panel: 10×10 with top 2–3 rows brown, rest green (forehead fringe)
Side panels: either open (for ears) or green only
Sew cap onto head covering top and back, with a small front fringe.
Ears (Mint Green – 2 Pieces)
ch 5
sc 5 for 3 rows (5×3 rectangle)
Sew one to each side of head at eye level.
Torso (Blue – 8×8×6)
ch 8
sc 8 for 6 rows (8×6 rectangle)
Make 6 panels and assemble into rectangular box.
Attach under head cube.
Arms (Mint Green – Bent at Elbow)
Make two 3×3 cubes per arm.
Attach first cube to torso at shoulder.
Attach second cube to first at 90° to form elbow bend.
Position so forearm points forward and slightly downward.
Optional: Work top 1–2 rows of upper arm in blue for sleeve effect before switching to mint green.
Legs (Purple)
ch 4
sc 4 for 4–5 rows (4×4 or 4×5 rectangles)
Make 6 panels per leg, assemble into short prisms.
Sew so legs straddle chicken sides.
Feet (Gray – Cubes)
ch 4
sc 4 for 3 rows (4×3 rectangle)
Make 4 per foot, assemble into cubes, and attach beneath legs.
Saddle (Dark Red – Back Pad)
ch 6
sc 6 for 6 rows (6×6 square)
Make 2–3 panels, stack for thickness.
Sew flat onto chicken’s back BEFORE seating zombie.
🧩 ASSEMBLY ORDER
1️⃣ Build and stuff chicken body (14×8), neck (3×3), and head (8×8).
2️⃣ Attach beak, eyes, comb, and flat wattles.
3️⃣ Add vertical wings near top sides.
4️⃣ Sew legs and thick feet beneath body.
5️⃣ Attach tail feather cluster pointing upward.
6️⃣ Assemble zombie head and hair cap with face details.
7️⃣ Join torso, bent arms, and legs with shoes.
8️⃣ Sew saddle to chicken’s back.
9️⃣ Seat zombie on top of saddle, leaning slightly forward.
🔟 Position zombie forearms as if gripping reins; optionally tack fingertips to chicken’s neck with a few hidden stitches.
✨ FINISHING TOUCHES
- Lightly steam block for crisp edges.
- Reinforce feet with plastic canvas for stability.
- Use tiny drops of hot glue inside cube corners for perfect angles.
- Shape arms and legs while warm to keep pose.
🎮 FINAL RESULT
Your Minecraft Chicken Jockey is complete!
With its wide white chicken body, tiny neck, upward tail cluster, and perfectly posed zombie rider, this build captures the iconic blocky chaos of the game in adorable amigurumi form.
Display it on your desk, gift it to a Minecraft fan, or add it to your collection of pixel friends — this little pair is ready to ride straight into your heart!


