Rev up your crochet skills with this Amigurumi Chevrolet Corvette pattern! Whether you’re crafting for car enthusiasts, adding a sleek touch to your handmade collection, or simply enjoy making unique amigurumi designs, this free pattern lets you stitch up a miniature version of the iconic Corvette bursting with personality. With its streamlined shape, bold details, and unmistakable charm, this crochet Corvette captures the essence of speed and style in every stitch. Perfect for gifting to fellow crochet lovers, decorating a themed space, or simply celebrating the joy of handmade creations, this amigurumi Chevrolet Corvette is sure to bring excitement—one stitch at a time! 🚗✨
Designed for customization, this pattern allows you to experiment with different color schemes, embroidered details, or even tiny accessories like racing stripes or miniature wheels for extra personality. Craft a classic Corvette in its signature red, create a pastel version for a whimsical aesthetic, or even stitch up a full set of car-inspired amigurumi for a stunning display! Whether gifted as a cherished keepsake, displayed as a stylish accent, or made simply for the joy of crafting, this Amigurumi Chevrolet Corvette is a fun and creative project—perfect for bringing the thrill of the open road to every stitch! 🧶🏁
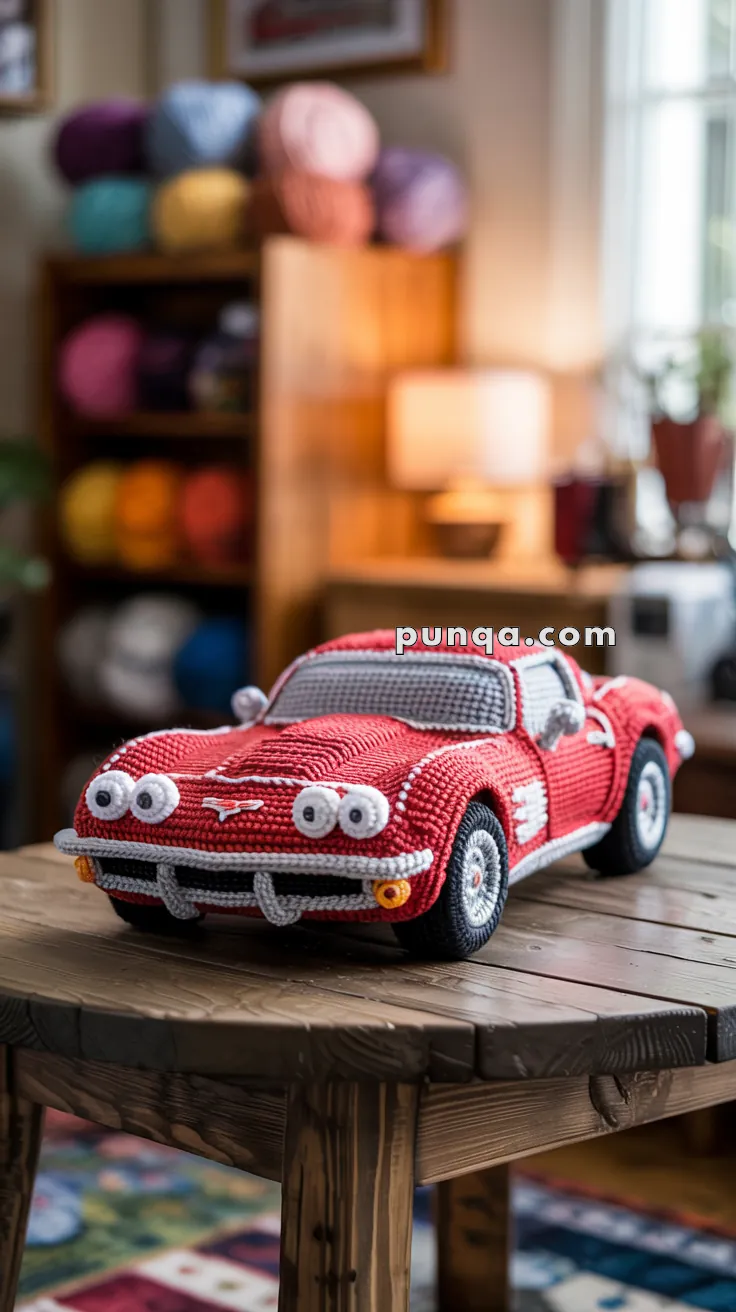
🏎️ Amigurumi Chevrolet Corvette Crochet Pattern
Speed into creativity with this stunning crochet Chevrolet Corvette!
This project captures every sleek curve — from its sporty red body and shining headlights to its raised hood ridge and sculpted fenders. It’s the perfect make for car lovers, collectors, and advanced crocheters who adore a challenge. 🚗💨
✨ Skill Level
Advanced – includes shaping, fine detailing, and layered assembly.
📏 Finished Size
Approx. 8–10 inches (20–25 cm) long when made with worsted or aran weight yarn and a 3.5 mm hook.
🧶 Materials
- Color A – Red: 120 g (main body)
- Color B – Light Grey: 40 g (windows, grille, bumper, trim)
- Color C – Black: 30 g (tires, window outlines)
- Color D – White: 20 g (headlights, side emblems)
- Color E – Yellow: 10 g (indicator lights)
- Color F – Silver: 10 g (mirrors and side vents)
Also needed:
- Crochet hook: 3.5 mm
- Fiberfill stuffing
- Tapestry needle
- Stitch markers
- Cardboard or plastic mesh (for internal structure)
- Optional: thin wire or flexible foam sheet for extra body shaping
💡 Use cotton or acrylic yarn with a firm twist to keep your stitches crisp and the car’s edges clean.
🪡 Abbreviations (US Terms)
MR – Magic Ring
sc – Single Crochet
inc – Increase (2 sc in same stitch)
dec – Decrease (sc2tog)
ch – Chain
sl st – Slip Stitch
FLO – Front Loop Only
BLO – Back Loop Only
FO – Fasten Off
🧵 Car Body
1️⃣ Base and Hood (Red – Color A)
Ch 21.
Row 1: sc in 2nd ch from hook and across (20).
Rows 2–5: sc across (20).
Row 6: inc at each end (22).
Rows 7–12: sc evenly across (22).
Row 13: dec at each end (20).
Rows 14–16: sc across (20).
Now sc evenly around the outer edge and continue working in the round to build the car’s shape.
Rounds 17–28: sc around, slightly increasing toward the front for the curved hood and decreasing at the back for the trunk.
Hood Ridge: On rounds 20–23, work the front six stitches in FLO to create a raised ridge running down the center of the hood. Resume regular sc afterward.
Stuff lightly as you go and insert a piece of cardboard at the base to help the car sit flat.
2️⃣ Windshield and Roof (Light Grey – Color B)
Attach yarn at the front top edge.
Row 29: sc 12 across for the windshield base.
Row 30: hdc across (12).
Row 31: sc across (10).
Row 32: hdc dec at each end (8).
Switch back to red (Color A) for the roof section:
Rows 33–36: sc around to form a smooth roof arch.
Leave open spaces on the sides for windows. Outline these windows later with black surface slip stitches for trim.
3️⃣ Rear Body (Red – Color A)
Continue crocheting from the roof.
Rows 37–42: sc around, decreasing slightly toward the back to shape the trunk slope.
Stuff firmly, then fasten off and close.
🛞 Tires and Wheel Arches
Tires (Make 4 – Black, Color C)
MR, 6 sc (6).
inc around (12).
(1 sc, inc) × 6 (18).
Rounds 4–7: sc around (18).
Stuff firmly to create a thick tire shape, then fasten off.
Hubcaps (Red – Color A): MR, 6 sc, FO. Sew one to the center of each tire.
Attach all four wheels evenly beneath the car body, tilting them slightly outward for stability.
Wheel Arches (Red – Color A)
Ch 12, sc back (11).
Work 3 rows, FO.
Make a duplicate piece for each and sew the two together with a bit of stuffing to give a padded, rounded shape.
Sew arches snugly above each tire to create defined fenders.
💡 Headlights and Front Details
Headlights (Make 4 – White, Color D)
MR, 6 sc (6).
inc × 6 (12).
Round 3: sc around (12).
Round 4: sc around again for extra depth.
Stuff gently and fasten off.
Sew two headlights per side, slightly stacked and angled forward near the hood curve.
Indicator Lights (Make 2 – Yellow, Color E)
MR, 5 sc, flatten, FO.
Sew onto the lower front corners of the bumper.
Grille and Bumper (Light Grey – Color B)
Grille: Ch 14, sc back, repeat twice to make 3 narrow strips. Sew horizontally with small gaps in between for depth.
Bumper: Ch 22, sc back across. FO. Sew under the grille, curving around the car’s front.
Add short vertical embroidered lines for bar details.
🪞 Mirrors and Trim
Side Mirrors (Silver – Color F)
MR, 5 sc (5).
Round 2: sc around (10).
Ch 3 to form a stalk. FO.
Lightly stuff each and sew to the door area at an outward angle.
Add a black slip stitch under each mirror for shading.
Window Trim
Using black yarn, surface slip stitch around all window edges for a clean outlined finish.
🔴 Rear Lights and Side Emblems
Rear Lights (Red – Color A)
MR, 6 sc (6).
inc × 6 (12).
Round 3: sc around (12).
Stuff lightly and sew flat to the rear of the car for a raised effect.
Side Emblems and Vents
Embroider three short white stitches behind each front wheel to mimic vents.
On the hood, embroider a small “V” logo using red and white yarn.
⚙️ Undercarriage Reinforcement
Before closing the base, insert a flat piece of cardboard or plastic mesh to keep the car’s shape and prevent sagging.
🧰 Assembly Order
1️⃣ Shape and stuff the car body.
2️⃣ Attach all four tires.
3️⃣ Sew wheel arches above each tire.
4️⃣ Add headlights, indicators, grille, and bumper.
5️⃣ Attach mirrors, window trims, and hood emblem.
6️⃣ Sew on the rear lights.
7️⃣ Steam block gently to smooth curves and set the structure.
🌟 Finishing Touches
Lightly steam the finished car to even out stitches.
You can crochet a small grey “display base” or embroidered license plate to personalize your Corvette.
Add a touch of matte varnish or fabric stiffener on the bumper for shine if desired.
Your Amigurumi Corvette is now ready to hit the display shelf — sleek, sporty, and full of handmade horsepower! 🏁
❤️ Final Thoughts
This crochet Chevrolet Corvette pattern captures the essence of the classic sports car with its smooth silhouette, stacked headlights, raised hood ridge, and sculpted fenders. It’s a fun yet rewarding challenge for experienced crocheters who love creating realistic amigurumi models.
Display it proudly or gift it to a car enthusiast who’ll recognize every stitch of your craftsmanship. 🚗✨