Amigurumi Cavalier King Charles Spaniel – FREE Crochet Pattern

A crocheted toy dog designed to resemble a cute, small breed with white and brown coloring, featuring large button-like eyes and a collar with a medallion, standing on a wooden floor in a cozy living room setting.
Spread the love

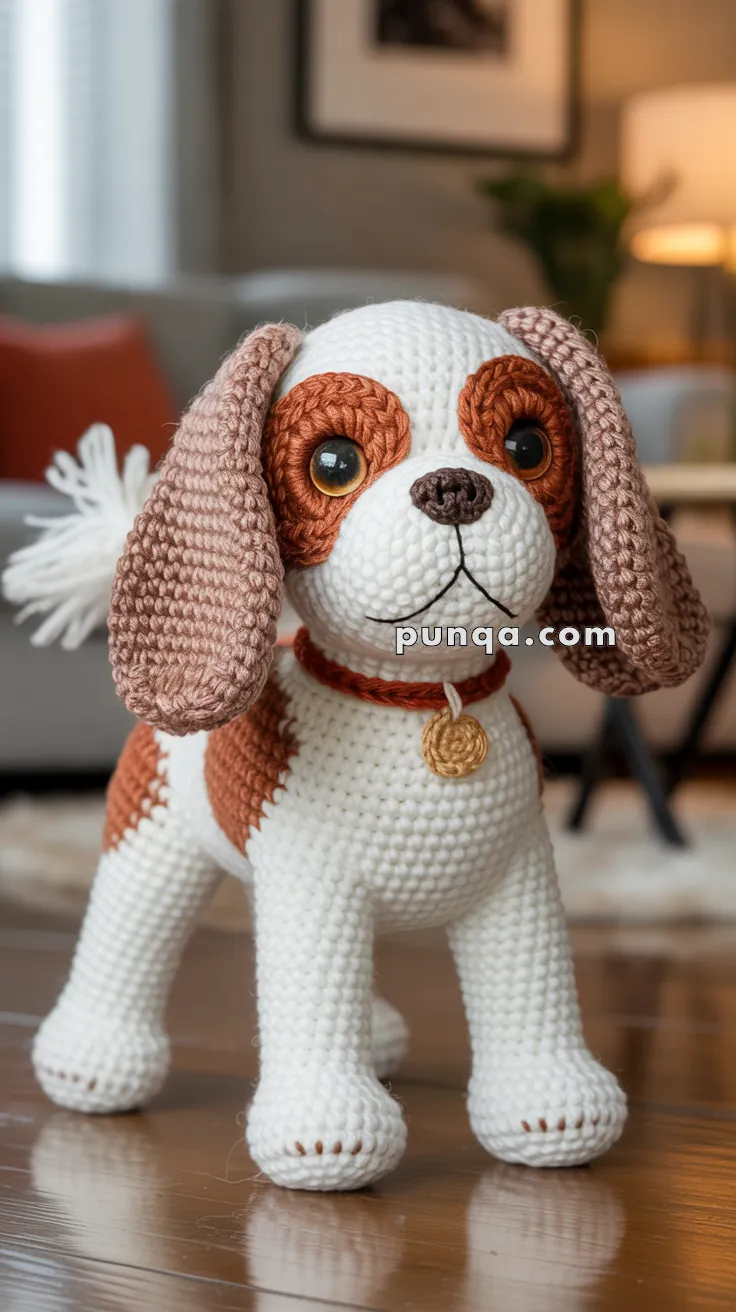
Get ready to fall in love with floppy ears and soulful eyes—this Amigurumi Cavalier King Charles Spaniel crochet pattern is pure puppy perfection! 🐶🧶 With its silky fur, gentle expression, and signature charm, this cuddly companion captures everything we adore about the beloved breed. Whether you’re crafting a tribute to your own furry friend or simply love stitching up realistic animal amigurumi, this spaniel is sure to become a treasured part of your handmade collection.

Designed with expressive shaping and cozy textures, this pattern invites you to play with classic color combos like Blenheim, tricolor, or ruby, and add sweet extras like a tiny collar or bow. You can customize the fur with loop stitches for a soft, fluffy finish or keep it sleek for a polished look. Whether perched on a shelf, gifted to a dog lover, or starring in a handmade pet parade, this Cavalier King Charles Spaniel Amigurumi is a joyful and satisfying project—perfect for stitching up a little tail-wagging love, one loop at a time! 🖤🐾💕

A crocheted toy dog designed to resemble a cute, small breed with white and brown coloring, featuring large button-like eyes and a collar with a medallion, standing on a wooden floor in a cozy living room setting.
Copyright & Pattern Usage Policy

🐶Amigurumi Cavalier King Charles Spaniel Crochet Pattern

Create this adorable Cavalier King Charles Spaniel with signature long floppy ears, expressive amber eyes with brown patches, white body with chestnut saddle marking, and textured collar with medallion!

Skill Level

Advanced Intermediate – Involves detailed color work, long ear construction, facial shaping, and breed-specific markings.

Finished Size

9-10 inches (23-25 cm) tall when standing, using DK weight yarn and 2.5 mm hook.

Materials

Yarn (DK Weight)

  • White – main body, legs, muzzle, chest (60g)
  • Chestnut brown – ears, eye patches, back saddle, paw accents (40g)
  • Black – nose embroidery (small amount)
  • Rust/terracotta red – collar (10g)
  • Gold/tan – medallion (small amount)
  • Pink – optional cheek blush (small amount)

Other Supplies:

  • Crochet hook: 2.5 mm
  • Safety eyes: 14-16 mm amber/golden brown
  • Polyfill stuffing
  • Yarn needle
  • Stitch markers
  • Black embroidery floss (for nose and mouth)
  • Scissors
  • Wire (20-22 gauge, optional for ear shaping)
  • Pins (for positioning pieces)

Abbreviations (US Terms)

  • MR – Magic Ring
  • sc – Single Crochet
  • hdc – Half Double Crochet
  • dc – Double Crochet
  • inc – Increase (2 sc in one stitch)
  • dec – Invisible Decrease
  • sl st – Slip Stitch
  • ch – Chain
  • BLO/FLO – Back/Front Loop Only
  • FO – Fasten Off

PATTERN INSTRUCTIONS

HEAD (White)

  1. MR, 6 sc (6)
  2. inc ×6 (12)
  3. (1 sc, inc) ×6 (18)
  4. (2 sc, inc) ×6 (24)
  5. (3 sc, inc) ×6 (30)
  6. (4 sc, inc) ×6 (36)
  7. (5 sc, inc) ×6 (42) 8-15. sc around (42) [8 rounds]

Position safety eyes between Rounds 11-12, approximately 10-12 stitches apart.

Before securing eyes, attach brown eye patches (see below).

  1. (5 sc, dec) ×6 (36)
  2. (4 sc, dec) ×6 (30)
  3. (3 sc, dec) ×6 (24)

Stuff head firmly.

  1. (2 sc, dec) ×6 (18)
  2. (1 sc, dec) ×6 (12)
  3. dec ×6 (6)

FO, close opening.


EYE PATCHES (Chestnut Brown – Make 2)

These create the signature Cavalier eye markings.

For each patch:

  1. Ch 8
  2. Starting in 2nd ch from hook: 6 sc, 3 sc in last ch
  3. Working along opposite side: 5 sc, 2 sc in last (16)
  4. inc, 5 sc, inc ×3, 5 sc, inc ×2 (22)
  5. 1 sc, inc, 5 sc, (1 sc, inc) ×3, 5 sc, (1 sc, inc) ×2 (28)

FO with long tail.

These create oval patches approximately 2 inches long.

Attachment:

  • Position patches on head where eyes will be placed
  • Center of patch should align with where eye will go
  • Pin in place before sewing
  • Sew patches to head securely around edges
  • THEN insert safety eyes through both patch and head
  • This creates the brown “mask” around each eye

MUZZLE (White)

Foundation:

  1. MR, 6 sc (6)
  2. inc ×6 (12)
  3. (1 sc, inc) ×6 (18)
  4. (2 sc, inc) ×6 (24) 5-8. sc around (24) [4 rounds]

FO with long tail. Stuff lightly.

Attachment:

  • Position muzzle on front of head, centered between eyes
  • Lower edge should be approximately at Round 13-14 of head
  • Sew all around edges
  • Muzzle should protrude slightly from face

Nose embroidery (Black):

  • At top center of muzzle, embroider triangular nose
  • Fill in solidly with satin stitch
  • Make triangle approximately 0.5 inch wide

Mouth line:

  • From bottom point of nose, embroider vertical line down (about 0.3 inches)
  • Then create curved smile line extending from bottom of vertical line
  • Use backstitch for clean lines

EARS (Chestnut Brown – Make 2)

The long, floppy ears are THE signature Cavalier feature!

Foundation:

  1. Ch 10
  2. Starting in 2nd ch from hook: 8 sc, 3 sc in last ch
  3. Working opposite side: 7 sc, 2 sc in last (20)

Building length: 4. inc, 7 sc, inc ×3, 7 sc, inc ×2 (26) 5-16. sc around (26) [12 rounds – this creates the length!]

Slight taper at tip: 17. (11 sc, dec) ×2 (24) 18-19. sc around (24) 20. (10 sc, dec) ×2 (22) 21. sc around (22)

Flatten and close:

  • Flatten ear with opening at top
  • Sc across through both layers to close (11 sc)
  • FO with long tail

Optional: Insert thin wire along length of ear before closing for shapeable ears.

Texture detail:

  • Using same brown yarn, surface crochet or embroider wavy lines down length of ears to suggest silky spaniel fur
  • Or gently brush yarn with wire brush for slight fuzzy texture

Attachment:

  • Position ears on sides of head at approximately Round 8-10
  • Ears should hang down past neck/shoulder area
  • Sew across top edge securely
  • Allow ears to drape naturally

BODY (White with Brown Saddle)

Body base (White):

  1. MR, 6 sc (6)
  2. inc ×6 (12)
  3. (1 sc, inc) ×6 (18)
  4. (2 sc, inc) ×6 (24)
  5. (3 sc, inc) ×6 (30)
  6. (4 sc, inc) ×6 (36) 7-14. sc around (36) [8 rounds]
  7. (4 sc, dec) ×6 (30) 16-18. sc around (30) [3 rounds]
  8. (3 sc, dec) ×6 (24) 20-22. sc around (24) [3 rounds]
  9. (2 sc, dec) ×6 (18)
  10. (1 sc, dec) ×6 (12)

Stuff body very firmly.

  1. dec ×6 (6)

FO and close.


SADDLE PATCH (Chestnut Brown)

This is the signature back marking of the Blenheim Cavalier!

Saddle piece:

  1. Ch 14
  2. Starting in 2nd ch from hook: 12 sc, 3 sc in last ch
  3. Working opposite side: 11 sc, 2 sc in last (28)
  4. inc, 11 sc, inc ×3, 11 sc, inc ×2 (34) 5-8. sc around (34) [4 rounds]

FO with long tail.

Attachment:

  • Position saddle patch on back of body
  • Should cover upper back area (approximately Rounds 6-13 of body)
  • Center on spine
  • Pin in place and try different positions to match photo
  • Sew all around edges neatly

LEGS (Make 4 – White with Brown Paws)

Paw (Chestnut Brown):

  1. MR, 6 sc (6)
  2. inc ×6 (12)
  3. (1 sc, inc) ×6 (18)
  4. BLO – sc around (18) [creates paw pad definition] 5-6. sc around (18)

Switch to White:

7-14. sc around (18) [8 rounds in white]

Slight taper at top: 15. (4 sc, dec) ×3 (15)

FO with long tail. Stuff legs firmly.

Paw pad details (optional):

  • With brown yarn, embroider 3-4 small ovals on bottom of brown paw section
  • Represents toe pads

Make all 4 legs identical.


TAIL (White with Brown Feathering)

Base tail (White):

  1. MR, 6 sc (6)
  2. (1 sc, inc) ×3 (9) 3-10. sc around (9) [8 rounds]

FO, leaving opening.

Feathering:

Method 1 – Yarn strands:

  • Cut 20-25 strands of chestnut brown yarn (each 3-4 inches long)
  • Using crochet hook, pull strands through stitches at tail end
  • Pull through at middle so both ends hang free
  • Creates fluffy feathered look
  • Trim to desired length
  • Gently brush with wire brush for fuller effect

Method 2 – Crocheted fringe:

  • With brown yarn, attach to tail end
  • (ch 6, sl st in next st) around entire opening
  • Creates loop fringe
  • Cut loops and brush out

Tail attachment:

  • Stuff tail lightly
  • Position at back of body (approximately Round 20-22)
  • Sew securely
  • Tail should curve slightly upward or sit naturally

COLLAR (Rust/Terracotta Red – Textured)

To match the dimensional collar in photo:

Braided/textured collar:

Foundation: Ch 40 (or measure around neck and adjust)

Option 1 – Ribbed texture:

  • Row 1: hdc in 3rd loop (creates rib) across
  • Row 2: ch 2, turn, hdc in 3rd loop across
  • FO

Option 2 – Twisted cord:

  • Cut 6 strands of red yarn (each 60 inches long)
  • Fold in half
  • Secure one end and twist tightly
  • Fold twisted length in half and allow to twist on itself
  • Creates rope-like collar

Option 3 – Multi-strand:

  • Ch 40 with 3 strands held together
  • Sc back with all 3 strands
  • Creates thick, dimensional collar

Adjust length to fit snugly around neck.


MEDALLION/TAG (Gold)

Circular medallion:

  1. MR, 6 sc in gold (6)
  2. inc ×6 (12)
  3. (1 sc, inc) ×6 (18)
  4. sl st to join

FO with long tail.

Detail (optional):

  • Embroider small design in center with brown or darker gold
  • Or leave plain

Attachment:

  • Sew medallion to center front of collar
  • Should hang at chest level when collar is worn

ASSEMBLY

Order of Construction:

1. Prepare head:

  • Sew brown eye patches to head first
  • Insert and secure safety eyes through patches
  • Stuff head firmly
  • Close head opening

2. Attach muzzle:

  • Position on front of head between eyes
  • Sew all around
  • Embroider nose and mouth

3. Attach ears:

  • Position on sides of head
  • Ensure symmetrical placement
  • Sew securely across top edge
  • Ears should hang freely

4. Prepare body:

  • Stuff body very firmly
  • Close body opening

5. Attach saddle patch:

  • Position on back of body
  • Pin first to check placement
  • Sew all around edges

6. Attach legs:

  • Front legs: Position at approximately Round 8-10 of body (forward)
  • Back legs: Position at approximately Round 18-20 of body (further back)
  • Legs should be angled slightly outward for stable stance
  • Sew very securely through body
  • Dog should be able to stand on all four legs

7. Attach tail:

  • Position at back (Round 20-22)
  • Sew securely
  • Arrange feathering

8. Join head to body:

  • Position head on top of body
  • Head should tilt slightly forward
  • Sew all around neck join very securely
  • Use ladder stitch for invisible seam

9. Add collar:

  • Wrap collar around neck
  • Sew or tie ends together at back of neck
  • Should fit snugly but not tight

10. Attach medallion:

  • Sew to front center of collar
  • Position at chest level

FINISHING TOUCHES

1. Facial details:

  • Add pink cheek blush with embroidery or fabric marker
  • Position below and slightly behind eyes
  • Very subtle for sweet expression

2. Ear shaping:

  • Arrange ears to hang naturally
  • If using wire, shape gentle curves
  • Ears should frame face

3. Eye highlights:

  • With white embroidery thread, add tiny highlight stitch to each eye
  • Positioned at upper right of each eye
  • Creates lifelike sparkle

4. Paw positioning:

  • Adjust legs so dog stands naturally
  • Front legs slightly forward
  • Back legs positioned for stability
  • All four paws should touch surface evenly

5. Tail fluff:

  • Gently separate and fluff brown feathering
  • Trim any uneven strands
  • Create natural feathered look

6. Overall grooming:

  • Check all seams are secure
  • Weave in any loose ends
  • Gently brush ears if desired for silky texture
  • Shape and arrange all elements

PRO TIPS FOR PHOTO ACCURACY

1. Eye patches are critical:

  • Must be large ovals, not small circles
  • Should extend beyond eye area
  • Create the signature Cavalier “spaniel” look
  • Attach BEFORE inserting eyes

2. Ear length matters:

  • Pattern creates ears about 4-5 inches long
  • Should hang well below head
  • This is THE defining Cavalier feature
  • Don’t make ears too short

3. Brown saddle placement:

  • Should cover most of upper back
  • Starts behind head, extends halfway down back
  • Creates the “Blenheim” marking pattern
  • Position carefully before sewing

4. Muzzle proportions:

  • Should protrude noticeably from face
  • Not too small or flat
  • Cavaliers have moderate muzzle length
  • Stuff lightly for dimension

5. Collar texture:

  • Photo shows dimensional, not flat collar
  • Use multiple strands or textured technique
  • Should look substantial around neck

6. Color accuracy:

  • Pure white (not cream or off-white)
  • Rich chestnut brown (not rust or orange)
  • Rust/terracotta red for collar (not bright red)
  • Golden amber eyes (not black or dark brown)

7. Body proportions:

  • Body should be slightly elongated (not ball-shaped)
  • Legs proportional and sturdy
  • Overall should look like a small spaniel
  • Cavaliers are not tall and leggy

8. Standing stance:

  • Dog should stand naturally on all four legs
  • Front legs slightly closer together than back
  • Slight curve to spine
  • Head positioned naturally on body

TROUBLESHOOTING

Problem: Ears too short

  • Solution: Add 4-6 more rounds before tapering
  • Each round adds about 0.3 inches to length
  • Cavaliers have notably long ears

Problem: Dog won’t stand properly

  • Solution: Stuff legs and body very firmly
  • Position legs at correct angles (front slightly forward, back slightly back)
  • Sew legs through body multiple times for security
  • Ensure all four paws touch surface

Problem: Eye patches look wrong

  • Solution: They should be ovals, not circles
  • Should be large enough to frame eyes completely
  • Position with more length than width
  • Extend from above eye to below

Problem: Saddle patch doesn’t look right

  • Solution: Should cover significant portion of back
  • Not a small spot, but large saddle shape
  • Pin in several positions before sewing
  • Reference Cavalier photos for placement

Problem: Muzzle looks flat

  • Solution: Increase stitch count (use 30 instead of 24)
  • Add one more round of sc for length
  • Stuff more firmly
  • Position slightly lower on face

Problem: Head too small for body

  • Solution: Increase head to 48 sts instead of 42
  • Or decrease body to 30 sts max instead of 36
  • Cavaliers have proportionally larger heads

Problem: Collar looks flat and ribbon-like

  • Solution: Use textured technique (ribbing or twisted cord)
  • Or crochet with multiple strands held together
  • Should be dimensional, not flat

SIZE ADJUSTMENTS

For larger Cavalier (12-14 inches):

  • Use worsted weight yarn with 3.5 mm hook
  • Increase head to 48 sts
  • Increase body to 42 sts
  • Add 4-6 more rounds to body length
  • Add 3-4 rounds to ear length
  • Add 3-4 rounds to leg length

For smaller Cavalier (6-7 inches):

  • Use sport weight yarn with 2.0 mm hook
  • Decrease head to 36 sts max
  • Decrease body to 30 sts max
  • Reduce rounds in body by 4-6
  • Keep ear proportions similar (still need length!)
  • Reduce leg rounds by 2-3

CARE INSTRUCTIONS

  • Spot clean only with damp cloth
  • Do not machine wash (will damage shape)
  • Brush ears gently if they become matted
  • Reshape as needed
  • Store upright in natural standing position
  • Keep away from direct sunlight (colors may fade)

Your Cavalier King Charles Spaniel is complete! With those signature long ears, sweet expression, and beautiful markings, this handmade pup captures the elegance and charm of this beloved breed.

Perfect for dog lovers, Cavalier enthusiasts, or anyone who appreciates detailed amigurumi craftsmanship!


Spread the love

Comments

No comments yet. Why don’t you start the discussion?

Leave a Reply

Your email address will not be published. Required fields are marked *