Buzz into cuteness with the Amigurumi Bee Gnome, a sweet and quirky crochet project that’s sure to bring smiles and springtime charm! 🐝🧶 With its fuzzy yellow stripes, whimsical wings, and signature gnome beard peeking out beneath a pointy bee-themed hat, this little character is a delightful mashup of garden whimsy and cozy folklore. Whether perched on a shelf, gifted to a bee-loving friend, or added to your seasonal décor, this gnome is ready to pollinate joy wherever it lands.
Perfect for crocheters who love playful mashups and expressive details, this pattern offers plenty of room for creative flair. Add tiny flowers to the hat, stitch in a honey pot accessory, or customize the colors for a whole hive of personalities. Whether you’re celebrating spring, supporting your local beekeepers, or just indulging your love of adorable amigurumi, the Bee Gnome is a buzz-worthy way to stitch up happiness—one cheerful loop at a time! 🌼🧵
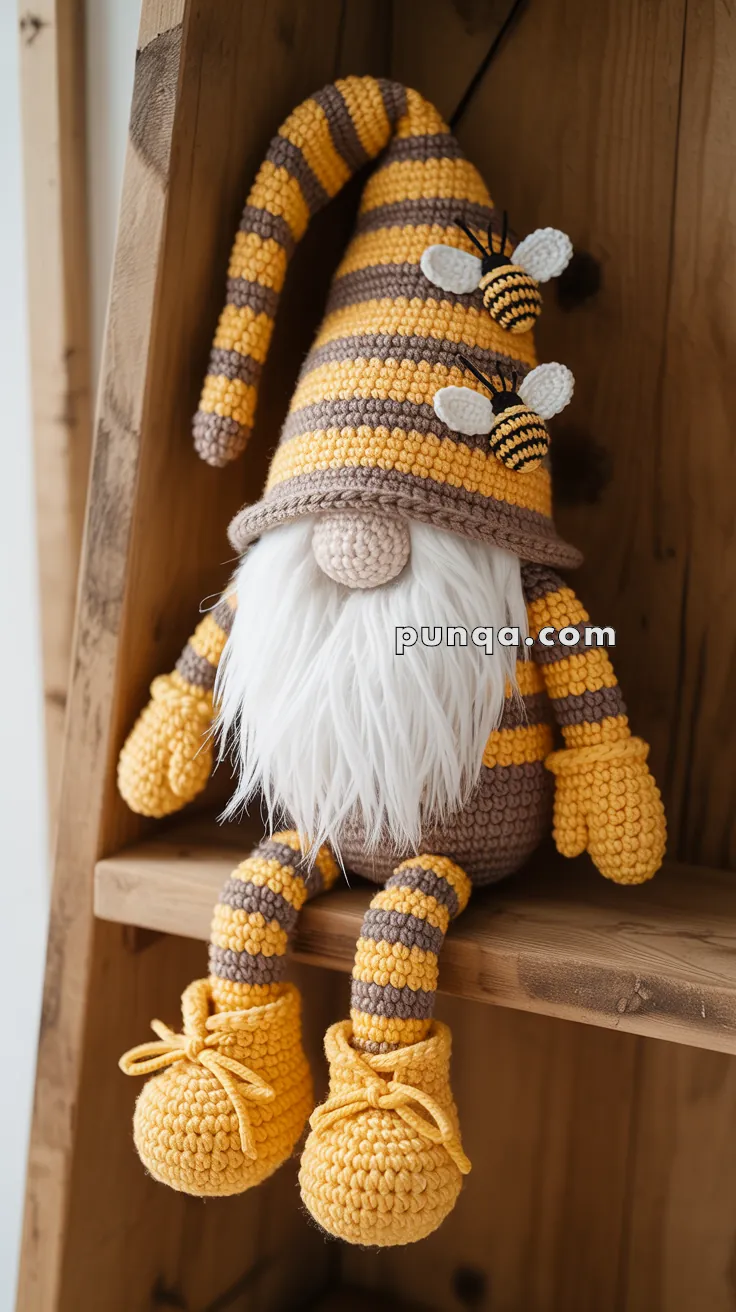
🐝 Bee Gnome Amigurumi Crochet Pattern
Create your own adorable bee-themed gnome complete with an extra-long striped hat, fluffy white beard, cheerful mittens, and two tiny bees perched on the side! This whimsical character combines the charm of Scandinavian gnomes with a sweet honey bee theme.
About This Pattern
Skill Level: Intermediate
Finished Size: Approximately 14-16 inches (36-40 cm) tall including hat
Time to Complete: 12-16 hours
Techniques Required: Magic ring, increasing, decreasing, color changes, basic sewing and assembly
🧶 Materials
Yarn
Worsted weight (Category 4) acrylic or cotton yarn in the following colors:
- Golden Yellow – for hat stripes, leg stripes, arm stripes, mittens, and shoes (approximately 150g)
- Brown or Taupe – for body, hat stripes, leg stripes, and arm stripes (approximately 150g)
- Cream or Beige – for nose (small amount)
- White – for bee wings (small amount) and faux fur or brushed yarn for beard (approximately 30g)
- Black – for bee stripes and antennae (small amount)
Other Supplies
- 3.5mm or 4mm (E/4 or F/5) crochet hook
- Polyfill stuffing
- Yarn needle for sewing
- Stitch markers
- Scissors
- Faux fur yarn OR regular white yarn and a wire brush for creating fluffy beard
- Optional: Pipe cleaner or craft wire for poseable hat
- Small amount of yellow yarn for shoe laces
Gauge
Gauge is not critical for this project, but consistent tension throughout will ensure even stitches and uniform stripes. With a 4mm hook and worsted weight yarn, 18-20 sc = 4 inches (10cm).
🔤 Abbreviations (US Terms)
- MR – Magic Ring
- sc – single crochet
- inc – increase (2 sc in one stitch)
- dec – decrease (sc2tog – single crochet 2 stitches together)
- ch – chain
- sl st – slip stitch
- hdc – half double crochet
- dc – double crochet
- FO – fasten off
- st(s) – stitch(es)
- ( ) x # – repeat instructions in parentheses the number of times indicated
Pattern Instructions
🪡 BODY (Brown/Taupe)
The body forms the base of your gnome. Most of it will be covered by the hat and beard.
R1: MR, 6 sc (6)
R2: inc x6 (12)
R3: (sc, inc) x6 (18)
R4: (2 sc, inc) x6 (24)
R5: (3 sc, inc) x6 (30)
R6: (4 sc, inc) x6 (36)
R7-20: sc around (36)
R21: (4 sc, dec) x6 (30)
R22: (3 sc, dec) x6 (24)
R23: (2 sc, dec) x6 (18)
Stuff firmly with polyfill. FO, leaving a long tail for sewing. Set aside.
🪡 LEGS (Make 2 – Striped Yellow/Brown)
The legs feature bold alternating stripes. Each color is worked for 3 rounds to create clean, visible bands.
Starting with YELLOW:
R1: MR, 6 sc (6)
R2: inc x6 (12)
R3-5: sc around (12) – yellow
R6-8: sc around (12) – brown
R9-11: sc around (12) – yellow
R12-14: sc around (12) – brown
R15-17: sc around (12) – yellow
R18-20: sc around (12) – brown
R21-22: sc around (12) – yellow
FO, leaving a long tail for attaching. Stuff lightly – legs should be soft and flexible, not rigid.
🪡 SHOES (Yellow, Make 2)
The shoes have a rounded, bulbous shape with decorative laces.
R1: MR, 6 sc (6)
R2: inc x6 (12)
R3: (sc, inc) x6 (18)
R4: (2 sc, inc) x6 (24)
R5-6: sc around (24)
R7: (2 sc, dec) x6 (18)
R8: sc around (18)
R9: (sc, dec) x6 (12)
FO, leaving tail for closing. Stuff firmly to create a rounded shoe shape.
Adding Laces:
With matching yellow yarn, chain 20-25. Weave the chain through the stitches at the top of the shoe (around R7-8), then tie in a bow at the center front. Trim ends to desired length.
Assembly:
Insert the bottom of the leg into the opening at the top of the shoe. Sew securely in place using the yarn tails.
🪡 ARMS (Make 2 – Striped Brown/Yellow)
The arms are thinner than the legs and feature alternating stripes.
Starting with BROWN:
R1: MR, 6 sc (6)
R2-4: sc around (6) – brown
R5-7: sc around (6) – yellow
R8-10: sc around (6) – brown
R11-12: sc around (6) – yellow
FO, leaving tail for attaching. Stuff very lightly or leave unstuffed for maximum flexibility.
🪡 MITTENS (Yellow, Make 2)
Simple rounded mittens for the gnome’s hands.
R1: MR, 6 sc (6)
R2: inc x6 (12)
R3-5: sc around (12)
R6: (2 sc, dec) x3 (9)
Stuff lightly. Insert the end of the arm into the mitten opening and sew closed, securing the arm inside.
🪡 HAT (Striped Yellow/Brown)
This is the signature feature of your bee gnome! The hat is a long tube/cone that fits over the body like a sleeve, with the pointed tip at the top and an open brim at the bottom.
Stripe Pattern: Alternate 3 rounds yellow, 3 rounds brown throughout the entire hat.
Starting with YELLOW at the pointed tip:
R1: MR, 6 sc (6)
R2: inc x6 (12)
R3: sc around (12) – complete yellow stripe
R4-6: sc around (12) – brown
R7-9: (sc, inc) x6 (18) – yellow
R10-12: (2 sc, inc) x6 (24) – brown
R13-15: (3 sc, inc) x6 (30) – yellow
R16-18: (4 sc, inc) x6 (36) – brown
R19-21: (5 sc, inc) x6 (42) – yellow
R22-24: (6 sc, inc) x6 (48) – brown
R25-27: (7 sc, inc) x6 (54) – yellow
R28-30: sc around (54) – brown
R31-90+: Continue sc around (54), maintaining the 3-round stripe pattern (yellow for R31-33, brown for R34-36, yellow for R37-39, etc.). Work until hat measures approximately 30-35cm (12-14 inches) total length from the pointed tip. The hat should be long enough to cover most of the body and extend slightly beyond it.
Important: DO NOT decrease or close the bottom. Leave the brim open at 54 stitches so it can slip over the gnome’s body.
FO, leaving a long tail for sewing to the body. Stuff very lightly with small amounts of polyfill – the hat should be soft and drapey, not firm or rigid.
Optional: Thread a pipe cleaner or craft wire through the center of the hat from tip to brim for a bendable, poseable hat that can be shaped and styled.
🪡 NOSE (Cream/Beige)
A small round nose that peeks out from under the hat brim.
R1: MR, 6 sc (6)
R2: inc x6 (12)
R3-4: sc around (12)
FO, leaving tail for sewing. Stuff firmly to create a rounded ball shape.
🧔 BEARD (White)
The fluffy white beard is a key feature that gives your gnome its character.
Method 1 – Using Faux Fur Yarn:
Cut a piece of white faux fur yarn approximately 15cm long and 10cm wide. Attach it to the gnome’s face area under the nose using a yarn needle. Shape and trim as needed to create a full, fluffy pointed beard that flows down over the body front.
Method 2 – Creating Fringe from Regular Yarn (Recommended for fullest look):
- Cut 60-80 strands of white yarn, each 12-15cm long
- Using the latch-hook method, attach the strands in multiple rows under and around the nose area
- Start just below the nose and work downward, attaching strands closely together
- Once all strands are attached, brush vigorously with a wire brush or pet slicker brush until the yarn becomes very fluffy and fuzzy
- Trim into a long, full pointed gnome beard shape that cascades down the front of the body
Tip: The more you brush, the fluffier the beard becomes! Don’t be shy with the brushing.
🐝 BEES (Make 2)
These adorable little bees add the perfect finishing touch to your bee gnome!
Bee Body
R1: MR, 6 sc in yellow (6)
R2: inc x6 in yellow (12)
R3: sc around in yellow (12)
R4: sc around in black (12)
R5: sc around in yellow (12)
R6: sc around in black (12)
R7: sc around in yellow (12)
R8: (2 sc, dec) x3 in yellow (9)
R9: sc around in yellow (9)
Stuff lightly with small amounts of polyfill. FO, weave yarn through remaining stitches and pull tight to close. This creates a slightly elongated oval body shape.
Bee Wings (Make 4 – Two per bee)
Using white yarn:
Ch 8, turn
Starting in 2nd ch from hook: sl st, sc, hdc, dc, dc, hdc, sc, sl st
FO, leaving a long tail for sewing.
Each wing should form a simple oval/teardrop shape. Attach two wings to the back/top of each bee body, positioning them at slight angles.
Bee Antennae (Make 4 – Two per bee)
Using black yarn:
Ch 6, sl st back down the chain
FO, leaving a long tail.
Attach two antennae to the top of each bee’s head, spacing them slightly apart.
🧵 Assembly
Follow these steps to bring your bee gnome to life:
- Attach the legs and shoes to the bottom of the body. Position them at the front, spacing them evenly so the gnome can sit or stand. Sew securely using the yarn tails and a yarn needle.
- Attach the arms and mittens to the upper sides of the body, approximately where the body is widest (around R10-12 of the body). Position them so they extend outward from the sides.
- Slip the hat over the body from bottom to top. The open brim (54 stitches wide) should slide over the body, with the pointed yellow tip extending upward. Pull the hat down to cover approximately 3/4 of the body height. The pointed tip will naturally flop to one side – this is the intended look! Sew the hat brim securely around the body using the yarn tail and working around the circumference.
- Attach the nose to the center front of the body, just below where the hat brim sits. This should be visible below the edge of the hat. Sew in place using the cream/beige yarn tail.
- Attach the beard under and around the nose area. The beard should cover the upper front portion of the body and flow downward. If using the fringe method, the latch-hooked strands should already be attached – just shape and trim. If using faux fur yarn, sew it in place and arrange it to create a full, flowing beard.
- Attach the bees to the SIDE of the striped hat. Position them at different heights on the yellow and brown stripes (not on the hat tip or brim). Space them apart vertically for a playful, whimsical look. The bees should appear to be landing on or resting on the hat. Sew securely through the bee body into the hat fabric.
💡 Tips for Success
- Consistent tension is key for even, clean-looking stripes throughout the project
- Stuff the body firmly, but keep legs and arms soft and flexible for a poseable finished gnome
- The hat should be stuffed minimally – just enough to hold its shape while remaining soft and drapey so it can flop naturally
- The pointed hat tip should extend upward but will naturally lean or flop to the side – embrace this whimsical look!
- If using the yarn fringe method for the beard, brush thoroughly and generously for maximum fluffy volume
- Position the bees at staggered heights on the hat side for the most visual interest
- Make sure the hat opening (54 stitches) is wide enough to slip over the body – don’t skip any of the increase rounds
- Secure the hat firmly to the body so it doesn’t shift or slide around
- Take your time with color changes to avoid visible color bleed between stripes
🔧 Troubleshooting
Hat won’t fit over body: Check that you completed all increase rounds to reach 54 stitches at the brim. If needed, work one more increase round: (8 sc, inc) x6 to reach 60 stitches.
Stripes look messy at color changes: When changing colors, always complete the last stitch of the old color until the final yarn over, then pull through with the new color. Carry the unused color inside your work and crochet over it.
Legs or arms too floppy: Add a bit more stuffing or work with slightly tighter tension.
Hat too stiff: Use less stuffing. The hat should be soft and pliable.
Beard not fluffy enough: Brush more! With the fringe method, extensive brushing is what creates that fuzzy, gnome-like beard texture.
📋 Pattern Notes
- This pattern creates a tube-style hat (pointed tip at top, open bottom) that fits over the gnome’s body like a sleeve
- The hat starts with yellow at the pointed tip
- All striped pieces (hat, legs, arms) use consistent 3-round intervals for each color
- Bees are sewn to the side of the hat tube, not to the tip or brim
- The beard should be very full and fluffy for an authentic gnome appearance
- Legs start with yellow at the top where they attach to the body
Customization Ideas:
- Adjust hat length by working more or fewer rounds in the straight section (R31-90+)
- Change the color scheme – try orange and black for a bumblebee look, or pastels for spring
- Add more bees for a busier, more populated hat!
- Embroider simple faces on the bees for extra personality
- Create a standing base by stuffing the body even more firmly and weighing it slightly
🌟 Your Bee Gnome is Complete!
Congratulations on completing your Bee Gnome! This charming character makes a delightful decoration for any season, a wonderful gift, or a special addition to your amigurumi collection. Display your gnome on a shelf, mantle, or bookcase where its whimsical hat and fuzzy beard can bring smiles.
Share Your Creation: We’d love to see your finished bee gnomes! The beauty of handmade items is that each one is unique.
Pattern Design Notes: This pattern is designed to match the proportions and styling shown, with an extra-long striped hat, bold yellow and brown color scheme, and playful bee embellishments.
Happy Crocheting! 🐝💛