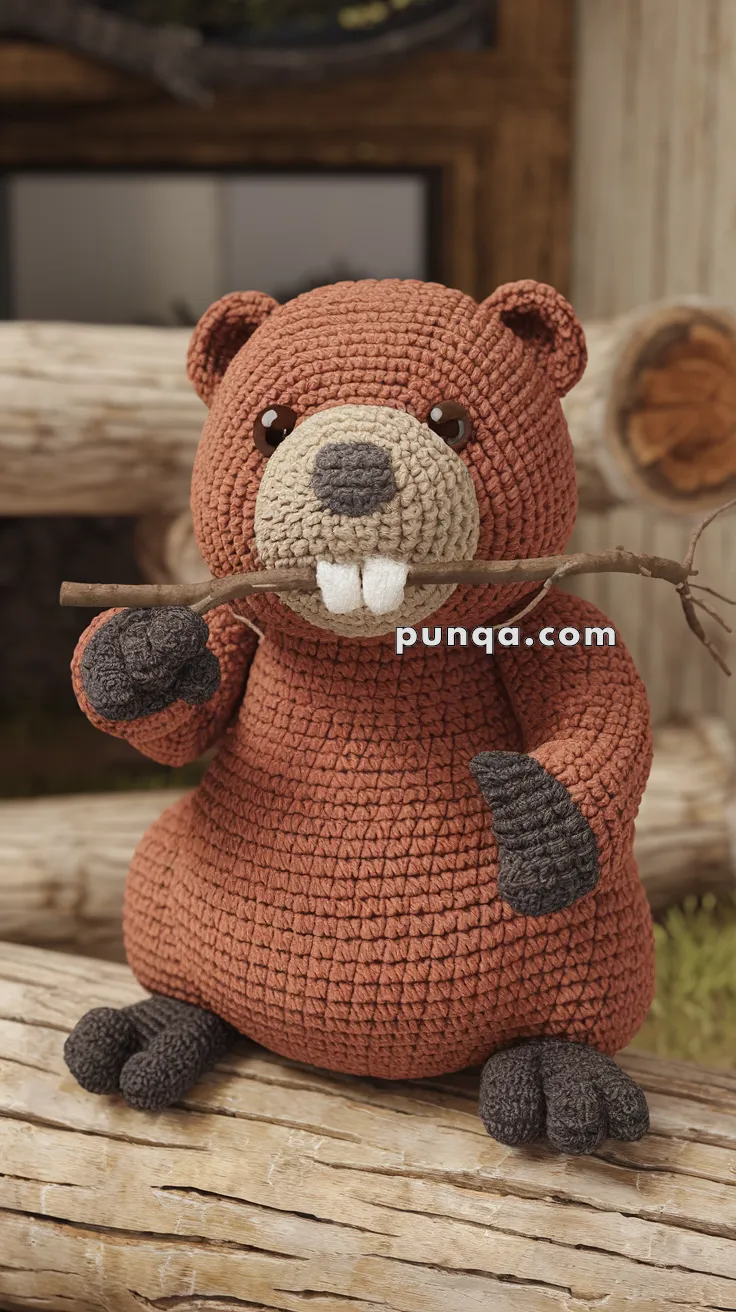
Bring a touch of woodland charm to your crochet collection with this Amigurumi Beaver pattern! Whether you’re crafting for nature lovers, playful decor, or simply enjoy making adorable amigurumi animals, this free pattern lets you stitch up a delightful beaver full of personality. With its cute little paws, textured tail, and expressive face, this crochet beaver captures the essence of these hardworking creatures in every stitch. Perfect for gifting to fellow wildlife enthusiasts, decorating a cozy space, or simply celebrating the joy of crochet, this amigurumi beaver is sure to bring smiles—one stitch at a time! 🦫✨
Designed for customization, this pattern allows you to experiment with different fur shades, embroidered details, or even tiny accessories like a miniature log or a tiny dam for extra charm. Craft a classic brown beaver, create a pastel version for a whimsical aesthetic, or even stitch up a full forest-inspired set with matching woodland friends! Whether displayed as a lovable accent, gifted to a fellow crochet lover, or made simply for the joy of crafting, this Amigurumi Beaver is a fun and creative project—perfect for bringing a touch of nature to every stitch! 🧶🌲

🦫 Amigurumi Beaver Crochet Pattern
Bring a cozy woodland touch to your crochet collection with this adorable beaver plush! With his chubby belly, big buck teeth, and twig-chewing pose, this chunky forest friend is full of rustic charm. Whether you’re making a woodland nursery buddy or a cottage-core décor piece, this soft crochet beaver will steal hearts instantly. 🌲💚
✨ Skill Level
Intermediate – features shaping, sewing, and light surface stitching for texture.
📏 Finished Size
Approximately 28–30 cm (11–12 in) tall when made with velvet or chenille yarn and a 3.5–4.0 mm hook.
🧶 Materials Needed
-
Color A: Reddish brown – 80 g (head, body, upper arms, ears)
-
Color B: Dark brown – 40 g (paws, feet, tail)
-
Color C: Light beige – 25 g (upper and lower muzzle)
-
Color D: Medium gray – 5 g (nose)
-
White: 5 g (teeth)
-
12–14 mm safety eyes
-
Polyester fiberfill
-
Crochet hook 3.5–4 mm
-
Tapestry needle, scissors, stitch marker
-
Small clean twig (10–12 cm) for the accessory
🧵 Abbreviations (US Terms)
MR – Magic Ring
sc – Single Crochet
inc – Increase (2 sc in same st)
dec – Decrease (sc 2 tog)
sl st – Slip Stitch
BLO – Back Loop Only
FO – Fasten Off
🪶 Head & Body (Worked Together – Color A)
Start from top of head
MR 6 sc [6]
(inc) × 6 [12]
(1 sc, inc) × 6 [18]
(2 sc, inc) × 6 [24]
(3 sc, inc) × 6 [30]
(4 sc, inc) × 6 [36]
R7–R14 sc [36]
(4 sc, dec) × 6 [30]
(3 sc, dec) × 6 [24]
Widen for belly:
(2 sc, inc) × 8 [32]
(3 sc, inc) × 8 [40]
(4 sc, inc) × 8 [48]
R19–R30 sc [48] – keep round and plump.
(6 sc, dec) × 6 [42]
(5 sc, dec) × 6 [36]
(4 sc, dec) × 6 [30]
(3 sc, dec) × 6 [24] – start stuffing firmly.
(2 sc, dec) × 6 [18]
(1 sc, dec) × 6 [12]
dec × 6 [6] FO and close.
Eye placement: between Rounds 8–9, about 10 stitches apart.
🐽 Two-Part Muzzle (Color C)
Upper Muzzle
MR 6 sc [6]
(inc) × 6 [12]
(1 sc, inc) × 6 [18]
(2 sc, inc) × 6 [24]
(3 sc, inc) × 6 [30]
R6–R8 sc [30]
R9 (3 sc, dec) × 6 [24]
Stuff lightly; FO with long tail.
Lower Muzzle (Chin Pad)
MR 6 sc [6]
(inc) × 6 [12]
(1 sc, inc) × 6 [18]
R4–R5 sc [18]
Do not overstuff.
Assembly: Sew the upper muzzle covering the lower 2⁄3 of the face, bottom edge near R12–R13. Sew the lower muzzle just under it for a nice forward-projecting shape.
👃 Nose (Color D)
MR 6 sc [6]
(inc) × 6 [12]
R3–R4 sc [12]
FO and flatten slightly. Sew centered on top of upper muzzle.
👀 Eyes
Insert 12–14 mm safety eyes right above the muzzle between R8–R9. Add tiny white highlight stitches if desired.
🦷 Teeth (White – Make 2)
Ch 7.
R1: sc in 2nd ch from hook and across (6).
R2–R4: sc across (6).
R5 (optional rounding): sc, sc, dec, sc, sc (5).
FO with tail.
Sew side-by-side to the front edge of the upper muzzle, letting them extend slightly over the lower chin pad for a forward bite.
💪 Arms × 2 (Color B → A)
Palm (Color B): MR 6 → (inc) × 6 [12] → R3–R4 sc 12
Forearm (Color A): R5–R8 sc 12 → stuff lightly → FO.
Attach angled forward so dark palms face front and appear to grip the twig.
Add 3 surface-stitched black lines on each palm for claws.
🦶 Feet × 2 (Color B)
Foot Base:
MR 6 → (inc) × 6 [12] → (1 sc, inc) × 6 [18]
R4–R6 sc 18
R7 (1 sc, dec) × 6 [12] → stuff → FO.
Toes (3 per foot):
MR 5 → R2 sc 5 → FO → lightly stuff.
Sew 3 toes evenly across front edge of each foot, fanning slightly outward. Attach feet to bottom sides of body so toes point forward and slightly out.
🦫 Tail (Color B)
MR 6 → (inc) × 6 [12] → (1 sc, inc) × 6 [18]
R4–R10 sc 18
R11 (1 sc, dec) × 6 [12]
R12 dec × 6 [6] FO. Flatten, lightly stuff, sew to lower back.
Texture Detail: Surface-stitch a criss-cross lattice every 2–3 stitches horizontally and vertically for classic beaver tail pattern.
👂 Ears × 2 (Color A)
MR 6 → (1 sc, inc) × 3 [9] → R3 sc [9] → FO. Flatten and sew on upper sides of head.
🌿 Stick Accessory
Find a smooth, clean twig (~10–12 cm). Place between the teeth and tack lightly to the palms with thread. Avoid hot glue on plush yarn.
🧺 Assembly Order
1️⃣ Sew upper and lower muzzle to face, then nose and teeth.
2️⃣ Insert eyes and embroider highlights if desired.
3️⃣ Attach arms forward to hold twig.
4️⃣ Sew feet with toes fanned out.
5️⃣ Attach tail and ears.
6️⃣ Shape and fluff gently for a plush, rounded look.
💡 Customization Ideas
-
Crochet a mini log instead of using a real stick.
-
Use bouclé or brushed yarn for a furry texture.
-
Add a tiny maple leaf appliqué for Canadian flair.
💕 Your Finished Beaver
You now have the perfect chunky woodland beaver—complete with big cheeks, oversized teeth, and a twig snack! This snuggly forest friend adds warmth to any handmade collection and makes a delightful nature-themed gift. 🌿🦫
