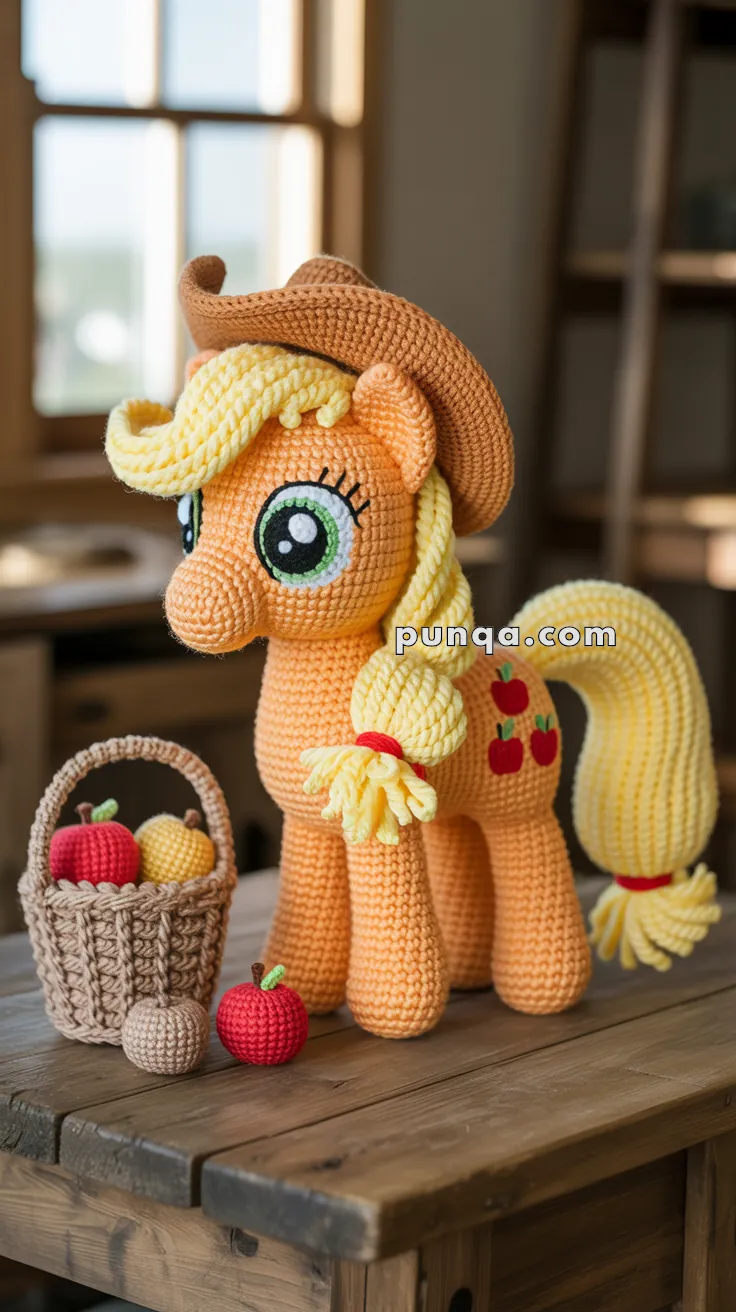
Saddle up for a fun crochet adventure with this Amigurumi Applejack pattern! Inspired by the hardworking and honest pony from My Little Pony, this adorable design captures Applejack’s signature cowboy hat, bright orange coat, and sweet freckles in every stitch. Whether you’re crafting for fans of the series, adding a playful touch to your collection, or simply enjoy making character-inspired amigurumi designs, this pattern lets you stitch up a miniature Applejack bursting with personality! Perfect for brightening up any space, this crochet creation brings a touch of handmade country charm to your collection. 🐴✨
Designed for customization, this pattern allows you to experiment with different shades of orange, embroidered details, or even tiny accessories like a miniature apple or lasso for extra flair. Craft a classic Applejack with her signature look, create a whimsical version with pastel hues, or even stitch up a full set of My Little Pony-inspired amigurumi for a delightful display! Whether gifted as a quirky keepsake, displayed as a charming accent, or made simply for the joy of crafting, this Amigurumi Applejack is a fun and creative project—perfect for bringing a touch of handmade pony magic to every stitch! 🧶💖✨
🍎 Amigurumi Applejack-Inspired Country Pony Crochet Pattern
Bring a little country charm to your crochet collection with this cheerful farm pony. 🐴👒
This detailed amigurumi features a warm orange coat, a large rounded head, an elongated muzzle, oversized green eyes with dramatic lashes, pointed ears, a sweeping golden forelock, a tied side mane, a full curved tail, four sturdy standing legs, a broad cowgirl hat, and three bright apples decorating the flank.
The pony is designed to stand on all four legs. Firm stuffing, broad feet, a substantial body, and careful leg placement create a stable display pose, while the thick mane and tail add the soft, flowing character of the finished doll.
✨ Skill Level
Intermediate to Advanced
This pattern includes:
- Oval and cylindrical shaping
- A four-legged standing construction
- Separate neck and head
- Layered crocheted eyes
- An elongated dimensional muzzle
- Double-layered pointed ears
- Dense yarn-strand hair
- A curved cowgirl hat
- Crocheted apple appliqués
- Optional basket and miniature apples
- Detailed pose-based assembly
📏 Finished Size
Using DK or light-worsted cotton yarn with a 2.75–3 mm crochet hook, the finished pony measures approximately:
- 29–32 cm (11½–12½ in) tall to the top of the hat
- 25–27 cm (9¾–10½ in) from hoof to ear
- 24–27 cm (9½–10½ in) from chest to rump
- Approximately 13–15 cm (5–6 in) wide through the body
The finished measurements may vary depending on yarn, hook size, tension, stuffing, and hair volume.
🧶 Yarn Requirements
Use smooth DK cotton, cotton-blend, or light-worsted yarn for the crocheted pieces. A soft acrylic or cotton-acrylic yarn works especially well for the mane and tail.
- 🧡 Warm light orange — 210–240 g
- 💛 Pale golden yellow — 115–140 g
- 🤎 Medium warm brown — 75–90 g
- 🤍 White — 18–25 g
- 💚 Bright green — 10–15 g
- 🖤 Black — 8–12 g
- ❤️ Apple red — 18–25 g
- 🌿 Leaf green — 5–8 g
- Dark brown for apple stems — 3–5 g
- Beige or natural tan for the optional basket — 40–55 g
Polyester fiberfill — approximately 280–350 g
Allow an additional 20–30 g of golden-yellow yarn when making an especially full mane and tail.
🧵 Materials
- 2.75–3 mm crochet hook
- Optional 2.5 mm hook for eye and apple details
- Polyester fiberfill
- Tapestry needle
- Fine embroidery needle
- Stitch markers
- Pins for positioning
- Scissors
- Small comb or wide-tooth comb
- Optional plastic pellets for body stability
- Optional plastic canvas for the hooves
- Optional 1.5–2 mm aluminum craft wire for the tail
- Floral tape for wrapping wire
- Optional fabric-safe steam source for shaping the hat
Embroidered or crocheted eyes are recommended. Avoid glue when the finished pony will be handled as a toy.
🔤 Abbreviations — US Terms
- MR — Magic Ring
- sc — Single Crochet
- inc — Increase: 2 sc in the same stitch
- dec — Invisible Decrease
- sl st — Slip Stitch
- ch — Chain
- hdc — Half Double Crochet
- dc — Double Crochet
- tr — Treble Crochet
- BLO — Back Loop Only
- FLO — Front Loop Only
- FO — Fasten Off
- st — Stitch
Work in continuous rounds unless instructed otherwise.
🐎 Body
The body is a long, rounded cylinder with a full chest and rump. It is worked from the rear toward the chest.
Using orange yarn:
R1
MR 6. (6)
R2
inc ×6. (12)
R3
(1 sc, inc) ×6. (18)
R4
(2 sc, inc) ×6. (24)
R5
(3 sc, inc) ×6. (30)
R6
(4 sc, inc) ×6. (36)
R7
(5 sc, inc) ×6. (42)
R8
(6 sc, inc) ×6. (48)
R9–25
sc around. (48)
Begin stuffing firmly.
R26
(6 sc, dec) ×6. (42)
R27–30
sc around. (42)
R31
(5 sc, dec) ×6. (36)
R32–34
sc around. (36)
Continue stuffing. Keep the rump full and the lower surface gently flattened.
R35
(4 sc, dec) ×6. (30)
R36
(3 sc, dec) ×6. (24)
Finish stuffing firmly.
FO, leaving a long sewing tail.
The closed end is the rear of the body, while the 24-stitch opening faces the chest and neck.
🦒 Upright Neck
The neck is long and nearly vertical, widening slightly where it joins the body.
Using orange yarn:
R1
MR 6. (6)
R2
inc ×6. (12)
R3
(1 sc, inc) ×6. (18)
R4
(2 sc, inc) ×6. (24)
R5–19
sc around. (24)
R20
(3 sc, inc) ×6. (30)
R21–23
sc around. (30)
Stuff very firmly.
FO, leaving a long sewing tail.
The wider end attaches to the front upper body. The 24-stitch end supports the head.
🪡 Attaching the Neck
Position the lower, wider neck end over the upper-front body.
The neck should:
- Rise almost vertically
- Lean slightly forward
- Sit between the two front legs
- Leave enough shoulder space for the side mane
- Be firmly supported with dense stuffing
Sew around the base several times.
Add hidden stitches between the back of the neck and upper body to prevent wobbling.
🐴 Head
The head is large, rounded, and slightly elongated from front to back.
Using orange yarn:
R1
MR 6. (6)
R2
inc ×6. (12)
R3
(1 sc, inc) ×6. (18)
R4
(2 sc, inc) ×6. (24)
R5
(3 sc, inc) ×6. (30)
R6
(4 sc, inc) ×6. (36)
R7
(5 sc, inc) ×6. (42)
R8
(6 sc, inc) ×6. (48)
R9–19
sc around. (48)
R20
(6 sc, dec) ×6. (42)
R21
(5 sc, dec) ×6. (36)
R22
(4 sc, dec) ×6. (30)
Begin stuffing firmly.
R23
(3 sc, dec) ×6. (24)
R24
(2 sc, dec) ×6. (18)
Continue stuffing, keeping the forehead rounded and the lower face slightly narrower.
R25
(1 sc, dec) ×6. (12)
R26
dec ×6. (6)
FO and close.
Shape the head into a broad oval. Gently flatten the lower-front area where the muzzle will be attached.
🐽 Elongated Muzzle
The muzzle is a broad horizontal oval rather than a small round bump.
Using orange yarn:
R1
Ch 8.
Starting in the second chain:
6 sc, 3 sc in the final chain.
Continue along the opposite side:
5 sc, inc. (16)
R2
inc, 5 sc, 3 inc, 5 sc, 2 inc. (22)
R3
(3 sc, inc) ×5, 2 sc. (27)
R4–7
sc around. (27)
R8
(7 sc, dec) ×3. (24)
R9
sc around. (24)
Lightly stuff, keeping the front rounded and the back opening flexible.
FO, leaving a long sewing tail.
🪡 Positioning the Muzzle
Pin the muzzle horizontally across the lower face.
It should:
- Sit beneath the eyes
- Project clearly forward
- Be wider than it is tall
- Angle very slightly downward
- Leave a smooth forehead above
- Sit centrally when viewed from the front
Sew the upper edge first.
Add or remove stuffing before closing the lower edge.
Keep the stitches relaxed so the base does not pinch inward.
👃 Nostrils and Smile
Using dark-brown or black embroidery thread:
- Stitch one tiny curved nostril on each upper side of the muzzle.
- Add a short curved smile near one lower corner if desired.
Keep the markings subtle.
👂 Outer Ears — Make 2
The ears are long, pointed, and slightly cupped.
Using orange yarn:
R1
MR 4. (4)
R2
(1 sc, inc) ×2. (6)
R3
(2 sc, inc) ×2. (8)
R4
(3 sc, inc) ×2. (10)
R5
(4 sc, inc) ×2. (12)
R6
(5 sc, inc) ×2. (14)
R7–11
sc around. (14)
Do not stuff.
Flatten and FO, leaving a long sewing tail.
🩷 Inner Ears — Make 2
Use a slightly darker peach yarn, or reuse orange yarn for a monochrome finish.
R1
Ch 7.
Starting in the second chain:
sl st, sc, hdc, 2 dc, 5 dc in the final chain.
Continue along the opposite side:
2 dc, hdc, sc, sl st.
FO.
Sew one inner panel to the front of each outer ear, leaving an orange border.
Pinch each ear base to form a gentle cup.
🪡 Attaching the Ears
Position the ears high on the head, behind the eyes and beneath the hat.
Angle them slightly outward.
The ears should remain visible at the sides of the hat brim.
Sew through the pinched bases several times.
👀 White Eye Bases — Make 2
The eyes are very large and dominate the face.
Using white yarn and the smaller hook:
R1
Ch 8.
Starting in the second chain:
6 sc, 3 sc in the final chain.
Continue along the opposite side:
5 sc, inc. (16)
R2
inc, 5 sc, 3 inc, 5 sc, 2 inc. (22)
R3
sc around. (22)
FO, leaving a long sewing tail.
Flatten each piece into a tall oval.
💚 Green Irises — Make 2
Using bright-green yarn:
R1
MR 6. (6)
R2
inc ×6. (12)
R3
(1 sc, inc) ×6. (18)
FO.
Sew one iris to the center of each white eye, slightly closer to the inner edge.
🖤 Pupils — Make 2
Using black yarn:
R1
MR 6. (6)
R2
inc ×6. (12)
FO.
Sew one pupil to each green iris.
Add:
- One large white highlight
- One small white highlight
The highlights should sit toward the upper outer area of each pupil.
🖤 Eye Outlines and Lashes
Using black embroidery thread:
- Outline each green iris.
- Add a thin upper line along the white eye.
- Embroider three or four long lashes at the upper outer corner.
- Add one or two shorter lashes beside them.
The lashes should sweep upward and outward.
🪡 Attaching the Eyes
Position the eyes on the front sides of the head, leaving enough space for the muzzle between and below them.
The eyes should:
- Sit high on the face
- Angle slightly toward the muzzle
- Be partly framed by the forelock
- Remain level when viewed from the front
Pin both eyes before sewing.
🦵 Legs — Make 4
The legs are long, straight, and substantial enough to support the standing body.
Using orange yarn:
R1
MR 6. (6)
R2
inc ×6. (12)
R3
(1 sc, inc) ×6. (18)
R4–18
sc around. (18)
R19
(4 sc, dec) ×3. (15)
R20–22
sc around. (15)
Stuff firmly from the bottom upward.
Leave the upper two rounds slightly softer for easier attachment.
Flatten the upper opening.
FO, leaving a long sewing tail.
🐾 Rounded Hooves — Make 4
The hooves are integrated visually with the legs but worked separately to create wider, flatter bases.
Using orange yarn:
R1
Ch 7.
Starting in the second chain:
5 sc, 3 sc in the final chain.
Continue along the opposite side:
4 sc, inc. (14)
R2
inc, 4 sc, 3 inc, 4 sc, 2 inc. (20)
R3
(3 sc, inc) ×5. (25)
R4–6
sc around. (25)
R7
(3 sc, dec) ×5. (20)
Stuff firmly.
FO, leaving a long sewing tail.
Sew one hoof to the lower end of each leg.
Keep the longer oval direction facing forward.
Optional: insert a plastic-canvas oval inside each hoof before closing.
🪡 Attaching the Legs
Place the pony upright on a flat surface before pinning the legs.
Front Legs
Attach the front legs beneath the chest.
Keep them:
- Parallel
- Slightly closer together than the rear legs
- Nearly vertical
- Positioned beneath the neck and shoulders
Rear Legs
Attach the rear legs beneath the rump.
Place them slightly wider apart for stability.
Check the pony from the front, back, and sides before sewing.
Reinforce every leg seam thoroughly.
💛 Forelock
Cut approximately 16–20 strands of yellow yarn measuring 22–26 cm (8¾–10¼ in).
Attach them across the upper forehead using lark’s head knots.
Use denser placement along one side of the hairline.
Sweep the strands across the forehead and toward one side of the muzzle.
Secure a few hidden strands near the temple so the forelock holds its curved shape.
Trim only after the hat has been fitted.
💛 Side Mane
Cut approximately 30–40 strands of yellow yarn measuring 28–34 cm (11–13½ in).
Attach the strands:
- Behind one ear
- Along the back edge of the neck
- Down toward the shoulder
Gather the lower half of the mane beside the neck.
Wrap a narrow red yarn band around the bundle.
Leave the ends loose beneath the band, forming a full tassel rather than a tight braid.
Trim the tassel ends unevenly for a soft, natural finish.
❤️ Mane Tie
Using red yarn:
Ch 15.
Join into a ring and work 2 rounds of sc.
FO.
Wrap the band around the gathered mane and sew it closed.
Add several hidden stitches through the mane and neck so the tie does not slip.
💛 Full Curved Tail
The tail has a thick curved upper section and a loose tassel at the bottom.
Crocheted Tail Core
Using yellow yarn:
R1
MR 6. (6)
R2
inc ×6. (12)
R3
(1 sc, inc) ×6. (18)
R4
(2 sc, inc) ×6. (24)
R5–26
sc around. (24)
R27
(2 sc, dec) ×6. (18)
R28–31
sc around. (18)
Stuff progressively, leaving the lower opening unclosed.
FO, leaving a long sewing tail.
Shape the tube into a broad downward curve.
Optional: insert a looped, floral-tape-wrapped wire before closing.
💛 Tail Tassel
Cut approximately 25–35 yellow strands measuring 22–26 cm (8¾–10¼ in).
Attach them densely around the open lower tail edge.
Gather the strands approximately 2 cm below the crocheted tube.
Tie with a red band.
Trim the tassel into a soft fan shape.
🪡 Attaching the Tail
Sew the wide end of the tail high on the rear body.
Curve it outward, upward, and then downward.
The lower tassel should hang near the hocks without touching the floor.
Add one hidden tacking stitch between the upper curve and rump if extra support is needed.
🍎 Apple Cutie Marks — Make 3
Using red yarn and the smaller hook:
R1
MR 6. (6)
R2
inc ×6. (12)
R3
(1 sc, inc) ×6. (18)
R4
sc around. (18)
FO.
Flatten each apple slightly.
Pull one small sculpting stitch downward through the upper center to create the apple indentation.
🌿 Apple Leaves — Make 3
Using green yarn:
Ch 5.
Starting in the second chain:
sl st, sc, hdc, sl st.
FO.
🤎 Apple Stems — Make 3
Using dark-brown yarn:
Ch 4.
Starting in the second chain, sl st across.
FO.
Sew one stem and leaf to the top of each apple.
🪡 Attaching the Cutie Mark
Arrange the three apples on one rear flank:
- One apple higher
- Two apples below
- Leaves angled in slightly different directions
Sew the apples flat against the body.
Keep them clear of the rear leg and tail seam.
🤠 Cowgirl Hat Crown
The hat has a shallow rounded crown and an extra-wide curved brim.
Using brown yarn:
R1
MR 6. (6)
R2
inc ×6. (12)
R3
(1 sc, inc) ×6. (18)
R4
(2 sc, inc) ×6. (24)
R5
(3 sc, inc) ×6. (30)
R6
(4 sc, inc) ×6. (36)
R7
(5 sc, inc) ×6. (42)
R8–14
sc around. (42)
R15
BLO sc around. (42)
FO.
Lightly stuff only the upper crown if needed. The lower edge should remain flexible.
🤠 Hat Brim
Attach brown yarn to the unused front loops of Crown R15.
R1
(6 sc, inc) ×6. (48)
R2
(7 sc, inc) ×6. (54)
R3
(8 sc, inc) ×6. (60)
R4
(9 sc, inc) ×6. (66)
R5
sc around. (66)
R6
(10 sc, inc) ×6. (72)
R7–8
sc around. (72)
FO.
The finished brim should be substantially wider than the crown.
🪄 Shaping the Hat
Dampen or lightly steam the brim.
Shape it while warm:
- Lift both side edges upward.
- Curve the front brim slightly downward at the center.
- Lift one front corner into a playful curl.
- Keep the back brim gently raised.
- Press a shallow crease along the top of the crown.
Allow the hat to cool completely before attaching it.
Do not place a hot iron directly on synthetic yarn.
🪡 Attaching the Hat
Place the hat over the top of the head.
It should sit:
- Behind the forelock
- Slightly tilted
- Low enough to frame the ears
- High enough to keep the eyes uncovered
Sew the crown to the head at several hidden points.
Do not sew the entire brim flat.
🧺 Optional Apple Basket
Basket Base
Using natural tan yarn:
R1
MR 6. (6)
R2
inc ×6. (12)
R3
(1 sc, inc) ×6. (18)
R4
(2 sc, inc) ×6. (24)
R5
(3 sc, inc) ×6. (30)
R6
BLO sc around. (30)
R7–14
sc around. (30)
R15
Reverse sc around for a corded rim.
FO.
🧺 Basket Texture
For a more woven appearance, embroider diagonal strands around the basket:
- Pass yarn diagonally over two rounds.
- Work around the basket in one direction.
- Repeat diagonally in the opposite direction.
- Keep the strands loose enough to avoid puckering.
🧺 Basket Handle
Using tan yarn:
Ch 35.
Starting in the second chain, sc across.
Work one more row of sc for strength.
FO.
Sew one handle end to each upper side of the basket.
Add a second line of stitching at each join.
🍎 Miniature Apples
Use red, yellow, or pale-brown yarn.
Apple
R1
MR 6. (6)
R2
inc ×6. (12)
R3
(1 sc, inc) ×6. (18)
R4–6
sc around. (18)
R7
(1 sc, dec) ×6. (12)
Stuff.
R8
dec ×6. (6)
FO and close.
Pull a strand from the base through the top and back to create a slight indentation.
Add a short brown stem and a tiny green leaf.
Make three to five apples for the basket and display.
🪡 Main Assembly Order
For the cleanest result, assemble the pony in this order:
- Complete and stuff the body.
- Attach the neck.
- Complete the head and muzzle.
- Add the eyes and lashes.
- Attach the ears.
- Sew the head to the neck.
- Complete the legs and hooves.
- Pin and attach all four legs.
- Add the apple flank markings.
- Install the forelock and side mane.
- Complete and attach the tail.
- Shape and attach the hat.
- Make the optional basket and apples.
- Trim and arrange all hair last.
✨ Final Shaping
- Keep the body long and horizontal.
- Make the neck tall and nearly upright.
- Angle the head slightly downward toward the muzzle.
- Position both eyes evenly.
- Let the forelock sweep dramatically across the forehead.
- Keep the mane full beside the neck.
- Curve the tail into a broad arc.
- Place all four hooves flat on the display surface.
- Angle the ears outward beneath the hat.
- Keep the hat brim wide and visibly curled.
- Position the apple marks clearly on the rear flank.
💡 Stability Tips
- Place a small fabric pouch of plastic pellets inside the lower body.
- Insert plastic-canvas ovals into the hooves.
- Stuff the legs and neck very firmly.
- Reinforce the neck-to-body and head-to-neck seams several times.
- Pin all four legs while the pony stands on a flat surface.
- Attach the diagonal opposite legs first, then recheck the balance.
- Tack the tail curve lightly to the rump if it pulls the body backward.
- Avoid overstuffing the hat.
🧼 Care Instructions
Spot clean gently with a damp cloth.
Allow the pony to air dry completely.
Comb the mane and tail carefully with your fingers after storage.
Avoid machine washing when wire, pellets, plastic canvas, or shaped hat elements are used.
Store upright without crushing the hat, ears, mane, or tail.
🌟 Final Thoughts
Your country pony is ready for a day on the apple farm. 🍎🐴
With her expressive green eyes, long orange muzzle, upright ears, sweeping golden forelock, tied side mane, dramatic curved tail, sturdy standing legs, broad cowgirl hat, and three bright apple markings, this handmade character is packed with warm country personality.
Add the miniature woven basket and apples for a complete harvest display, or let the pony stand proudly on her own as a charming centerpiece.
Happy Crocheting! 🧶👒🍎