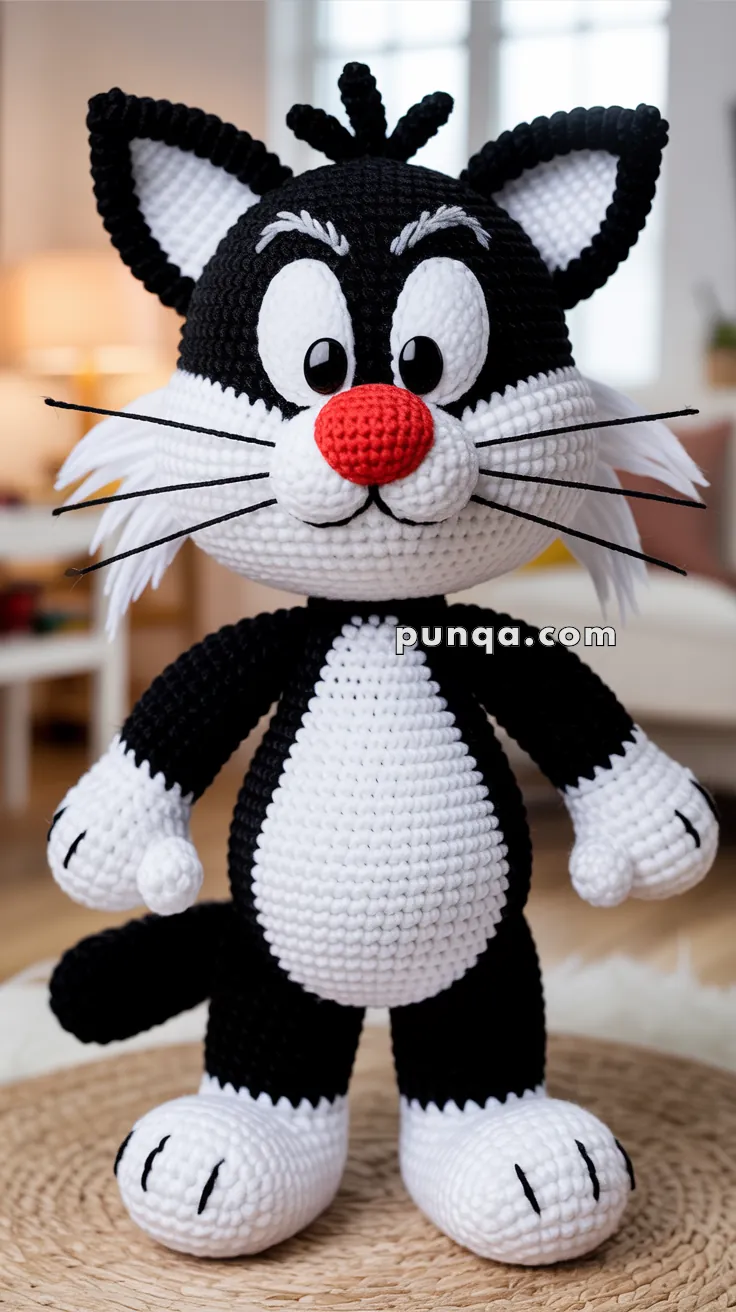
Bring a dash of classic cartoon mischief to your crochet collection with this Amigurumi Sylvester the Cat pattern! 🐱🎬 With his signature black-and-white fur, oversized red nose, and that eternally flustered expression, Sylvester is ready to leap off the screen and into your yarn stash. Whether you’re a lifelong Looney Tunes fan or just love crafting expressive characters, this iconic feline is a playful and nostalgic project that’s sure to spark smiles and maybe a few “Sufferin’ succotash!” moments.
Designed with bold shapes and animated charm, this pattern invites you to explore fun colorwork, sculpted features, and whimsical extras like a tiny Tweety companion or a mischievous pose. Customize Sylvester with your favorite yarns or add embroidered details to bring out his personality. Whether perched on a shelf, gifted to a cartoon lover, or starring in a handmade toon-town scene, this Sylvester Amigurumi is a joyful and satisfying project—perfect for stitching up a little animated magic, one loop at a time! 🧶✨📺
🐾 Amigurumi Sylvester the Cat Crochet Pattern
Bring this classic Looney Tunes icon to life with yarn, imagination, and a dash of mischief! This amigurumi Sylvester the Cat captures every beloved detail — from his oversized red nose and fluffy white muzzle to his expressive oval eyes and trademark whiskers. Perfect for cartoon lovers, collectors, or anyone who adores personality-packed crochet creations.
✨ Skill Level
Intermediate to Advanced
Includes:
- sculpted shaping
- large facial appliqués
- color blocking
- dimensional assembly
- whisker installation
- oversized cartoon proportions
📏 Finished Size
Approx. 34–38 cm (13–15 inches) tall
Using velvet or chenille yarn with a 4.0 mm hook.
🧶 Yarn Requirements
Black Yarn
Approx. 140 g
Used for:
- head
- outer body
- ears
- arms
- legs
- tail
- upper face
White Yarn
Approx. 120 g
Used for:
- muzzle
- belly
- cheeks
- paws
- feet
- eye whites
- inner ears
Bright Red Yarn
Approx. 12 g
Used for:
- nose
Black Embroidery Thread
Small amount
Used for:
- claws
- mouth
- outlines
White Embroidery Thread
Small amount
Used for:
- eyebrows
Whiskers
Use:
- black fishing line
- coated jewelry wire
- nylon whisker cord
🧵 Supplies
- 4.0 mm crochet hook
- Fiberfill stuffing
- Yarn needle
- Stitch markers
- 22–24 mm black safety eyes
- Fabric glue (optional)
- Floral wire (optional for tail)
🔤 Abbreviations (US Terms)
- MR – magic ring
- sc – single crochet
- inc – increase
- dec – invisible decrease
- ch – chain
- sl st – slip stitch
- FO – fasten off
- BLO – back loop only
🐱 Head (Large Rounded Cartoon Shape)
The head should be dramatically oversized compared to the body and almost perfectly spherical.
Black Yarn
R1: MR 6 sc (6)
R2: inc x6 (12)
R3: (1 sc, inc) x6 (18)
R4: (2 sc, inc) x6 (24)
R5: (3 sc, inc) x6 (30)
R6: (4 sc, inc) x6 (36)
R7: (5 sc, inc) x6 (42)
R8: (6 sc, inc) x6 (48)
R9: (7 sc, inc) x6 (54)
R10: (8 sc, inc) x6 (60)
R11: (9 sc, inc) x6 (66)
R12–R24:
sc around (66)
Insert safety eyes between R15–R16 with 12 stitches between them.
R25: (9 sc, dec) x6 (60)
R26: (8 sc, dec) x6 (54)
R27: (7 sc, dec) x6 (48)
R28: (6 sc, dec) x6 (42)
Stuff extremely firmly.
R29: (5 sc, dec) x6 (36)
R30: (4 sc, dec) x6 (30)
R31: (3 sc, dec) x6 (24)
R32: (2 sc, dec) x6 (18)
R33: (1 sc, dec) x6 (12)
R34: dec x6 (6)
FO.
The head should remain very round with a flatter lower front area for the muzzle.
🤍 Oversized Double-Cheek Muzzle
The muzzle is one of the largest features in the design and should cover most of the lower face.
White Yarn
R1: Ch 13
Round 1:
Starting in 2nd chain:
sc 11,
3 sc in last,
working opposite side:
sc 10,
inc in final st (26)
R2:
inc,
sc 10,
3 inc,
sc 10,
2 inc (32)
R3:
(3 sc, inc) around (40)
R4–R7:
sc around (40)
Stuff lightly.
FO leaving long tail.
Sew low on head beneath eyes.
The muzzle should protrude outward heavily and appear very rounded.
❤️ Large Rounded Nose
The nose is oversized and highly visible.
Red Yarn
R1: MR 6
R2: inc x6 (12)
R3: (1 sc, inc) x6 (18)
R4: (2 sc, inc) x6 (24)
R5–R7:
sc around (24)
Stuff firmly.
R8:
(2 sc, dec) x6 (18)
FO.
Attach at upper center of muzzle.
👀 Giant Oval Eye Panels (Make 2)
The eyes are very tall and exaggerated.
White Yarn
Ch 10
Round 1:
Starting in 2nd chain:
sc 8,
3 sc in last,
opposite side:
sc 7,
inc (20)
Round 2:
inc,
sc 7,
3 inc,
sc 7,
2 inc (26)
Round 3:
sc around (26)
Round 4:
(5 sc, inc) around (30)
FO.
Flatten vertically into large ovals.
Attach close together above muzzle.
⚫ Pupils
Use large black safety eyes or glossy black crochet circles.
Place slightly inward and low for classic cartoon expression.
🪶 Top Fur Tufts
The top fur spikes are short, thick, and upright.
Black Yarn
Make 3 tufts:
Ch 7
Sl st back down chain.
Attach tightly to top center of head.
👂 Oversized Ears (Make 2)
The ears are very large with deep cupped shaping.
Outer Ear (Black)
R1: MR 4
R2: inc x4 (8)
R3: (1 sc, inc) x4 (12)
R4: (2 sc, inc) x4 (16)
R5: (3 sc, inc) x4 (20)
R6: (4 sc, inc) x4 (24)
R7: (5 sc, inc) x4 (28)
R8–R10:
sc around (28)
Flatten into large rounded triangle.
Inner Ear (White)
Repeat through R6 only.
Attach centered inside black ear.
Fold lower ear edge inward slightly before sewing to head.
Attach high and angled outward dramatically.
🤍 Fluffy Cheek Tufts (Make 2)
The cheek fluff is very prominent and extends outward from the muzzle.
White Yarn
Ch 22
In each chain:
sl st, sc, hdc, dc pattern repeatedly.
Create feathered curved strips.
Attach beneath ears and beside muzzle.
Lightly brush with velcro brush if desired for softer fluff effect.
🐾 Body (Short & Compact)
The body is intentionally much smaller than the head.
Start with White Belly
R1: MR 6
R2: inc x6 (12)
R3: (1 sc, inc) x6 (18)
R4: (2 sc, inc) x6 (24)
R5: (3 sc, inc) x6 (30)
R6: (4 sc, inc) x6 (36)
R7–R15:
sc around (36)
Switch to black.
R16–R24:
sc around (36)
R25:
(4 sc, dec) x6 (30)
R26:
(3 sc, dec) x6 (24)
Stuff firmly.
R27:
(2 sc, dec) x6 (18)
R28:
(1 sc, dec) x6 (12)
FO.
The torso should look rounded and compact beneath the oversized head.
💪 Arms (Make 2)
The paws are oversized and rounded.
White Paw
R1: MR 6
R2: inc x6 (12)
R3: (1 sc, inc) x6 (18)
R4–R8:
sc around (18)
Switch to black.
R9–R18:
sc around (18)
Lightly stuff.
FO.
Embroider 3 thin black claw lines.
🦶 Legs & Feet (Make 2)
The feet are very large and oval-shaped.
White Foot
R1: MR 6
R2: inc x6 (12)
R3: (1 sc, inc) x6 (18)
R4: (2 sc, inc) x6 (24)
R5: (3 sc, inc) x6 (30)
R6: (4 sc, inc) x6 (36)
R7–R10:
sc around (36)
Switch to black.
R11–R20:
sc around (36)
Stuff very firmly.
FO.
Flatten bottoms slightly.
Embroider 3 claw lines on each foot.
🐈 Tail
The tail is thick, rounded, and slightly curved.
Black Yarn
R1: MR 6
R2–R38:
sc around (6)
Insert floral wire optionally.
Stuff lightly.
Curve gently sideways.
Attach low on back.
🧵 Whiskers
Use:
- stiff fishing line
- coated jewelry wire
- nylon whiskers
Cut 6 strands approx. 14 cm long.
Insert:
3 per side.
Angle outward slightly upward.
Secure from inside with glue.
✨ Facial Embroidery
Eyebrows
Use thick white embroidery stitches.
Make dramatic angled cartoon brows.
Mouth
Embroider wide upside-down Y shape below nose.
Keep expression playful and mischievous.
Claws
Embroider thin black claw marks on paws and feet.
🪡 Final Assembly
Step 1
Attach muzzle.
Step 2
Attach nose.
Step 3
Attach eye panels and pupils.
Step 4
Sew ears high on head.
Step 5
Attach cheek tufts.
Step 6
Attach head securely to body.
Step 7
Attach arms angled slightly downward.
Step 8
Attach oversized feet.
Step 9
Attach tail.
Step 10
Insert whiskers and embroider facial details.
🌟 Final Thoughts
This oversized cartoon tuxedo cat perfectly captures the exaggerated proportions and expressive personality of classic vintage animation with its enormous rounded head, giant eyes, oversized muzzle, fluffy cheek tufts, dramatic whiskers, chunky paws, and iconic red nose. The bold black-and-white contrast and polished sculpted features make it an unforgettable statement piece for any amigurumi or cartoon-inspired collection. 🐾🧶✨


Thank you for the lovely pattern of Sylvester, love it!
Me encanto el patrón, fácil de leer, cuando lo haga se lo compartiré. Gracias por compartir el patrón. Soy una nueva seguidora. Bendiciones!!
Thank you for sharing the pattern , I was looking for it