Welcome to the playful and yoga-inspired world of amigurumi! 🐱🧘♂️ Today, I’m excited to share my free crochet pattern for an Amigurumi Cat Doing Downward Dog—a quirky and adorable creation perfect for cat lovers, yoga enthusiasts, or anyone who enjoys crafting expressive and dynamic plush designs! 🌟 Whether you love stitching up fun animal poses, creating textured and lifelike figures, or simply want to add a stretching kitty to your handmade lineup, this pattern will guide you through crafting a beautifully sculpted plush with a curved back, extended paws, and a touch of feline flexibility! 🧶
This design embraces soft textures, playful shaping, and charming details to bring a lighthearted and energetic presence to your crochet projects! ✨ I’ve carefully outlined each step to ensure your Amigurumi Cat Doing Downward Dog turns out just right—ready to brighten up your space or become a treasured handmade gift! 🎁 So grab your hooks, pick out classic grays, warm oranges, or soft creams, and let’s stitch up a yoga-loving kitty! 🐾
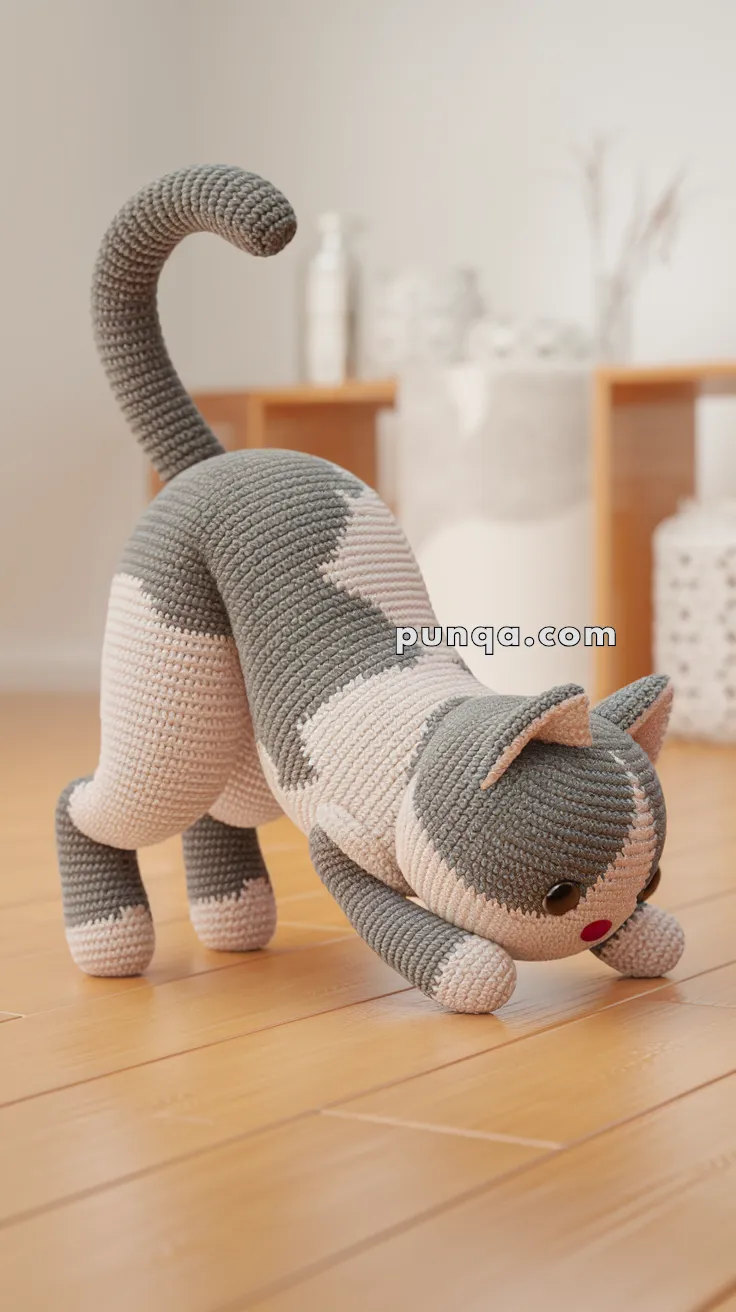
🐱 Amigurumi Downward Dog Cat Crochet Pattern
This playful amigurumi cat, caught mid-stretch in the iconic “downward dog” yoga pose, is full of charm and character! With seamlessly crocheted legs and a flexible tail, this pattern is perfect for animal lovers and yoga fans alike. Get ready to create a lifelike stretching kitty that holds its pose with clever shaping.
✨ Skill Level
Advanced – Includes shaping, continuous form with no leg seams, and posture sculpting.
📏 Finished Size
Approx. 22–25 cm (8.5–10 inches) long from paws to tail tip using worsted weight yarn and a 3.0 mm hook.
🧶 Materials
- Worsted weight yarn:
- Light cream/pink (base color)
- Medium grey (patches & tail)
- Pink (nose & cheeks)
- Black (eyes & embroidery)
- 3.0 mm crochet hook
- Fiberfill stuffing
- Safety eyes (8–10 mm)
- Tapestry needle
- Stitch markers
- Optional: Pipe cleaner/floral wire for tail
🧵 Abbreviations (US Terms)
- MR – Magic Ring
- sc – Single Crochet
- inc – Increase (2 sc in same st)
- dec – Decrease (sc2tog)
- ch – Chain
- sl st – Slip Stitch
- BLO – Back Loop Only
- FO – Fasten Off
🐾 Pattern Instructions
Back Legs (Make 2)
Rounder thigh shaping included.
- MR, 6 sc
- inc x6 (12)
- (1 sc, inc) x6 (18)
4–9. sc around (18) (extra 2 rounds for thigh bulge) - (4 sc, dec) x3 (15)
11–13. sc around (15)
FO for the right leg, do not FO for the left. Stuff lightly.
Join Legs & Start Body
- Ch 3, join left leg to right with sc, continue in round across both legs + chain (36)
2–9. sc around (36) - (4 sc, dec) x6 (30)
- (3 sc, dec) x6 (24)
Stuff as you go. Change between cream and grey to make natural fur patches.
Front Legs (Attached Later)
Made longer for accuracy.
- MR, 6 sc
- inc x6 (12)
3–11. sc around (12) (extra 2 rounds for longer forearm)
Stuff lightly. Sew angled forward into “stretching” pose.
Chest & Neck
Continue from body:
1–4. sc evenly (24)
5. (2 sc, dec) x6 (18)
This forms the narrow neck base.
Head
Oval shaping included.
- MR, 6 sc
- inc x6 (12)
- (1 sc, inc) x6 (18)
- (2 sc, inc) x6 (24)
- (3 sc, inc) x6 (30)
- (4 sc, inc) x6 (36)
7–12. sc around (36) (extra rounds for oval face) - (4 sc, dec) x6 (30)
- (3 sc, dec) x6 (24)
- (2 sc, dec) x6 (18)
Insert eyes between R10–11, approx. 7 sts apart. Stuff firmly. - (1 sc, dec) x6 (12)
- dec x6 (6)
FO, close, sew to neck angled downward.
Tail
Thicker base for photo match.
- MR, 8 sc
- (1 sc, inc) x4 (12)
- (2 sc, inc) x4 (16) (wider base)
4–25. sc around (16)
Stuff base only. Insert wire/pipe cleaner if desired. Shape in curve and sew firmly to back body.
Ears (Make 2)
- MR, 4 sc
- (1 sc, inc) x2 (6)
- (2 sc, inc) x2 (8)
- (3 sc, inc) x2 (10)
- sc around (10)
FO, flatten, sew on top of head.
Face & Details
- Nose: Pink yarn embroidered as triangle.
- Mouth: Black embroidery thread, small curve under nose.
- Cheeks: Crochet 2 pink circles (MR, 6 sc), sew under eyes.
- Patches: Surface crochet or color changes for natural grey markings.
🐾 Assembly & Shaping
- Position front legs bent forward so the chest lowers toward the floor.
- Back legs slightly apart, angled to support weight.
- Curve tail up and slightly forward.
- Stuff body firmly but shape chest so it leans downward.
🌟 Final Touch
And there you have it – a perfectly stretching amigurumi cat, ready for yoga class or a playful morning pounce! With its curved tail, sweet cheeks, and lifelike pose, it’s guaranteed to be a showstopper on your shelf or the perfect handmade gift for any cat lover.