Saddle up for a fun crochet adventure with this Amigurumi Rodeo Rider pattern! Whether you’re a fan of the wild west or just love crafting adorable characters, this free pattern brings a touch of cowboy charm to your handmade collection. With its tiny hat, boots, and adventurous spirit, this little rodeo rider is ready to lasso some hearts! Perfect for gifting or displaying, it’s an engaging project that lets you play with colors and details to create a rider that reflects your favorite western style.
This pattern is great for crocheters of all skill levels, offering room for customization—from classic denim and leather tones to vibrant rodeo-ready outfits. Add extra details like a tiny lasso or a bandana to make your cowboy or cowgirl truly one-of-a-kind. So, grab your hook, round up your yarn, and let’s get ready to stitch up some rodeo magic—one loop at a time! 🤠✨
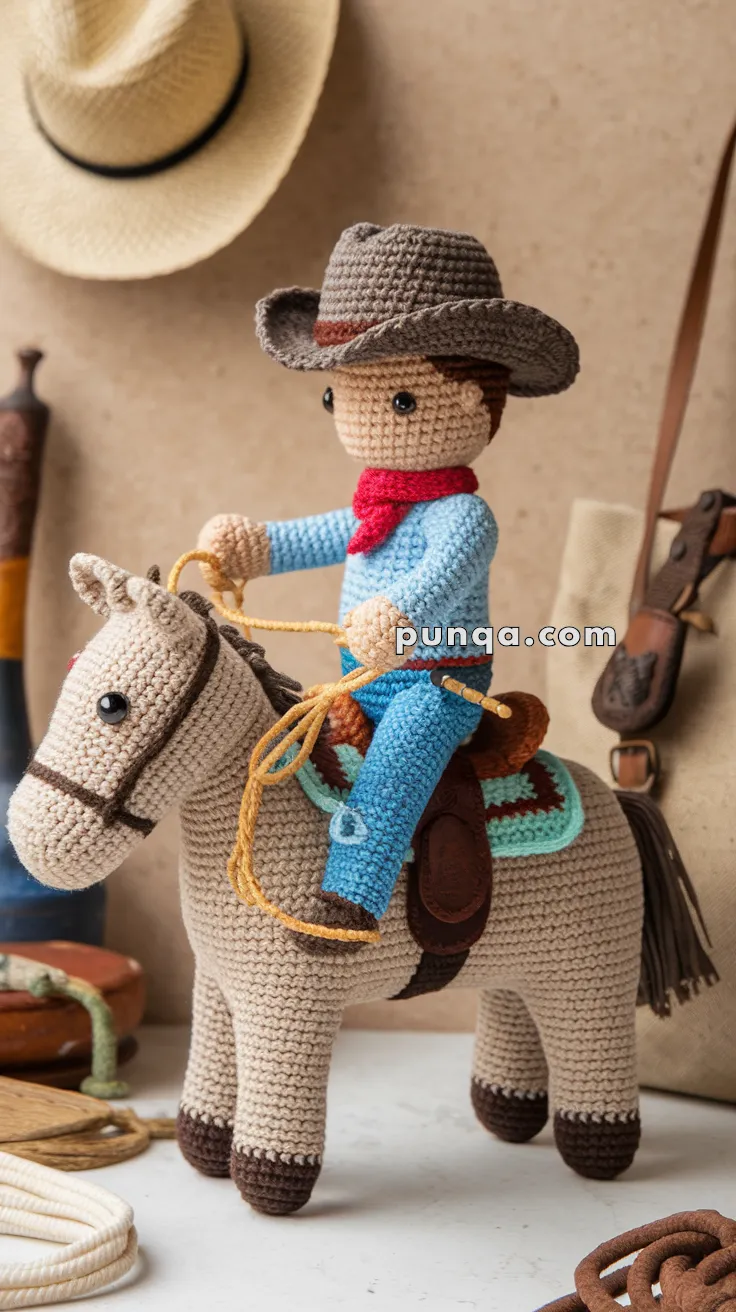
🤠 Amigurumi Rodeo Rider & Horse Crochet Pattern
Bring the spirit of the open range to your crochet collection with this detailed rodeo rider and horse set! 🐴✨
Featuring a seated cowboy in a bright blue shirt, red neckerchief, long trousers, brown boots, and a sculpted wide-brimmed hat, this western-inspired project is full of rustic character. The completed rider is designed to sit securely in the saddle, hold the reins with both hands, and pair naturally with the sturdy standing horse.
The set makes a beautiful shelf display, cowboy-themed nursery decoration, handmade collectible, or heirloom gift for anyone who loves horses and western style. 🤎
✨ Skill Level
Advanced
This project includes:
- 🤠 Sculpted cowboy hat construction
- 🧍 Seated rider shaping
- ✋ Rounded hands designed to hold reins
- 👢 Long trouser legs with separate boots
- 🧣 Neckerchief construction
- 🪡 Multi-piece positioning and assembly
- 🐴 Detailed horse and western tack
📏 Finished Size
Using DK cotton yarn and a 2.75–3.0 mm crochet hook:
- Cowboy seated height: approximately 17–19 cm (6¾–7½ in)
- Horse height: approximately 27–29 cm (10½–11½ in)
- Complete display height: approximately 31–34 cm (12¼–13½ in), depending on hat placement
Finished size may vary with yarn choice, hook size, tension, and stuffing.
🧶 Yarn Requirements
Complete Cowboy
🧡 Skin Tone — 35 g
🩵 Light Blue — 55 g
💙 Medium Blue — 35 g
🤎 Medium Brown — 45 g
🟤 Dark Brown — 20 g
❤️ Red — 10 g
🟡 Golden Yellow — 5 g
🖤 Black embroidery yarn — small amount
Complete Horse and Tack
🤍 Warm Beige — 145 g
🤎 Dark Brown — 60 g
🟤 Saddle Brown — 55 g
🩵 Turquoise — 25 g
🟡 Golden Yellow — 20 g
A full materials list for the horse and accessories continues in Part 2.
🧵 Materials
- 2.75–3.0 mm crochet hook
- 6 mm black safety eyes for the rider
- 8 mm black safety eyes for the horse
- Polyester fiberfill
- Tapestry needle
- Stitch markers
- Scissors
- Pins for positioning
- Optional plastic pellets for weighting the horse
- Optional craft wire for gently shaping the reins
🔤 Abbreviations (US Terms)
MR – Magic Ring
sc – Single Crochet
inc – Increase
dec – Invisible Decrease
sl st – Slip Stitch
ch – Chain
hdc – Half Double Crochet
dc – Double Crochet
BLO – Back Loop Only
FLO – Front Loop Only
FO – Fasten Off
Work in continuous rounds unless otherwise stated.
🤠 Cowboy Head
The cowboy has a softly squared head with a rounded jaw and minimal facial details.
Using skin-tone yarn:
R1
MR 6
(6)
R2
inc ×6
(12)
R3
(1 sc, inc) ×6
(18)
R4
(2 sc, inc) ×6
(24)
R5
(3 sc, inc) ×6
(30)
R6
(4 sc, inc) ×6
(36)
R7–14
sc around
(36)
Insert the 6 mm safety eyes between Rounds 10 and 11, leaving approximately 7 stitches between them.
R15
(4 sc, dec) ×6
(30)
R16
(3 sc, dec) ×6
(24)
Begin stuffing firmly.
R17
(2 sc, dec) ×6
(18)
R18
(1 sc, dec) ×6
(12)
R19
dec ×6
(6)
FO and close.
The head should be smooth and compact, with the face positioned slightly below center to leave room for the hat.
👃 Nose
Using skin-tone yarn:
R1
MR 5
R2
sc around
(5)
FO, leaving a long tail.
Lightly stuff and sew directly between the eyes.
Keep the nose small and rounded.
🙂 Facial Details
Using dark brown or black embroidery thread:
- Embroider a short neutral mouth below the nose.
- Add two small eyebrows above the eyes.
- Optional: add a single short stitch at each side of the mouth for extra expression.
Keep the face simple and understated.
🤎 Hair Cap
Using medium brown yarn:
R1
MR 6
R2
inc ×6
(12)
R3
(1 sc, inc) ×6
(18)
R4
(2 sc, inc) ×6
(24)
R5
(3 sc, inc) ×6
(30)
R6
(4 sc, inc) ×6
(36)
R7–9
sc around
(36)
FO, leaving a long tail.
Place the cap over the back and upper sides of the head. Leave the forehead mostly uncovered.
Sew securely around the upper edge.
🤎 Side Hair Pieces (Make 2)
The side hair peeks out beneath the hat near the ears.
Using medium brown yarn:
Row 1
Ch 6.
Starting in the second chain, sc across.
(5)
Row 2
Ch 1, turn, dec, 1 sc, dec.
(3)
FO.
Sew one small piece to each side of the head, directly beneath the hat brim.
🤠 Cowboy Hat
The hat is made in two parts: a structured crown and a broad curved brim.
Hat Crown
Using medium brown yarn:
R1
MR 6
(6)
R2
inc ×6
(12)
R3
(1 sc, inc) ×6
(18)
R4
(2 sc, inc) ×6
(24)
R5
(3 sc, inc) ×6
(30)
R6
BLO sc around
(30)
R7–12
sc around
(30)
R13
(8 sc, dec) ×3
(27)
R14
sc around
(27)
FO.
Lightly stuff only the upper crown if needed. The lower section should remain flexible enough to fit over the hair.
Hat Brim
Using medium brown yarn:
R1
Ch 31 and join carefully without twisting.
R2
sc around
(30)
R3
(4 sc, inc) ×6
(36)
R4
(5 sc, inc) ×6
(42)
R5
(6 sc, inc) ×6
(48)
R6
(7 sc, inc) ×6
(54)
R7
sc around
(54)
FO.
Sew the crown into the center opening.
Pinch both sides of the brim upward and shape the front and back edges slightly downward.
Use a few hidden stitches to hold the curved western shape.
🟥 Hatband
Using rust-red yarn:
Ch 32.
Starting in the second chain, sl st across.
FO.
Wrap around the lower crown and sew the ends together at the back.
🧍 Cowboy Torso
The torso is slim and slightly tapered to fit naturally between the rider’s arms and legs.
Using light blue yarn:
R1
MR 6
(6)
R2
inc ×6
(12)
R3
(1 sc, inc) ×6
(18)
R4
(2 sc, inc) ×6
(24)
R5–12
sc around
(24)
R13
(2 sc, dec) ×6
(18)
R14–16
sc around
(18)
Stuff firmly.
FO, leaving a long tail for sewing.
🧣 Red Neckerchief
Using red yarn:
Row 1
Ch 18.
Starting in the second chain, sc across.
(17)
Row 2
Ch 1, turn, dec, 13 sc, dec.
(15)
Row 3
Ch 1, turn, dec, 11 sc, dec.
(13)
Row 4
Ch 1, turn, dec, 9 sc, dec.
(11)
FO.
Wrap the wider edge around the neck and bring the pointed section toward the front.
Sew in place beneath the chin.
💪 Arms (Make 2)
The arms are long and lightly bent forward so both hands can hold the reins.
Hands
Using skin-tone yarn:
R1
MR 6
(6)
R2
inc ×6
(12)
R3–5
sc around
(12)
Begin stuffing lightly.
Sleeves
Switch to light blue yarn.
R6–18
sc around
(12)
Do not overstuff the final six rounds. Keeping the upper arm slightly soft allows it to bend toward the reins.
Flatten the opening.
FO, leaving a long tail.
👍 Thumb Detail
Using skin-tone yarn:
R1
MR 4
R2–3
sc around
(4)
FO.
Make one thumb for each hand.
Sew each thumb to the inner side of the hand so the palms can curve around the reins.
👖 Cowboy Legs (Make 2)
The long trouser legs extend down the horse’s sides while the rider remains seated on the saddle.
Begin with dark brown yarn for the boots.
Boot
R1
Ch 6.
Starting in the second chain:
4 sc
3 sc in the last chain
Continue along the opposite side:
3 sc
inc
(12)
R2
inc, 3 sc, 3 inc, 3 sc, 2 inc
(18)
R3
BLO sc around
(18)
R4–7
sc around
(18)
Stuff the toe firmly.
R8
(1 sc, dec) ×6
(12)
Trouser Leg
Switch to medium blue yarn.
R9–29
sc around
(12)
Stuff lightly, leaving the top several rounds soft for bending.
Flatten the opening.
FO, leaving a long sewing tail.
Make the second leg to match.
🩵 Trouser Cuffs
Using light blue yarn:
Attach yarn around the lower edge of each trouser leg directly above the boot.
Work one round of sc.
FO.
This creates a subtle rolled cuff.
🟡 Belt
Using golden yellow yarn:
Ch 27.
Starting in the second chain, sl st across.
FO.
Wrap around the waist where the shirt meets the trousers.
Sew securely.
🤎 Belt Buckle
Using saddle-brown yarn:
Row 1
Ch 5.
Starting in the second chain, sc across.
(4)
Rows 2–3
Ch 1, turn, sc across.
FO.
Sew to the center front of the belt.
🪡 Rider Assembly
Attach the Head
Center the head on the torso and sew securely around the neck opening.
The face should look forward with the chin slightly raised.
Attach the Hat
Position the hat low enough to cover most of the hair cap while leaving the side hair visible.
Tilt it very slightly backward.
Sew through the crown and hair cap at several points.
Attach the Arms
Sew the arms high on the shoulders.
Angle both arms forward and slightly inward.
Do not stitch the hands together; leave enough space between them for the reins.
Attach the Legs
Place the rider in a seated position.
Sew the legs to the lower sides of the torso so they bend naturally at the hips.
The boots should point slightly downward and rest along the horse’s sides once assembled.
✨ Rider Shaping
Before moving on to the horse:
- Bend the arms gently toward the center.
- Shape the thumbs so the reins can pass between each thumb and palm.
- Angle the legs forward from the hips.
- Curve the hat brim upward at both sides.
- Make sure the scarf point lies flat against the chest.
The completed rider should already hold a stable seated pose before being attached to the saddle.
🐴 Horse Body
The horse has a long, sturdy torso with a gently rounded back and enough structure to support the saddle and seated rider.
Using warm beige yarn:
R1
MR 6
(6)
R2
inc ×6
(12)
R3
(1 sc, inc) ×6
(18)
R4
(2 sc, inc) ×6
(24)
R5
(3 sc, inc) ×6
(30)
R6
(4 sc, inc) ×6
(36)
R7
(5 sc, inc) ×6
(42)
R8
(6 sc, inc) ×6
(48)
R9–25
sc around
(48)
Stuff firmly as you work, keeping the back level and the sides evenly rounded.
R26
(6 sc, dec) ×6
(42)
R27
(5 sc, dec) ×6
(36)
R28
(4 sc, dec) ×6
(30)
Continue stuffing firmly.
R29
(3 sc, dec) ×6
(24)
R30
(2 sc, dec) ×6
(18)
R31
(1 sc, dec) ×6
(12)
R32
dec ×6
(6)
FO and close.
Gently shape the body into a long horizontal oval. The back should remain broad enough to hold the saddle blanket without folding.
🐴 Horse Neck
The neck is a separate tapered cylinder that angles forward from the body.
Using warm beige yarn:
R1
MR 6
(6)
R2
inc ×6
(12)
R3
(1 sc, inc) ×6
(18)
R4
(2 sc, inc) ×6
(24)
R5–13
sc around
(24)
R14
(2 sc, dec) ×6
(18)
R15–18
sc around
(18)
Stuff firmly, keeping the lower end slightly wider than the upper end.
FO, leaving a long sewing tail.
Sew the wider end to the front upper section of the body at a gentle forward angle.
🐴 Horse Head
The head is long and narrow with a softly squared forehead.
Using warm beige yarn:
R1
MR 6
(6)
R2
inc ×6
(12)
R3
(1 sc, inc) ×6
(18)
R4
(2 sc, inc) ×6
(24)
R5–12
sc around
(24)
Insert 8 mm safety eyes between Rounds 7 and 8, leaving approximately 9 stitches between them.
R13
(2 sc, dec) ×6
(18)
R14–16
sc around
(18)
Begin stuffing firmly.
R17
(1 sc, dec) ×6
(12)
R18
sc around
(12)
FO, leaving the opening available for attaching the muzzle.
The head should be longer than it is wide, with the eyes positioned high on the face.
🤍 Horse Muzzle
The muzzle is an elongated oval that projects noticeably from the lower front of the head.
Using warm beige yarn:
R1
Ch 8.
Starting in the second chain:
6 sc
3 sc in the final chain
Continue along the opposite side:
5 sc
inc
(16)
R2
inc
5 sc
3 inc
5 sc
2 inc
(22)
R3
sc around
(22)
R4
inc, 9 sc, inc, 10 sc
(24)
R5–7
sc around
(24)
Lightly stuff.
Flatten the opening slightly.
FO, leaving a long sewing tail.
Sew to the lower front of the head, keeping the muzzle level and centered.
🤎 Nostrils
Using dark brown embroidery yarn:
Stitch one small horizontal nostril near each side of the muzzle.
Keep the stitches subtle and symmetrical.
👂 Horse Ears (Make 2)
The ears are short, pointed, and slightly folded inward.
Using warm beige yarn:
R1
MR 4
(4)
R2
inc around
(8)
R3
(1 sc, inc) ×4
(12)
R4–6
sc around
(12)
R7
(1 sc, dec) ×4
(8)
Do not stuff.
Flatten each ear and pinch the base.
FO, leaving a sewing tail.
Attach to the top of the head with a slight outward angle.
🐴 Horse Legs (Make 4)
Each leg is a sturdy cylinder ending in a short rounded dark hoof.
Begin with dark brown yarn.
Hoof
R1
MR 6
(6)
R2
inc ×6
(12)
R3
(1 sc, inc) ×6
(18)
R4–7
sc around
(18)
Switch to warm beige yarn.
Leg
R8–24
sc around
(18)
Stuff firmly from hoof to top.
Flatten the opening slightly.
FO, leaving a long sewing tail.
Make four identical legs.
🪡 Attaching the Legs
Position the legs beneath the body in two evenly spaced pairs.
The front legs should sit slightly behind the neck.
The back legs should sit close to the rear curve of the body.
Before sewing permanently:
- Make sure all four hooves touch the surface.
- Check that the body remains level.
- Keep the legs parallel rather than angled outward.
- Pin each leg securely and view the horse from the front and side.
Sew around each leg opening using several strong passes.
🤎 Mane
The mane runs from between the ears down the back of the neck.
Using dark brown yarn, cut approximately 30 strands, each measuring 10–12 cm.
Attach the strands along a straight center line using lark’s head knots.
Begin just behind the ears and continue to the base of the neck.
Trim the mane into a softly uneven edge.
For a fuller appearance, separate the yarn plies gently with a tapestry needle.
🤎 Tail
Cut approximately 22 strands of dark brown yarn measuring 18–20 cm each.
Fold the strands in half and tie securely through the rear center of the body.
Wrap another short strand around the top of the bundle to create a neat tail base.
Trim the ends evenly.
Allow the tail to hang naturally behind the back legs.
🟤 Bridle Noseband
Using dark brown yarn:
Ch 28.
Starting in the second chain, sl st across.
FO.
Wrap the strip around the muzzle just below the eyes and sew the ends together beneath the head.
The band should fit snugly without compressing the stuffing.
🟤 Head Strap
Using dark brown yarn:
Ch 34.
Starting in the second chain, sl st across.
FO.
Position the strap from one side of the noseband, behind the ears, and down to the opposite side.
Sew securely at both ends.
🟡 Reins
Using golden yellow yarn:
Ch approximately 85–95, adjusting the length after the rider is seated.
Starting in the second chain, sl st across for a sturdy cord.
FO.
Attach both ends to the bridle near the sides of the muzzle.
Leave the middle section loose so it can pass naturally into the rider’s hands.
🐴 Horse Assembly
Attach the Neck
Sew the wide lower end of the neck to the upper front section of the body.
Angle it forward slightly.
The join will later be partly covered by the saddle and mane.
Attach the Head
Position the head at the upper end of the neck.
The muzzle should point forward and remain almost horizontal.
Sew securely around the neck opening.
Attach the Ears
Sew both ears to the crown of the head.
Place them slightly behind the eyes and angle them outward.
Add the Mane
Attach the yarn strands after the head and neck are fully assembled.
Keep the mane centered and allow it to fall toward one side naturally.
Add the Tail
Sew or knot the tail bundle securely to the rear of the body.
Use extra stitches through the center of the bundle so it cannot loosen.
✨ Horse Shaping
Take a few minutes to refine the horse before adding the tack.
🐴 Massage the body into a long, softly rectangular oval.
👃 Shape the muzzle so the end remains broad and rounded.
👂 Fold the ears gently inward.
🦵 Adjust the legs until all four hooves sit flat.
🤎 Separate and arrange the mane strands.
The completed horse should stand steadily without leaning forward or backward.
🧵 Preparing for the Tack
Before beginning the saddle and blanket, confirm that you have completed:
- Horse body
- Neck
- Head and muzzle
- Two ears
- Four legs and hooves
- Mane
- Tail
- Bridle
- Reins
Do not attach the rider yet. The saddle blanket, saddle, stirrups, and final rein placement will be completed first.
🩵 Western Saddle Blanket
The saddle blanket is a rectangular turquoise pad with a contrasting brown center motif and a neat border. It should lie flat across the horse’s back and extend slightly beyond the saddle on all sides.
Using turquoise yarn:
Row 1
Ch 23.
Starting in the second chain, sc across.
(22)
Rows 2–15
Ch 1, turn, sc across.
(22)
FO.
🤎 Blanket Center Motif
Using saddle-brown yarn:
Row 1
Ch 11.
Starting in the second chain, sc across.
(10)
Rows 2–7
Ch 1, turn, sc across.
(10)
FO.
Sew the brown rectangle to the center of the turquoise blanket.
🩵 Decorative Blanket Corners
Using turquoise yarn, embroider or surface crochet one small geometric accent near each corner of the brown center panel.
Keep the decoration simple and symmetrical.
🤎 Blanket Border
Using saddle-brown yarn:
Attach yarn to any corner of the blanket.
Work one round of sc evenly around the outside edge, placing 3 sc in each corner.
FO.
Lightly block the finished blanket so it lies flat.
🪑 Saddle Seat
The saddle is layered over the blanket and includes a curved seat, raised front, hanging side flaps, and a girth strap beneath the horse.
Using saddle-brown yarn:
Row 1
Ch 17.
Starting in the second chain, sc across.
(16)
Rows 2–11
Ch 1, turn, sc across.
(16)
Row 12
Ch 1, turn, dec, 12 sc, dec.
(14)
Row 13
Ch 1, turn, dec, 10 sc, dec.
(12)
FO.
The narrower end forms the raised front of the saddle.
🤎 Saddle Side Flaps (Make 2)
Using saddle-brown yarn:
Row 1
Ch 11.
Starting in the second chain, sc across.
(10)
Rows 2–8
Ch 1, turn, sc across.
(10)
Row 9
Ch 1, turn, dec, 6 sc, dec.
(8)
Row 10
Ch 1, turn, dec, 4 sc, dec.
(6)
FO.
Sew one flap beneath each side of the saddle seat.
The lower edges should hang down the horse’s sides.
🤎 Saddle Front
Using saddle-brown yarn:
R1
MR 6.
R2
inc around.
(12)
R3
sc around.
(12)
Lightly stuff.
FO.
Sew to the narrow front edge of the saddle seat to create a small rounded pommel.
🤎 Saddle Back
Using saddle-brown yarn:
Row 1
Ch 10.
Starting in the second chain, sc across.
(9)
Rows 2–4
Ch 1, turn, sc across.
FO.
Fold the piece gently into a curved roll and sew to the rear edge of the saddle.
🟤 Girth Strap
Using dark brown yarn:
Ch 46.
Starting in the second chain, sl st across.
FO.
Sew one end beneath the saddle.
Wrap the strap firmly beneath the horse’s body and attach the opposite end securely.
The strap should hold the saddle in place without compressing the horse.
🤎 Stirrups (Make 2)
Using dark brown yarn:
Strap
Ch 25.
Starting in the second chain, sl st across.
FO.
Foot Loop
Ch 11 and join to form a ring.
Work one round of sc around the ring.
FO.
Sew one foot loop to the end of each strap.
Attach the upper ends beneath the saddle flaps.
Position each loop so the rider’s boot can rest naturally inside it.
🪡 Attaching the Saddle Blanket
Place the blanket across the horse’s back behind the neck.
Center it carefully so both sides hang evenly.
Use several small hidden stitches near the top edge to keep the blanket from sliding.
Do not sew all the way around; the lower edges should remain loose.
🪑 Attaching the Saddle
Center the saddle on top of the blanket.
The raised pommel should face forward.
Sew through the saddle, blanket, and upper body in several places.
Attach the girth strap beneath the body and check that the saddle remains level.
🤠 Positioning the Rider
Place the cowboy on the saddle with the torso upright.
The rider’s legs should fall naturally down both sides of the horse.
Angle the knees slightly forward and place each boot into a stirrup.
Pin the rider in position before sewing.
🪡 Securing the Rider
Use matching yarn to sew the rider securely through:
- The lower torso into the saddle
- The upper thighs into the saddle flaps
- The inside edges of the boots near the stirrup straps
Keep the stitches hidden beneath the clothing whenever possible.
The rider should remain stable without leaning to either side.
🟡 Placing the Reins
Bring the center of the reins upward from the horse’s muzzle.
Pass one section into each of the rider’s hands.
Position the cord between each thumb and palm.
Use a few small golden-yellow stitches to secure the reins inside the hands.
Leave a gentle loop between the hands and bridle rather than pulling the reins tight.
🐴 Bridle Finishing
Check the fit of the noseband and head strap.
The noseband should sit across the muzzle without covering the nostrils.
The head strap should pass neatly behind the ears.
Secure any loose sections with small hidden stitches.
🤠 Final Rider Details
Arrange the cowboy’s clothing and accessories.
❤️ Smooth the neckerchief against the chest.
🤠 Curve the hat brim upward at both sides.
👢 Position the boots securely in the stirrups.
💪 Bend the arms gently so both hands meet the reins naturally.
🟡 Center the belt buckle at the front waist.
🐴 Final Horse Details
Shape the horse carefully after all accessories are attached.
🐴 Keep the back level beneath the saddle.
🤎 Arrange the mane so it falls behind the bridle.
🦵 Confirm that all four hooves touch the display surface.
👂 Angle the ears slightly forward.
🤍 Smooth the muzzle and body stuffing.
✨ Complete Assembly Checklist
Before weaving in the final tails, check that:
- The horse stands evenly on all four legs.
- The neck and head remain firmly attached.
- The saddle blanket hangs evenly on both sides.
- The saddle is centered and secure.
- The girth strap sits flat beneath the body.
- The rider remains upright.
- Both boots sit inside the stirrups.
- The reins form relaxed loops.
- The hat, scarf, mane, and tail are neatly arranged.
🌟 Shaping and Stability Tips
A few final adjustments will help the completed set display beautifully.
- Add extra stuffing beneath the horse’s back before closing if the saddle causes it to dip.
- Place a small pouch of poly pellets inside the lower body for extra stability.
- Reinforce the leg seams with several passes of yarn.
- Keep the rider’s upper legs lightly stuffed so they curve around the horse.
- Use hidden stitches between the rider and saddle if the figure shifts.
- Avoid pulling the reins too tightly, as this can tilt the horse’s head.
🧼 Care Instructions
To protect the finished crochet set:
🧽 Spot clean gently with a damp cloth.
☀️ Allow to air dry completely.
🚫 Avoid machine washing because the saddle, reins, and shaped hat may become distorted.
📦 Store upright in a dry place away from prolonged direct sunlight.
If the hat brim loses its curve, gently reshape it with your fingers and secure it temporarily with pins until dry.
🎁 Display Ideas
This western crochet set makes a wonderful centerpiece for:
🤠 Cowboy-themed nurseries
🐴 Equestrian shelves and collections
🏡 Rustic farmhouse décor
🎂 Western birthday parties
🎁 Handmade gifts for horse lovers
📚 Storybook and playroom displays
Place the set on a stable shelf or wooden tray so the horse’s four hooves remain fully supported.
💡 Personalization Ideas
Give your rider and horse a unique personality with a few optional details.
⭐ Add a tiny sheriff badge to the shirt.
🤎 Embroider the horse’s name on the saddle blanket.
🩵 Change the blanket colors to match a favorite ranch or riding club.
🟡 Add a small crocheted rope coil behind the saddle.
🤠 Decorate the hatband with a tiny contrasting stitch.
🐴 Add a narrow white blaze to the horse’s forehead.
🤎 Final Thoughts
Congratulations on completing your Rodeo Rider and Horse amigurumi set! 🤠🐴✨
With its sturdy standing horse, detailed western tack, layered saddle blanket, carefully shaped cowboy hat, and securely seated rider, this project brings the spirit of the open range to life one stitch at a time.
Every element—from the rounded hooves and flowing mane to the tiny stirrups and reins—adds character and craftsmanship to this special handmade display. Whether created for a horse lover, a western-themed room, or your own collection, this crochet duo is sure to become a treasured keepsake.
Happy Crocheting! 🧶🤠🐴