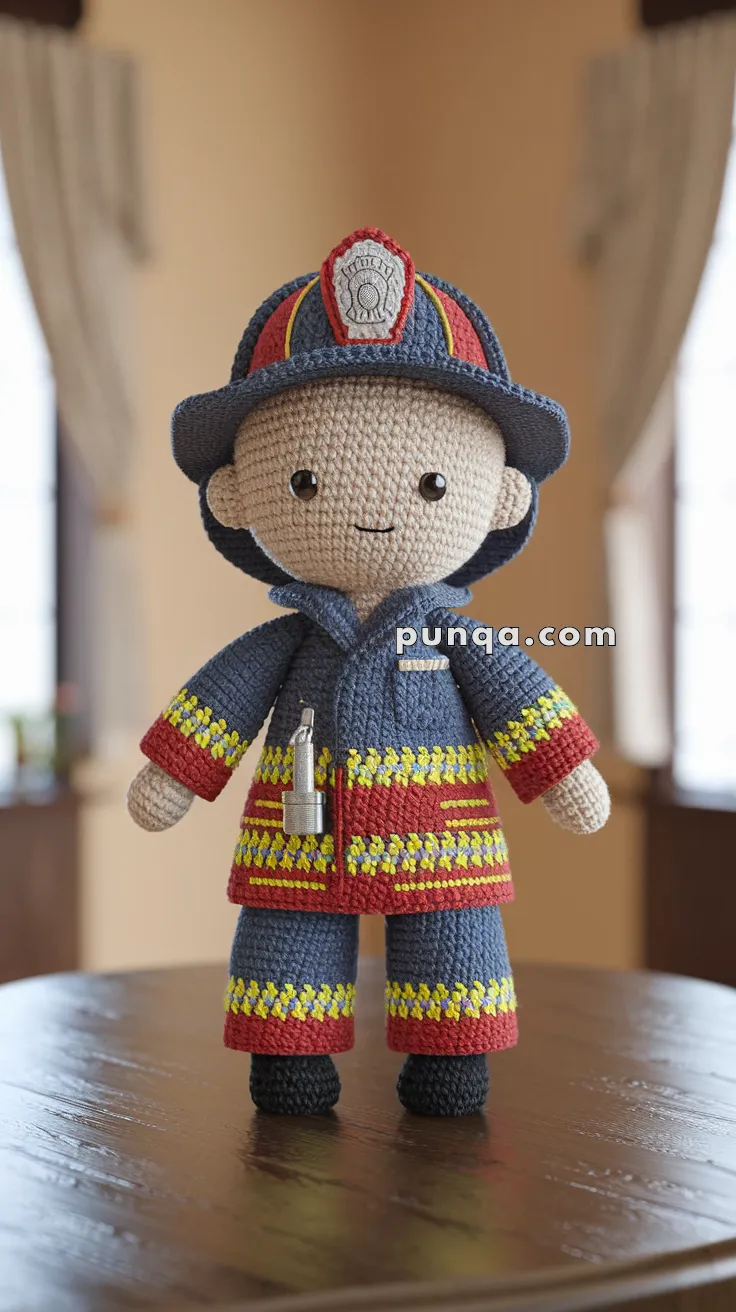
Sound the sirens—your next heroic crochet project has arrived! 🚒🧶 The Amigurumi Firefighter Doll is a brave little character ready to bring courage and charm to your handmade collection. With a bright uniform, sturdy boots, and a determined expression, this doll celebrates everyday heroes in the most adorable way. Whether you’re crafting for a little one who dreams of firefighting adventures or honoring someone special, this doll is sure to spark joy.
Perfect for crocheters who love character-driven designs and meaningful makes, this pattern invites you to explore bold colors, fun accessories, and thoughtful details. Add a tiny hose, stitch on a badge, or personalize the helmet for extra flair. The Amigurumi Firefighter Doll is a heartwarming way to stitch up bravery, gratitude, and a whole lot of handmade pride—one loop at a time! 🧵🔥
👨🚒 Amigurumi Firefighter Doll Crochet Pattern
Brave, cheerful, and always ready to save the day — this amigurumi firefighter doll is a heartfelt tribute to real-life heroes. With a detailed fire uniform, striped jacket, helmet badge, and even a little tool accessory, this doll makes a wonderful handmade gift for kids, collectors, or local heroes.
✨ Pattern Details
-
Skill Level: Intermediate (colorwork, shaping, small accessories)
-
Finished Size: 10–12 inches (25–30 cm) tall
-
Time to Make: 6–8 hours (depending on speed)
🧵 Materials
-
DK or worsted yarn in:
-
Beige (skin)
-
Navy blue (uniform)
-
Red (jacket trim, pant cuffs, helmet details)
-
Yellow (reflective stripes)
-
Black (boots, accents)
-
Grey (helmet badge, tool accessory)
-
White (helmet badge base)
-
-
Crochet hook: 3.0–3.5 mm
-
10 mm safety eyes
-
Fiberfill stuffing
-
Stitch markers
-
Yarn needle
-
Black embroidery thread (mouth & eyebrows)
🔤 Abbreviations (US Terms)
-
MR = Magic Ring
-
sc = Single Crochet
-
inc = Increase (2 sc in same stitch)
-
dec = Decrease (sc 2 together)
-
sl st = Slip Stitch
-
ch = Chain
-
FO = Fasten Off
-
BLO = Back Loop Only
-
FLO = Front Loop Only
👦 Head
With beige:
-
MR, 6 sc (6)
-
inc x6 (12)
-
(1 sc, inc) x6 (18)
-
(2 sc, inc) x6 (24)
-
(3 sc, inc) x6 (30)
-
(4 sc, inc) x6 (36)
7–14. sc around (36) -
(4 sc, dec) x6 (30)
-
(3 sc, dec) x6 (24)
👉 Insert safety eyes between R10–11, spaced 7 sts apart.
👉 Embroider small smile between R12–13. -
(2 sc, dec) x6 (18)
-
(1 sc, dec) x6 (12)
-
dec x6 (6), FO.
Stuff firmly.
👕 Body & Jacket
Start with beige (neck):
-
MR, 6 sc (6)
-
inc x6 (12)
3–4. sc around (12)
Switch to navy blue:
5. (1 sc, inc) x6 (18)
6. (2 sc, inc) x6 (24)
7. (3 sc, inc) x6 (30)
8–10. sc (30)
Switch to red (jacket):
11. sc (30)
12. (4 sc, inc) x6 (36)
13–18. sc (36)
Reflective stripes:
-
R15 & R17 → work in yellow
-
(4 sc, dec) x6 (30)
-
sc (30), FO.
Stuff firmly.
👖 Legs (x2)
With black (boots):
-
MR, 6 sc (6)
-
inc x6 (12)
3–5. sc (12)
Switch to red (cuffs):
6–7. sc (12)
Switch to yellow:
8. sc (12)
Switch to navy blue:
9–15. sc (12), FO.
Stuff lightly, sew to body.
💪 Arms (x2)
With beige:
-
MR, 6 sc (6)
-
(1 sc, inc) x3 (9)
3–4. sc (9)
Switch to red (sleeves):
5–10. sc (9)
Add yellow reflective bands at R6 & R8.
FO, stuff lightly, sew to body.
🧑🚒 Helmet
With navy blue:
-
MR, 6 sc (6)
-
inc x6 (12)
-
(1 sc, inc) x6 (18)
-
(2 sc, inc) x6 (24)
-
(3 sc, inc) x6 (30)
-
(4 sc, inc) x6 (36)
7–9. sc (36)
Brim: FLO → (2 sc, inc) x12 (48)
10. sc around (48)
Switch to red for edge trim: sl st around, FO.
Helmet Badge
-
With white: MR, 6 sc, inc x6 (12), FO.
-
Border in red (sl st around).
-
Embroider fire emblem in grey.
-
Sew to helmet front.
🔦 Tool Accessory (Optional)
With grey:
-
ch 6, sc back across (5), FO.
-
Roll into cylinder, sew to jacket side as flashlight/tool.
🧷 Assembly
-
Sew head to body
-
Attach arms at shoulder level
-
Attach legs evenly at bottom
-
Place helmet on head (secure with a few stitches if needed)
-
Embroider eyebrows/blush (optional)
-
Add tool accessory
🎁 Finished Doll
Now you have a brave firefighter amigurumi doll — complete with jacket, reflective stripes, helmet badge, and tiny tool. Perfect for play, decor, or gifting to a hero!