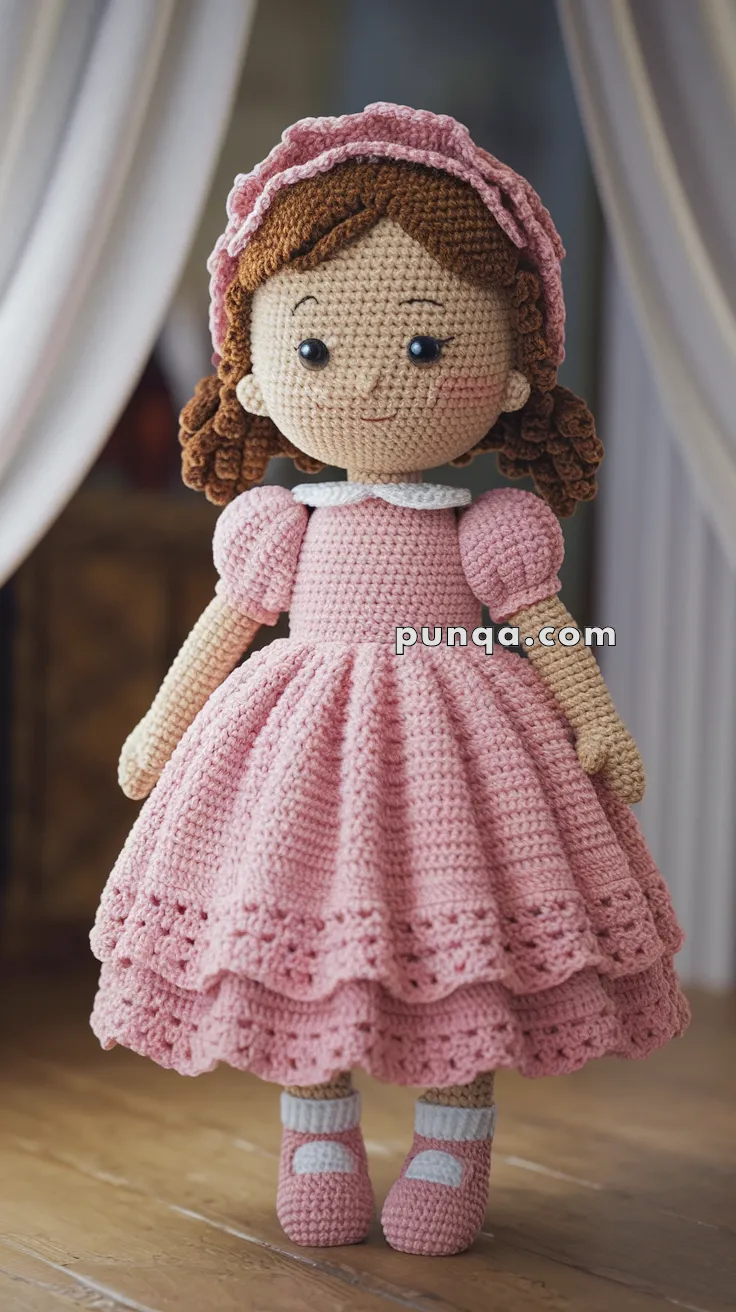
Step into a fairytale with the Amigurumi Princess Doll, a charming crochet project that’s full of grace, whimsy, and royal flair! 👑🧶 With her flowing gown, delicate crown, and sweet embroidered features, this princess is ready to reign over your handmade kingdom. Whether she’s part of a magical playset, a nursery decoration, or a heartfelt gift, she brings a touch of enchantment to every stitch.
Perfect for crocheters who love character-rich designs and imaginative details, this pattern invites endless customization. Choose regal colors, add sparkly accents, or stitch up a whole royal family with different hairstyles and outfits. Whether you’re crafting for a little dreamer or simply indulging your love of storybook charm, the Princess Doll is a delightful way to stitch up magic—one graceful loop at a time! 💖✨
🎀 Amigurumi Princess Doll Crochet Pattern
Create a graceful, heirloom-style princess doll with soft ringlet curls, delicate facial features, and a beautifully structured double-layer dress. This design focuses on correct proportions—a gently rounded head, slim arms, small neat feet, and a full, flowing skirt with visible pleats and lace edges. The result is an elegant doll that stands beautifully and feels balanced from every angle. 🧶✨
✨ Skill Level
Intermediate – shaping, layered garments, curls, and detailed finishing.
📏 Finished Size
Approx. 30–32 cm (12–12.5 inches) tall
🧶 Materials & Yarn Amount
- Beige (skin): 55 g
- Medium brown (hair): 45–50 g
- Dusty pink (dress, sleeves, shoes, headband): 95–100 g
- White (collar, socks, lace trim): 25–30 g
- Black embroidery thread: small amount
- Brown embroidery thread: small amount
Supplies:
- 10 mm safety eyes
- 2.75–3 mm hook
- Fiberfill (~200 g)
- Needle, stitch marker
🧵 Abbreviations
MR – magic ring
sc – single crochet
inc – increase
dec – invisible decrease
ch – chain
sl st – slip stitch
dc – double crochet
hdc – half double crochet
FLO – front loop only
BLO – back loop only
FO – fasten off
👧 Head
R1: MR, 6 (6)
R2: inc ×6 (12)
R3: (1 sc, inc) ×6 (18)
R4: (2 sc, inc) ×6 (24)
R5: (3 sc, inc) ×6 (30)
R6: (4 sc, inc) ×6 (36)
R7–16: sc around (36)
Insert eyes between R11–12 (7–8 stitches apart for a softer look).
R17: (4 sc, dec) ×6 (30)
R18: (3 sc, dec) ×6 (24)
R19: (2 sc, dec) ×6 (18)
Stuff firmly.
R20: (1 sc, dec) ×6 (12)
R21: dec ×6 (6)
FO.
Embroider:
- tiny curved smile
- subtle nose
- soft angled eyebrows
👂 Ears (Make 2)
R1: MR, 6
R2: (1 sc, inc) ×3 (9)
R3–4: sc around (9)
Flatten and sew slightly low and centered on head sides.
💇 Hair Cap
R1–6: same as head (36 sts)
R7–11: sc around (36)
FO and fit snugly.
💫 Ringlet Curls (Full & Dense)
Make 16–20 curls:
ch 38–42
Work 3 dc in each chain
FO.
Attach densely along sides and back only.
Add a few shorter curls near the cheeks for framing.
🧍 Body (Slim Upper Torso)
R1: MR, 6
R2: inc ×6 (12)
R3: (1 sc, inc) ×6 (18)
R4: (2 sc, inc) ×6 (24)
R5–7: sc around (24)
Switch to pink:
R8–15: sc around (24)
Lightly stuff (keep torso narrow and straight).
FO.
🦵 Legs (Correct Small Feet & Balance)
Feet (Make 2)
R1: MR, 6
R2: inc ×6 (12)
R3: (1 sc, inc) ×6 (18)
R4–5: sc around (18)
➡️ Stop increasing here (prevents oversized feet)
Switch to beige:
R6–9: sc around (18)
Switch to white:
R10–11: sc around (18)
Stuff firmly in foot only.
FO.
💪 Arms with Soft Puff Sleeves (Make 2)
R1: MR, 6
R2: (1 sc, inc) ×3 (9)
R3–8: sc around (9)
Switch to pink:
R9: (2 sc, inc) ×3 (12)
R10–11: sc around (12)
R12: (2 sc, dec) ×3 (9)
Lightly stuff.
FO.
👗 Dress Construction (Structured & Layered)
Base Skirt Expansion (Creates Volume)
Attach pink yarn at waist:
R1: (2 sc, inc) ×8 → (32)
R2: (3 sc, inc) ×8 → (40)
R3: (4 sc, inc) ×8 → (48)
R4: (5 sc, inc) ×8 → (56)
R5–9: sc around (56)
🌸 Upper Skirt Layer (Short, Folded Look)
Attach to FLO around mid-skirt:
R1: (sc, ch 2) around
R2–5: sc around
Edge: (sc, ch 3, skip 1) repeat
🌸 Lower Skirt Layer (Long, Flowing Base)
Attach to lower FLO:
R1: (sc, ch 2) around
R2–10: sc around
Edge: (sc, ch 3, skip 1) repeat
👉 This creates the visible double-tier lace effect.
🤍 Collar
Attach white yarn:
(sc, ch 2, sc) repeat around neckline
Keep it small and flat.
👟 Shoes
Add strap:
Attach pink yarn → ch 8 across front → sl st back
Optional: embroider tiny strap detail.
🎀 Headband
ch 65
Join and sc around
Add ruffle: (ch 3, sl st) repeat
🧷 Assembly
- Sew head securely to body
- Attach legs centered and slightly forward
- Sew arms slightly angled down
- Attach hair cap, then curls
- Add headband on top
- Adjust skirt folds evenly
🌟 Final Thoughts
This princess doll captures a soft, storybook elegance through its flowing skirt, delicate lace edges, and beautifully balanced proportions. The gentle curls, puffed sleeves, and layered dress give it a refined handmade charm that feels both nostalgic and timeless.
Whether placed on a shelf, gifted to someone special, or kept as a treasured piece, this doll carries a quiet beauty—crafted with care and meant to be admired for years to come. 🎀💗