Oh, the joy of crafting! 🧶 There’s something utterly magical about creating tiny, whimsical creatures with nothing but a hook and some yarn. One of my favorite little projects is an amigurumi butterfly. These charming, crocheted butterflies have an irresistible appeal, both for the maker and the beholder. They’re pocket-sized bursts of color and imagination, perfect for decoration, gifts, or just to brighten someone’s day. The variety of colors and patterns you can explore is endless, making each butterfly a unique masterpiece. Whether you’re a seasoned crocheter or a beginner, these delightful little creatures are sure to bring a smile to your face. 🦋
The process of creating an amigurumi butterfly involves a delightful dance of stitches and creativity. It usually starts with choosing vibrant yarns that capture the essence of fluttering wings. I love this part because it feels like painting with fibers! 🖌️🎨 Once I’ve gathered my materials, it’s time to dive into the pattern, which guides the crafting journey stitch by stitch. Starting with a magic ring and working through rounds of single crochets, each wing and body slowly comes to life in my hands. As I add the finishing touches—perhaps a pair of tiny antennae or a sprinkle of embroidery—my heart does a little happy flutter, just like the butterfly I’ve created.
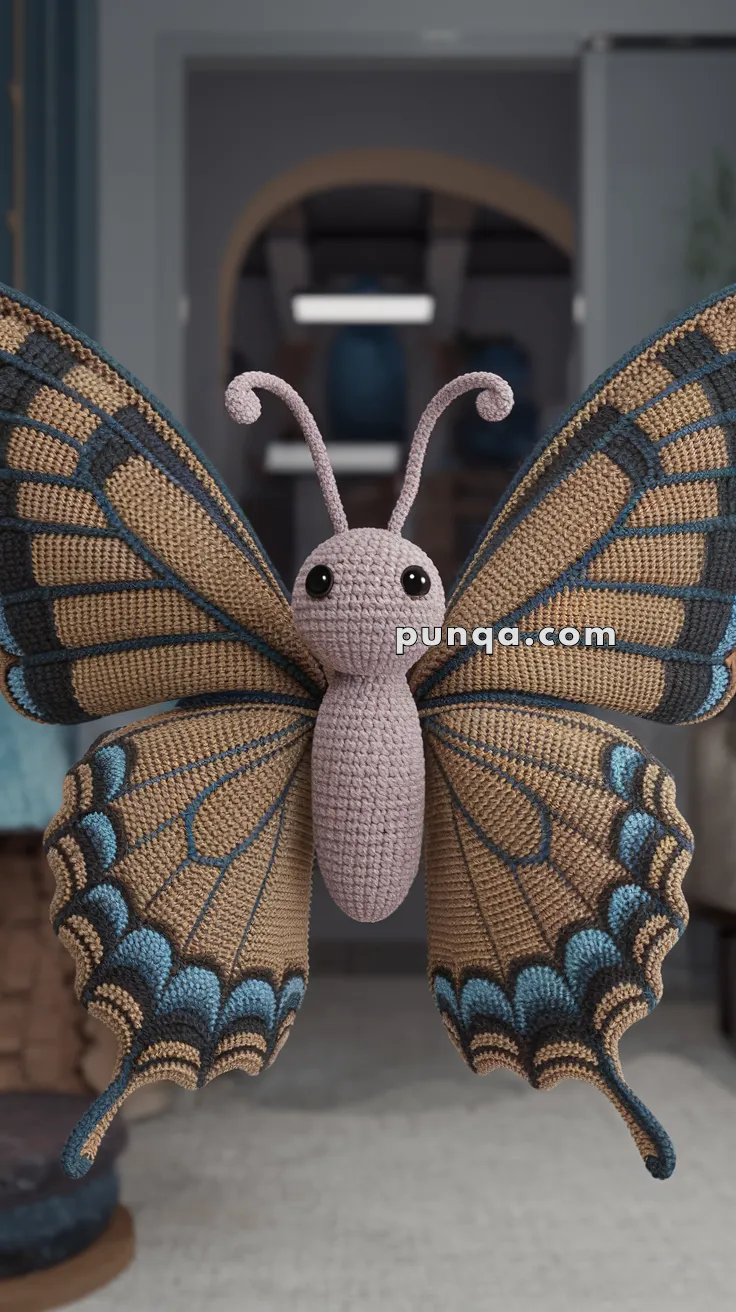
🦋 Amigurumi Butterfly Crochet Pattern
With graceful wings and intricate colors, this butterfly makes a magical wall hanging, nursery decor, or even a whimsical mobile. The wings can be customized with your favorite palette or mimicked from real species like swallowtails or monarchs.
📏 Finished Size
Approx. 25–30 cm (10–12 in) wingspan
💡 Skill Level
Advanced – requires tapestry crochet, surface crochet, and color blocking
🧶 Materials
- Yarn (DK or Sport weight):
- A: Mauve/dusty lavender (body)
- B: Beige/tan (main wing)
- C: Dark brown/black (veins, outlines)
- D: Blue/teal (eyespots, accents)
- E: Light tan/cream (highlights – optional)
- 2.5–3.0 mm crochet hook
- Yarn needle (tapestry needle for weaving)
- Stitch markers
- Fiberfill stuffing
- Black safety eyes (8–10 mm) or embroidered eyes
- 2 pipe cleaners (for antennae structure)
- Floral wire (optional, for poseable wings)
- Blocking board and pins
- Fabric stiffener or diluted glue (optional)
🧵 Abbreviations (US Terms)
- MR – Magic Ring
- ch – Chain
- sc – Single Crochet
- hdc – Half Double Crochet
- dc – Double Crochet
- inc – Increase (2 sc in one stitch)
- dec – Decrease (sc2tog)
- sl st – Slip Stitch
- FLO – Front Loop Only
- BLO – Back Loop Only
- FO – Fasten Off
🪶 BODY
Head
With A (mauve):
- MR, 6 sc
- inc × 6 (12)
- (sc, inc) × 6 (18) 4–6. sc around (18)
Insert safety eyes between rounds 4 and 5, approximately 4–5 stitches apart.
- (sc, dec) × 6 (12)
Stuff firmly.
Thorax
8–9. sc around (12) 10. (3 sc, inc) × 3 (15) 11–12. sc around (15)
Stuff as you go.
Abdomen
- (3 sc, dec) × 3 (12) 14–20. sc around (12)
Continue stuffing.
- dec × 6 (6)
FO, weave closed.
🪩 Antennae (Make 2)
With C (dark brown):
- Ch 15
- Starting in 2nd ch from hook: sl st in next 3 ch, sc in next 8 ch, hdc in next 2 ch, curl the tip around a pipe cleaner
- FO, leave long tail
Assembly:
- Insert pipe cleaner into chain, leaving 1–2 cm extending
- Bend the tip into a small curl
- Sew to head between rounds 2–3, angled outward
🦋 UPPER WINGS (Make 2)
These wings are worked flat in rows with color changes to create the striped pattern.
Base Section (Rounds 1-3)
With B (beige):
- MR, 6 sc
- inc × 6 (12)
- (sc, inc) × 6 (18)
Transition to Flat Working (Row 4 onward)
Row 4: Ch 1, turn. Sc 18 across Row 5: Ch 1, turn. Inc, sc 16, inc (20)
Color Block Pattern (Rows 6-14)
Now we’ll create the striped effect. Carry yarn behind work or cut and rejoin as needed.
Row 6: Ch 1, turn
- With B: sc 3
- With C: sc 2 (dark stripe)
- With B: sc 10
- With C: sc 2
- With B: sc 3
Row 7: Ch 1, turn. Inc, sc across with color pattern, inc (22) Continue color pattern vertically
Row 8: Ch 1, turn
- With B: sc 3
- With C: sc 3 (stripe widening)
- With B: sc 10
- With C: sc 3
- With B: sc 3
Rows 9-12: Continue increasing at edges every other row (24, 24, 26, 26) Maintain vertical stripe pattern, adding horizontal stripes:
Horizontal Stripes (work entire rows):
- Row 10: All C (dark band)
- Row 11: Return to vertical stripe pattern
- Row 13: All C (second dark band)
Rows 14-16: Begin decreasing for rounded wing shape Work (dec, sc across, dec) while maintaining stripe pattern
Scalloped Edge with Eyespots
With C (dark brown): Work around entire wing perimeter:
- Sc evenly around, placing 5–6 sc per row-end
- Mark 5 positions for eyespots (evenly spaced along curved edge)
At each eyespot position:
- Switch to D (blue)
- (sc, hdc, 3 dc in next st, hdc, sc) to create “bubble”
- Switch back to C, continue sc
Final edge: FO with C, weave in ends.
🦋 LOWER WINGS (Make 2)
Similar construction but smaller.
Base (Rounds 1-2)
With B:
- MR, 6 sc
- inc × 6 (12)
Flat Working (Rows 3-10)
Row 3: Ch 1, turn. Sc 12 Row 4: Ch 1, turn. Inc, sc 10, inc (14)
Color Pattern (simplified for lower wing):
- 2 vertical dark stripes
- 1 horizontal band at row 7
- Rows 8-10: Round out shape with decreases
Scalloped Edge
Work same as upper wing but with 3 eyespots instead of 5.
Add one large blue eyespot near the “tail” (bottom corner):
- Ch 4, sl st to form small circle
- Work (sc, hdc, dc, hdc, sc) around circle
- Attach to wing corner
🕸️ SURFACE CROCHET VEINING
This creates the realistic vein structure.
With C (dark brown), using a tapestry needle or surface crochet:
Upper Wing Veins:
- Central vein: From wing base to tip (straight line)
- Radiating veins: 4–5 lines from base spreading outward like a fan
- Cross-veins: 2–3 gentle arcs connecting the radiating veins
Lower Wing Veins:
- Similar pattern but with 3 radiating veins
- 1–2 cross-veins
Technique:
- Thread needle with C
- Backstitch or chain-stitch along surface
- Follow the natural curve of the wing
- OR use surface slip stitch crochet (insert hook, pull up loop, sl st through)
🎨 OPTIONAL ENHANCEMENTS
Wing Stiffening:
- Mix 1 part white glue with 2 parts water
- Paint onto wings with brush
- Pin to blocking board in desired shape
- Let dry 24 hours
Wire Insertion (for poseable wings):
- Cut floral wire to wing perimeter length
- Before closing wing edge, crochet around wire
- Shape wings into natural curves
Color Gradients:
- Add E (cream) highlights by working occasional rows in lighter color
- Blend into B sections for depth
🧷 ASSEMBLY
Step 1: Wing Pairing
- Align one upper and one lower wing
- Sew together at base with matching yarn
- Ensure right sides face outward
- Repeat for second wing pair
Step 2: Attach to Body
- Position wing pairs on body at thorax (rounds 8-10)
- Sew securely with yarn needle
- Upper wings should angle upward at 30-40°
- Lower wings angle downward at 45°
Step 3: Final Shaping
- Gently curve wings outward
- Block if needed
- Adjust antennae position
Step 4: Finishing Touches
- Add optional French knots in D (blue) for extra texture
- Embroider small white highlights on eyespots (optional)
- Steam block for professional finish
📊 VISUAL GUIDE: Wing Color Map
Upper Wing (simplified grid):
         [B B B B B]
       [C C B B B B C]
     [B B C C C C B B]
   [C C C C C C C C C C] ← dark band
 [B B B D B B B D B B B] ← eyespots (D)
[C C C C C C C C C C C C] ← scalloped edge
✨ PRO TIPS
- Work wing pairs simultaneously to ensure symmetry
- Block wings before assembly for best results
- Use stitch markers to track color change positions
- Carry yarn loosely behind work to prevent puckering
- Reference real butterfly anatomy (Buckeye, Peacock, or Swallowtail species)
- Take progress photos to compare with target image
- Practice color changes on a swatch first
✨ Final Words
Congratulations on completing your photo-accurate butterfly! This project combines advanced colorwork, sculptural shaping, and detailed finishing techniques—you should be incredibly proud of your work.
Remember: The beauty of handmade creatures lies in their uniqueness. Your butterfly may not be pixel-perfect to the photo, and that’s what makes it special. Each stitch carries your personal touch, your patience, and your creativity.
What’s Next?
- Display it proudly: Mount on a shadow box, create a mobile, or pin to a wall as living art
- Create a collection: Make butterflies in different color schemes inspired by real species (Monarchs, Swallowtails, Blue Morphos)
- Share your work: Tag your creation online—other makers would love to see your interpretation
- Gift with meaning: These make treasured gifts for nature lovers, new babies, or anyone who needs a reminder that beautiful transformations are possible
A Note on Time
This pattern requires 10-15 hours of focused work. If it takes you longer, that’s perfectly normal. The detailed colorwork and finishing steps demand patience. Take breaks, enjoy the process, and remember: rushed butterflies never learned to fly.
Happy stitching, and may your hooks always find their yarn! 🦋✨