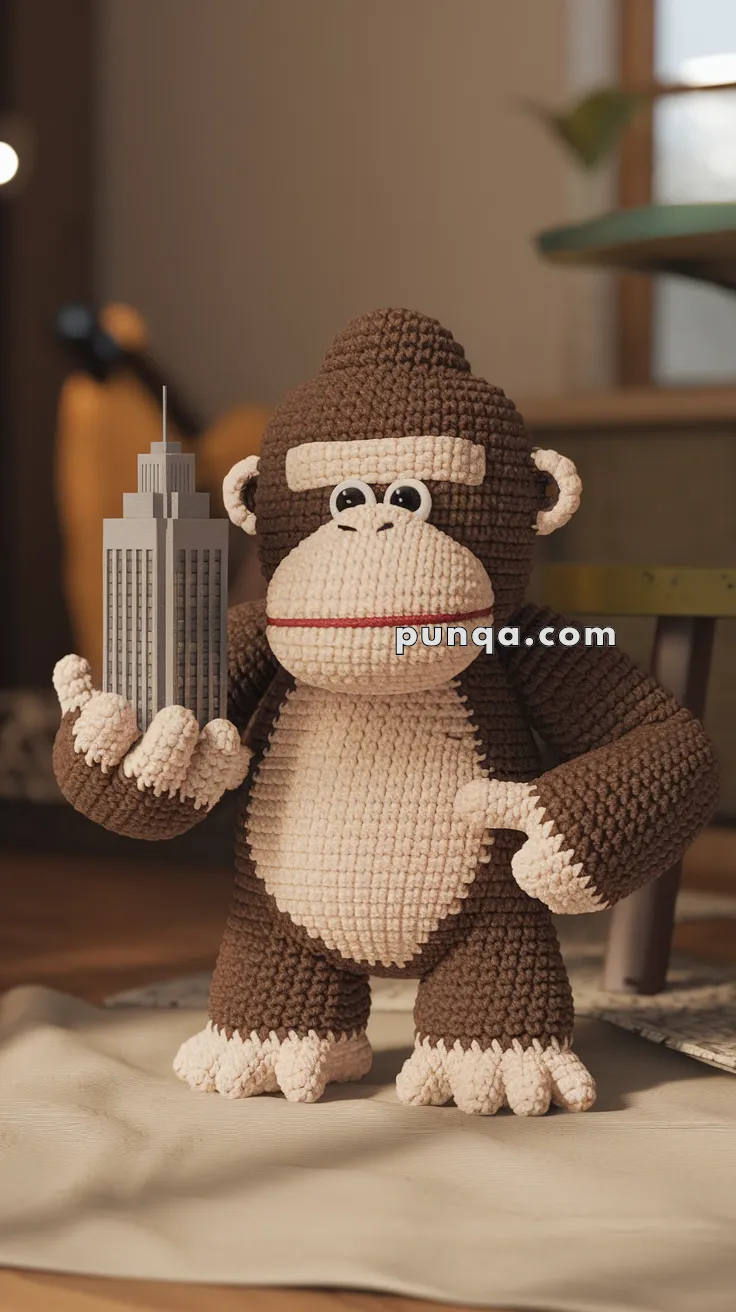
Get ready for some larger-than-life crochet fun with the Amigurumi King Kong, a project that’s bold, playful, and full of character! 🦍🧶 With his towering presence captured in soft yarn form, this design brings the legendary figure to life in a cozy, huggable way. From his expressive face to his chunky proportions, this King Kong radiates personality while still being irresistibly cuddly.
Perfect as a showstopping handmade gift, a whimsical décor piece, or a unique addition to your amigurumi collection, this project is sure to spark smiles and conversation. Fun to stitch and delightful to display, the Amigurumi King Kong is a joyful way to crochet creativity, character, and a sprinkle of handmade magic—one loop at a time! ✨🌆🧵
🦍Amigurumi King Kong Crochet Pattern
This highly detailed gorilla amigurumi captures the iconic character with a tall domed skull, strong brow ridge, large oval muzzle, wide beige chest panel, massive arms, and fully separated fingers and toes. The structure of the head, especially the prominent forehead peak and forward-projecting muzzle, is essential to achieving the correct expression. The hands feature individually sculpted fingers, and the ears include both outer and inner shaping for realism.
✨ Skill Level
Intermediate to Advanced
This pattern includes structural shaping, sculpted facial features, separate fingers and toes, and multi-part assembly.
📏 Finished Size
Height: 28–30 cm (11–12 inches)
Using worsted weight yarn and a 3.0–3.5 mm hook.
🧶 Yarn Requirements
Dark brown yarn (head, body, arms, legs, outer ears): 130 g (280 m)
Beige yarn (muzzle, chest panel, palms, soles, inner ears, brow ridge): 70 g (150 m)
Black yarn (nostrils): 2 g (4 m)
Red yarn (mouth line): 2 g (4 m)
White yarn (eye embroidery if needed): 2 g (4 m)
Additional materials:
-
10–12 mm safety eyes
-
Polyester fiberfill stuffing
-
Crochet hook 3.0–3.5 mm
-
Yarn needle
-
Stitch markers
🧵 Abbreviations (US Terms)
MR – magic ring
sc – single crochet
inc – increase
dec – invisible decrease
sl st – slip stitch
ch – chain
FO – fasten off
BLO – back loop only
🧠 Head (Domed Skull Shape)
With dark brown yarn:
Round 1: MR, 6 sc (6)
Round 2: inc x6 (12)
Round 3: (1 sc, inc) x6 (18)
Round 4: (2 sc, inc) x6 (24)
Round 5: (3 sc, inc) x6 (30)
Round 6: (4 sc, inc) x6 (36)
Round 7: (5 sc, inc) x6 (42)
Round 8: (6 sc, inc) x6 (48)
Round 9: (7 sc, inc) x6 (54)
Rounds 10–20: sc around (54)
This larger stitch count creates the tall, rounded skull.
Round 21: (7 sc, dec) x6 (48)
Round 22: (6 sc, dec) x6 (42)
Stuff upper head firmly to maintain dome.
Do not close yet.
👃 Muzzle (Large Oval Projection)
With beige yarn:
Round 1: MR, 6 sc
Round 2: inc x6 (12)
Round 3: (1 sc, inc) x6 (18)
Round 4: (2 sc, inc) x6 (24)
Round 5: (3 sc, inc) x6 (30)
Rounds 6–10: sc around (30)
Stuff very firmly into oval shape.
Flatten top slightly.
Sew centered between rounds 14–22 of head.
👁 Brow Ridge Strip
With beige yarn:
Ch 12
Row 1: sc across (11)
Row 2: sc across
FO.
Sew above muzzle to form strong brow ridge.
Insert safety eyes directly through ridge and head.
🧠 Complete Head Closure
Continue head shaping:
Round 23: (5 sc, dec) x6 (36)
Round 24: (4 sc, dec) x6 (30)
Round 25: (3 sc, dec) x6 (24)
Round 26: (2 sc, dec) x6 (18)
Round 27: (1 sc, dec) x6 (12)
Round 28: dec x6 (6)
FO and close.
🧠 Head Sculpting (Essential Step)
Using strong thread:
Insert needle from bottom of head.
Exit beside eye.
Reinsert at opposite eye.
Pull gently to create inward eye sockets.
Repeat above muzzle to create defined brow ridge.
This produces:
-
Prominent forehead peak
-
Deep-set eyes
-
Forward-projecting muzzle
👂 Ears (Make 2)
Outer ear with dark brown yarn:
Round 1: MR, 6 sc
Round 2: (1 sc, inc) x3 (9)
Round 3: sc around
FO.
Inner ear with beige yarn:
Round 1: MR, 5 sc
Round 2: sc around
FO.
Sew inner ear inside outer ear.
Attach at eye level.
🦍 Body
Start with beige yarn:
Round 1: MR, 6 sc
Round 2: inc x6 (12)
Round 3: (1 sc, inc) x6 (18)
Round 4: (2 sc, inc) x6 (24)
Round 5: (3 sc, inc) x6 (30)
Round 6: (4 sc, inc) x6 (36)
Round 7: (5 sc, inc) x6 (42)
Rounds 8–12: sc around (42)
Switch to dark brown yarn.
Rounds 13–24: sc around (42)
Round 25: (5 sc, dec) x6 (36)
Round 26: (4 sc, dec) x6 (30)
Round 27: (3 sc, dec) x6 (24)
Round 28: (2 sc, dec) x6 (18)
Stuff firmly.
Round 29: (1 sc, dec) x6 (12)
FO.
💪 Arms
With dark brown yarn:
Round 1: MR, 6 sc
Round 2: inc x6 (12)
Round 3: (1 sc, inc) x6 (18)
Round 4: (2 sc, inc) x6 (24)
Rounds 5–18: sc around (24)
Stuff lightly.
✋ Hands with Individual Fingers
Make 4 fingers per hand with beige yarn:
Round 1: MR, 6 sc
Rounds 2–4: sc around
FO.
Make thumb same way.
Join fingers by crocheting around them.
Round 1: sc around entire finger cluster (approx 30)
Round 2: dec evenly to 24
Switch to dark brown.
Attach to arm.
Lightly stuff palm only.
🦵 Legs
With dark brown yarn:
Round 1: MR, 6 sc
Round 2: inc x6 (12)
Round 3: (1 sc, inc) x6 (18)
Round 4: (2 sc, inc) x6 (24)
Rounds 5–16: sc around (24)
Stuff firmly.
🦶 Feet and Toes
Make 3 toes per foot with beige yarn:
Round 1: MR, 6 sc
Round 2: sc around
FO.
Join toes and crochet foot base.
Switch to dark brown and continue leg.
🧵 Assembly
Attach head securely.
Attach ears at eye level.
Attach arms slightly forward.
Attach legs evenly spaced.
🧵 Facial Details
Embroider nostrils near top of muzzle.
Embroider straight horizontal mouth line across muzzle center.
🌟 Finishing Touches
Shape forehead with fingers to maintain dome.
Ensure muzzle remains firmly stuffed.
Position fingers naturally curved.
Your finished King Kong amigurumi now features the correct skull dome, sculpted brow ridge, forward muzzle projection, separated fingers, and realistic ear placement, resulting in a powerful and expressive finished piece perfect for display or gifting.