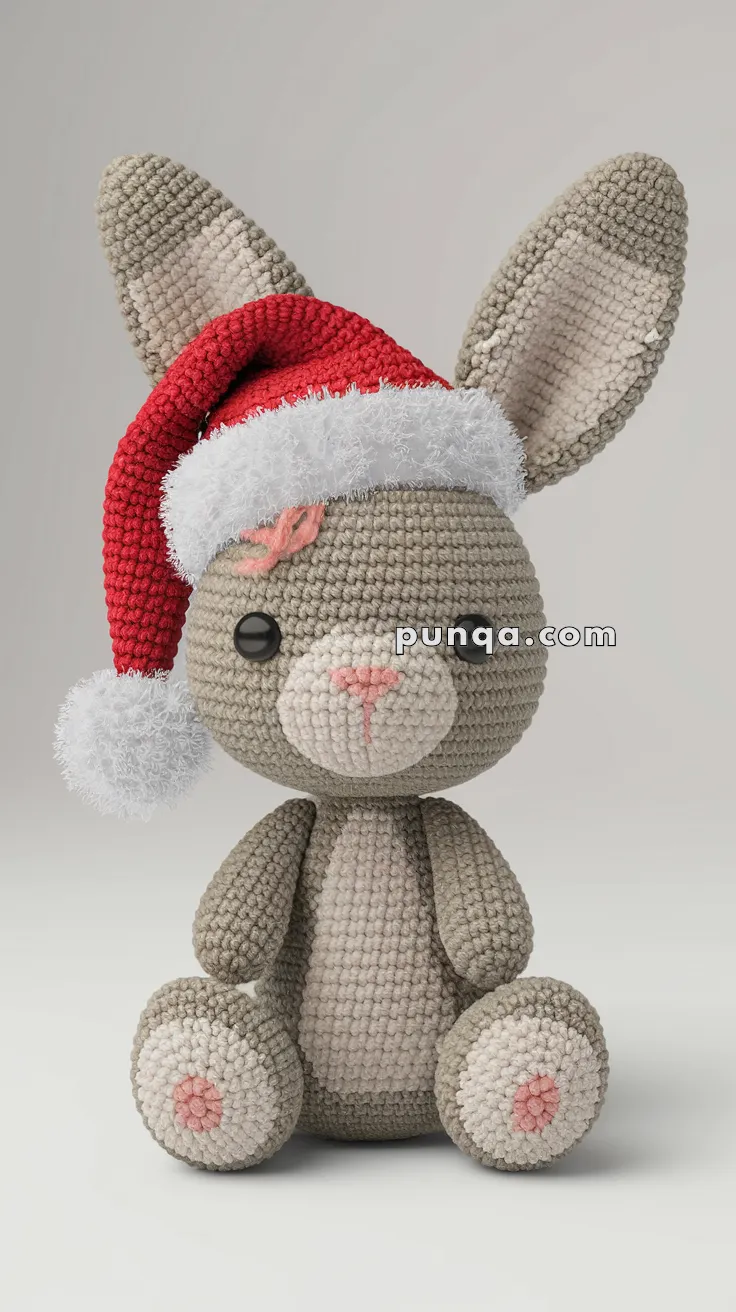
When it comes to crafting during the festive season, creating an amigurumi Christmasbunny with a Santa hat is pure joy! 🐰🎅 The charm of amigurumi lies in its ability to transform simple yarn into adorable, whimsical creatures that bring smiles to faces young and old. The process itself is a delightful journey of creativity and patience, where you watch your chosen colors and stitches come together stitch by stitch, forming a cuddly little character ready to spread holiday cheer. The prospect of gifting something handmade and filled with love truly embodies the giving spirit of Christmas.
Starting your amigurumi project is like embarking on a magical adventure. The excitement begins with selecting the perfect yarn in festive hues—perhaps a cozy white for the bunny and a jolly red for the Santa hat. As I gather my materials, I can’t help but imagine how this little creature will come to life. With crochet hook in hand, I dive into the rhythmic process of counting stitches and rounds, slowly shaping the bunny’s body and charming features. Each detail, from the floppy ears to the tiny pompom on its hat, adds to its character and heartwarming appeal. The whole experience is incredibly rewarding, resulting in a unique piece that holds a special place in any holiday décor. 🎄
🎄 Amigurumi Christmas Bunny With Santa Hat Pattern
Looking for a festive crochet project that adds instant cheer to your home or gift list? This adorable Amigurumi Christmas Bunny, complete with a fluffy Santa hat, is the perfect companion for the holidays. Whether perched under your tree or tucked into a stocking, this handmade bunny will steal hearts!
✂️ Skill Level
Intermediate – includes shaping, color changes, and sewing pieces
📏 Finished Size
Approximately 10–12 inches (25–30 cm) tall with worsted weight yarn and a 2.5–3.0 mm hook
🧵 Materials Needed
Worsted weight yarn in:
Taupe or Grey (main body)
Light Beige or Cream (belly, muzzle, ear insides)
Pink (nose and footpads)
Red (Santa hat)
White fluffy yarn (Santa hat brim and pom-pom)
Crochet hook: 2.5 mm or 3.0 mm
Safety eyes (10–12 mm)
Tapestry needle
Stuffing
Stitch marker
Scissors
🧶 Abbreviations (US Terms)
MR – Magic Ring sc – Single Crochet inc – Increase dec – Decrease ch – Chain sl st – Slip Stitch BLO – Back Loop Only FO – Fasten Off
🧸 Pattern Instructions
🟤 Head (Taupe)
MR, 6 sc
inc x6 (12)
(1 sc, inc) x6 (18)
(2 sc, inc) x6 (24)
(3 sc, inc) x6 (30)
(4 sc, inc) x6 (36) 7–14. sc around (36) – Place safety eyes between Rounds 9–10, about 8 sts apart
(4 sc, dec) x6 (30)
(3 sc, dec) x6 (24)
(2 sc, dec) x6 (18) – Stuff firmly
(1 sc, dec) x6 (12)
dec x6 (6), FO and close
🐰 Body (Taupe with beige belly)
MR, 6 sc
inc x6 (12)
(1 sc, inc) x6 (18)
(2 sc, inc) x6 (24)
(3 sc, inc) x6 (30) 6–12. sc around
(3 sc, dec) x6 (24)
(2 sc, dec) x6 (18)
(1 sc, dec) x6 (12) – Stuff and FO, leave tail for sewing
✋ Arms (Make 2 – Taupe)
MR, 6 sc
inc x6 (12) 3–7. sc around (12)
(2 sc, dec) x3 (9) 9–12. sc around (9) – Stuff lightly and FO
🦶 Legs (Make 2 – Taupe with beige/pink footpads)
MR with pink, 6 sc
inc x6 (12)
(1 sc, inc) x6 (18), change to taupe 4–8. sc around (18)
(2 sc, dec) x4, sc x2 (14) 10–11. sc around – Stuff and FO
👂 Ears (Make 2 – Taupe and Beige)
Outer (Taupe)
MR, 6 sc
inc x6 (12)
(1 sc, inc) x6 (18) 4–10. sc around (18) – FO and flatten
Inner (Beige) – Same as outer but stop at Rnd 8 – Sew inner piece onto outer ear, then attach to head
🧣 Muzzle (Beige)
MR, 6 sc
inc x6 (12)
(1 sc, inc) x6 (18)
sc around – Stuff and sew under eyes – Embroider pink nose and line
🎅 Santa Hat
Red Section
MR, 4 sc
(1 sc, inc) x2 (6)
(2 sc, inc) x2 (8)
(3 sc, inc) x2 (10)
(4 sc, inc) x2 (12)
(5 sc, inc) x2 (14)
(6 sc, inc) x2 (16)
sc around – Continue increasing every few rounds until it fits bunny’s head (about 36–40 sts) – FO
Brim (White fluffy yarn)
Join to base of red hat, sc around
You can use fluffy yarn or regular white yarn with surface slip stitches for texture
Pom-pom
Make a small pom-pom and sew to the tip of the hat
🧷 Assembly
Attach head to body
Sew arms slightly below neck area
Attach legs symmetrically at bottom
Stitch on ears, muzzle, and embroidered nose
Place Santa hat tilted to one side
Optional: Add blush, bows, or a gift bag
🎁 Finishing Touch
Your Christmas Bunny is now ready to hop into holiday joy! This little one brings warmth, charm, and festive cheer to your handmade collection.