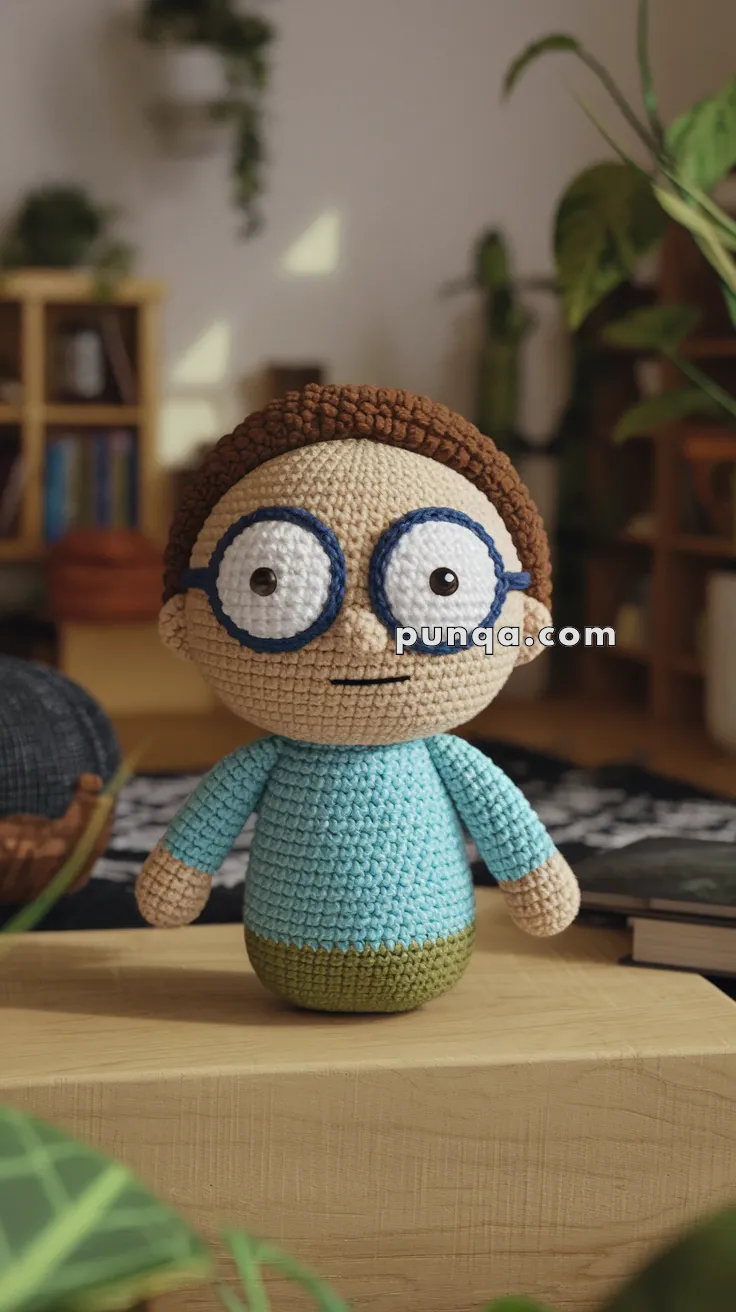
Get ready to crochet your own Amigurumi Morty Smith, the lovable, anxious sidekick from Rick and Morty!🌀✨ With his worried expression, and classic cartoon charm, this project is perfect for fans of the show and amigurumi enthusiasts alike. Whether you’re crafting Morty as a standalone piece or pairing him with Rick for the ultimate duo, each stitch brings his quirky personality to life. Customize his look with different yarn textures or add embroidered details to make him uniquely yours!
🧶🚀 This free crochet pattern offers a fun challenge, blending simple shapes with expressive features to capture Morty’s iconic style. Whether you’re a beginner looking for a rewarding project or an experienced crocheter eager to add another character to your collection, this pattern is sure to be a hit. Grab your yarn, hook, and a little interdimensional creativity—it’s time to bring Morty to life, one stitch at a time! 🛸💛
🧠 Amigurumi Morty Smith Crochet Pattern
Oh geez! 😰 Bring your favorite dimension-hopping teen to life with this adorable Amigurumi Morty. Featuring his classic wide-eyed expression, curly brown hair, and blue sweater, this doll is perfect for Rick and Morty fans of all skill levels.
✨ Skill Level
Intermediate – includes shaping, color transitions, facial placement, and textured hair techniques.
📏 Finished Size
20–22 cm tall using DK yarn and a 2.75–3 mm hook.
🧶 Materials
-
Light beige yarn (skin)
-
Medium brown yarn (hair)
-
Light turquoise yarn (shirt)
-
Olive yarn (lower body)
-
White yarn (eye whites)
-
Navy yarn (glasses)
-
Black yarn/thread (mouth)
-
8–10 mm safety eyes
-
Crochet hook 2.75–3.0 mm
-
Stuffing
-
Tapestry needle
🧵 Abbreviations (US Terms)
MR – magic ring
sc – single crochet
inc – increase
dec – decrease
sl st – slip stitch
ch – chain
BLO – back loop only
FO – fasten off
🧍♂️ Head (Light Beige)
Round 1: MR, 6 sc
Round 2: inc ×6 (12)
Round 3: (sc, inc) ×6 (18)
Round 4: (2 sc, inc) ×6 (24)
Round 5: (3 sc, inc) ×6 (30)
Round 6: (4 sc, inc) ×6 (36)
Round 7: (5 sc, inc) ×6 (42)
Rounds 8–18: sc around (42)
Round 19: (5 sc, dec) ×6 (36)
Round 20: (4 sc, dec) ×6 (30)
Round 21: (3 sc, dec) ×6 (24)
Round 22: (2 sc, dec) ×6 (18)
Stuff firmly.
Round 23: (sc, dec) ×6 (12)
Round 24: dec ×6 (6)
FO and close.
👁 Eye Whites (Make 2 – White)
Round 1: MR, 6 sc
Round 2: inc ×6 (12)
Round 3: (sc, inc) ×6 (18)
Round 4: (2 sc, inc) ×6 (24)
Rounds 5–6: sc around (24)
Lightly stuff for a gentle dome.
Insert safety eyes slightly above center.
Sew eyes touching each other horizontally on the face.
Placement:
-
Center front of head
-
Lower edges sit slightly above midline of head
👓 Glasses (Navy Blue)
Make two rings sized to your eye pieces.
Typical: ch 28, join to form a loop, sc around.
Make two loops of identical size.
Stitch snugly around each eye so they frame the domed whites.
Add a simple embroidered bridge between the circles and small side “arms” toward the ears.
👃 Nose (Light Beige)
Round 1: MR, 5 sc
Round 2: (sc, inc) ×2 + sc (7)
Round 3: sc around (7)
FO and lightly stuff.
Placement:
Attach directly against the lower edge of the eyes—almost touching the whites.
👄 Mouth (Black)
Embroider a small, gentle upward curve, centered and spaced a few rows below the nose.
👂 Ears (Make 2 – Light Beige)
Round 1: MR, 6 sc
Round 2: sc around (6)
Round 3: (sc, inc) ×3 (9)
FO and flatten.
Placement:
Sew each ear so its center aligns horizontally with the center of the eyes.
💇 Hair (Textured Brown Cap)
Cap Base
Round 1: MR, 6 sc
Round 2: inc ×6 (12)
Round 3: (sc, inc) ×6 (18)
Round 4: (2 sc, inc) ×6 (24)
Round 5: (3 sc, inc) ×6 (30)
Round 6: (4 sc, inc) ×6 (36)
Round 7: (5 sc, inc) ×6 (42)
Texture Rounds
Rounds 8–12: loop stitch or alternating (sc, loop stitch) around (42)
This produces the dense, bumpy hair texture from the photo.
FO and sew to head.
Hairline placement:
Starts 2–3 rounds above the top line of the glasses.
🧍♂️ Body (Pear-Shaped, Starting at Shoulders)
Begin with turquoise (shirt)
Round 1: MR, 6 sc
Round 2: (sc, inc) ×3 (9)
Rounds 3–5: sc around (9) — narrow shoulder top
Round 6: (2 sc, inc) ×3 (12)
Round 7: (3 sc, inc) ×3 (15)
Round 8: (4 sc, inc) ×3 (18)
Round 9: sc around (18)
Round 10: (2 sc, inc) ×6 (24)
Rounds 11–15: sc around (24)
Change to Olive (lower body)
Round 16: (3 sc, inc) ×6 (30)
Rounds 17–23: sc around (30) — this is the widest area
Round 24: (4 sc, inc) ×6 (36)
Rounds 25–26: sc around (36) — gentle base curve
Round 27: (4 sc, dec) ×6 (30)
Round 28: (3 sc, dec) ×6 (24)
Round 29: (2 sc, dec) ×6 (18)
Stuff firmly, especially at the olive base to keep the pear silhouette stable.
FO, leave tail, and sew to head.
🧤 Arms (Make 2 – Slightly Thicker)
Start with light beige (hands)
Round 1: MR, 7 sc
Rounds 2–3: sc around (7)
Switch to turquoise
Rounds 4–12: sc around (7)
FO and stuff lightly.
Placement:
Attach arms exactly at the color-change line, not higher—matching the photo.
✨ Assembly
-
Attach head directly to narrow top of body
-
Sew hair cap so bumpy texture sits evenly
-
Position eyes touching, nose right underneath
-
Curve the smile for a friendly expression
-
Attach arms level with the turquoise/olive transition
-
Shape body gently with stuffing to maintain the rounded lower silhouette
🎉 Finished!
Your Morty plush is ready—with his wide glasses, sweet smile, bumpy hair, and perfectly shaped pear-body, he brings a warm, handmade charm to any shelf or collection. Display him proudly, gift him to a fellow fan, or let him join your growing amigurumi universe.