Meet the Amigurumi Quail, a tiny bundle of charm inspired by one of nature’s most endearing birds! 🐦🧶 With its plump little body, soft coloring, and signature topknot plume, this crochet cutie captures all the gentle personality of a real quail in a huggable handmade form. Whether nestled in a woodland-themed display, perched on a shelf, or gifted to a bird-loving friend, it’s a delightful way to bring a touch of nature indoors.
Perfect for crocheters who love sweet details and cozy shapes, this pattern invites you to play with soft yarns and subtle colorwork. Add a tiny egg, stitch up a whole covey of quail, or personalize your bird with a splash of whimsy. The Amigurumi Quail is a joyful way to stitch up serenity, sweetness, and a sprinkle of handmade woodland magic—one loop at a time! 🧵🌿
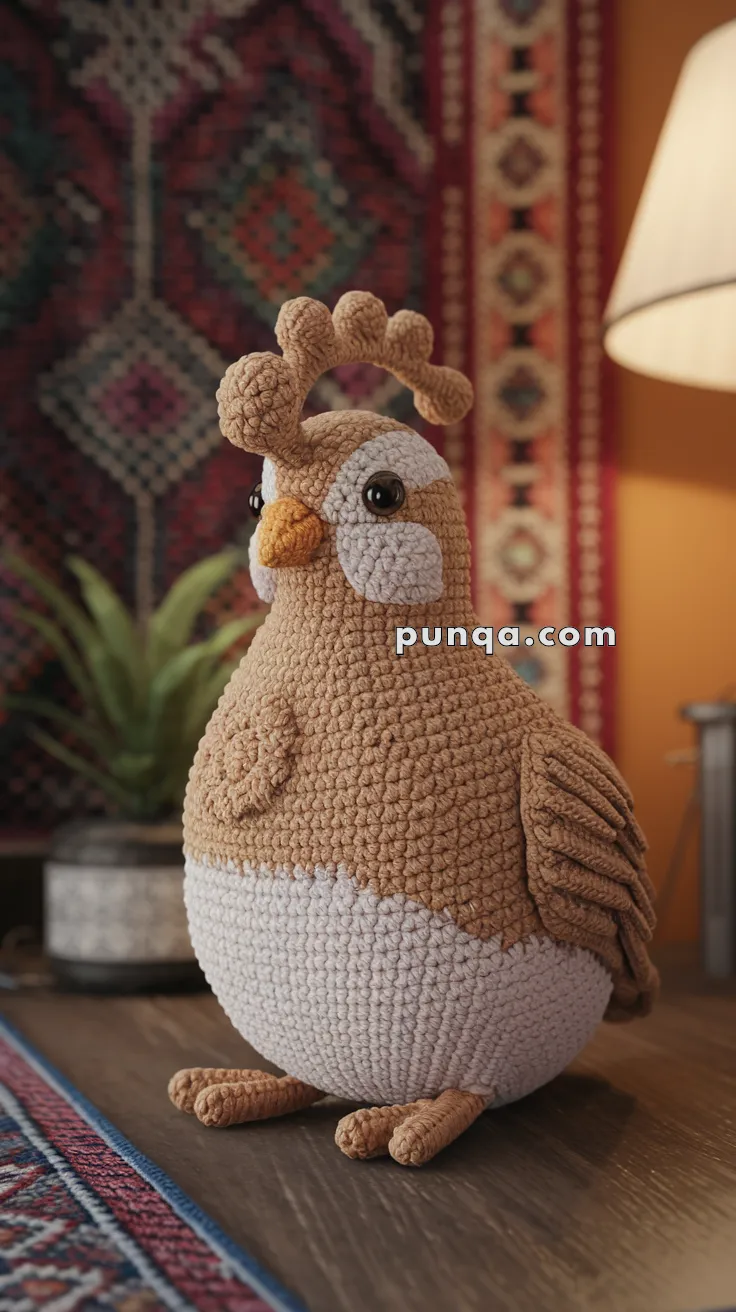
🪶 Amigurumi Quail Crochet Pattern
This delightful quail, with its round plush body and signature bobbled crest, captures the cozy charm of woodland life. Designed for plush yarn, this pattern creates a beautifully balanced bird with sculpted wings, textured details, and a graceful stance — perfect for display or gifting.
✨ Skill Level
Intermediate–Advanced
Techniques included:
- Sculptural shaping
- Layered wing construction
- Crest assembly
- Color transitions
- Standing balance shaping
- Dimensional feather detailing
📏 Finished Size
Approximately:
- 8–10 inches (20–25 cm) tall
- 5–6 inches (13–15 cm) wide
Using plush, chenille, or velvet yarn with a 4 mm crochet hook.
🧶 Materials
Yarn Colors
- Warm camel brown
- Soft cream beige
- Golden mustard orange
- Dark brown or black
Supplies
- 4 mm crochet hook
- 12–14 mm safety eyes
- Polyester stuffing
- Yarn needle
- Stitch markers
- Optional weighted pellets
- Optional floral wire for crest support
🧵 Required Yarn Amounts
- Warm camel brown: 95–115 g
- Soft cream beige: 55–70 g
- Golden mustard orange: 5–8 g
- Dark brown/black: small amount
- Polyester stuffing: 250–300 g
🔤 Abbreviations
- MR – Magic Ring
- sc – Single Crochet
- inc – Increase
- dec – Invisible Decrease
- sl st – Slip Stitch
- ch – Chain
- hdc – Half Double Crochet
- dc – Double Crochet
- BLO – Back Loop Only
- FO – Fasten Off
Work in continuous rounds unless noted.
🪺 Body & Head (One Piece)
The quail’s body should resemble a standing pear shape:
very full at the bottom with a softer narrowing toward the head.
Start with soft cream beige yarn.
Round 1
6 sc in MR (6)
Round 2
inc around (12)
Round 3
(1 sc, inc) ×6 (18)
Round 4
(2 sc, inc) ×6 (24)
Round 5
(3 sc, inc) ×6 (30)
Round 6
(4 sc, inc) ×6 (36)
Round 7
(5 sc, inc) ×6 (42)
Round 8
(6 sc, inc) ×6 (48)
Round 9
(7 sc, inc) ×6 (54)
Round 10
(8 sc, inc) ×6 (60)
Round 11
(9 sc, inc) ×6 (66)
Rounds 12–20
sc around (66)
This section forms the oversized lower belly.
The cream belly should occupy roughly the lower third of the bird.
───────────────
🟤 Upper Body Color Change
Switch to warm camel brown yarn.
Rounds 21–33
sc around (66)
The brown section should cover:
- Chest
- Neck
- Head
- Entire back
The cream section must remain visible only on the lower rounded belly.
Stuff body firmly and evenly.
The lower body should remain much wider than the upper section.
───────────────
🪶 Neck & Head Shaping
The head should taper softly from the large body instead of forming a separate round ball.
Round 34
(9 sc, dec) ×6 (60)
Round 35
(8 sc, dec) ×6 (54)
Round 36
(7 sc, dec) ×6 (48)
Round 37
(6 sc, dec) ×6 (42)
Rounds 38–40
sc around (42)
Insert safety eyes between Rounds 38–39 with 8 stitches between them.
The eyes should sit high beside the cream cheek patches.
Round 41
(5 sc, dec) ×6 (36)
Round 42
(4 sc, dec) ×6 (30)
Stuff head slightly softer than body.
Round 43
(3 sc, dec) ×6 (24)
Round 44
(2 sc, dec) ×6 (18)
Round 45
(1 sc, dec) ×6 (12)
Round 46
dec around (6)
FO and close.
The finished silhouette should remain upright and egg-like.
───────────────
🎭 Face Patches (Make 2)
Using soft cream beige yarn.
These patches should sit high and large around the eyes.
Round 1
6 sc in MR
Round 2
inc around (12)
Round 3
(1 sc, inc) ×6 (18)
Round 4
(2 sc, inc) ×6 (24)
Round 5
sc around (24)
FO.
Flatten slightly into rounded ovals.
Sew beneath and around the eyes.
The patches should nearly touch beside the beak.
───────────────
🧡 Beak
Using golden mustard orange yarn.
Round 1
4 sc in MR
Round 2
inc around (8)
Round 3
sc around (8)
Round 4
(2 sc, dec) ×2 (6)
Stuff lightly.
Flatten gently into a short cone shape.
Sew centered between face patches.
The beak should remain short and rounded.
───────────────
👀 Facial Details
Using dark brown or black yarn:
- Embroider tiny nostril dots
- Add slight upper eyelid shaping if desired
Keep expression soft and calm.
───────────────
👑 Curved Crest
The crest arches backward in a smooth curved fan shape.
Using warm camel brown yarn.
Make 5 crest bubbles.
Crest Bubble
Round 1
6 sc in MR
Round 2
inc around (12)
Rounds 3–4
sc around (12)
Round 5
(1 sc, dec) ×4 (8)
Stuff lightly.
FO.
Arrange bubbles in graduating curved order.
Sew together into an arch shape.
Attach behind forehead curving backward.
Optional:
insert floral wire through crest for stronger shaping.
───────────────
🪽 Layered Wings (Make 2)
The wings should appear folded with layered feather ridges.
Using warm camel brown yarn.
Round 1
6 sc in MR
Round 2
inc around (12)
Round 3
(1 sc, inc) ×6 (18)
Round 4
(2 sc, inc) ×6 (24)
Round 5
(3 sc, inc) ×6 (30)
Round 6
(4 sc, inc) ×6 (36)
Rounds 7–10
sc around (36)
Flatten lightly.
Feather Layer Rows
Create layered feather texture:
(ch 4, sl st in next stitch) repeated across lower wing edge.
Work 3 staggered rows.
The finished wings should appear heavily layered and folded downward.
Attach low on body sides angled backward.
───────────────
👣 Feet (Make 2)
The feet should remain tiny beneath the oversized body.
Using warm camel brown yarn.
Leg Base
Round 1
6 sc in MR
Round 2
inc around (12)
Rounds 3–4
sc around (12)
Toes
Create 3 short toes:
Toe
ch 4, sc back across chain.
Repeat 3 times.
FO.
Flatten slightly before attaching.
Attach close together beneath belly.
───────────────
🪶 Tail Feathers
Using warm camel brown yarn.
Make 3 small feathers.
Feather
Ch 8.
Starting in second chain:
sc, hdc, dc ×3, hdc, sc
FO.
Layer slightly overlapping.
Attach low on back angled upward.
The tail should remain small and subtle.
───────────────
🪡 Assembly
🧵 Sew face patches high around eyes
🧵 Attach beak centered between patches
🧵 Attach crest curving backward
🧵 Sew wings low and angled backward
🧵 Attach feet evenly beneath body
🧵 Sew tail low on back
───────────────
✨ Shaping Tips
✨ Keep belly extremely round and full
✨ Allow upper body to taper gently upward
✨ Keep head smaller than belly
✨ Angle wings downward naturally
✨ Curve crest backward in soft arc
✨ Add weighted pellets inside base for stability
🌿 Finishing Touches
✨ Steam wings lightly for feather definition
✨ Shape belly evenly with hands
✨ Adjust crest bubbles carefully
✨ Brush plush yarn lightly if desired
✨ Add soft blush near cheeks for warmth
Your woodland crochet quail is now complete! 🪶✨
With its oversized rounded belly, layered feather wings, tiny standing feet, curved crest, and soft natural coloring, this charming handmade bird becomes a cozy nature-inspired display piece full of warmth and personality.