Creating an amigurumi raccoon baby is such a delightful adventure! 🦝 There’s something incredibly satisfying about crafting these adorable creatures with just a hook and some yarn. The charm of amigurumi raccoons lies in their cute and whimsical design, which brings smiles to both young and old. The process is like painting a picture with yarn; every single stitch adds character and personality to the little critter. What I love most is the creativity it invites—choosing colors, adding details, and watching the raccoon come to life with each turn of the hook. The joy of seeing a finished raccoon amigurumi is truly unmatched!
Beginning the amigurumi journey might seem a bit daunting, but trust me, it’s easier than it looks! First, I grab my favorite soft yarn and a trusty crochet hook. Following a well-crafted pattern is essential and there are so many amazing ones out there that guide you from the first stitch to the last. Crafting the little raccoon’s body, limbs, and distinctive masked face is like putting together a puzzle. The repetitive nature of crocheting is not only meditative but also super rewarding as each part comes together. Stuffing, sewing parts, and adding final touches like little eyes or a nose is the grand finale, turning a simple ball of yarn into a charming raccoon buddy ready to be cuddled! 🧶
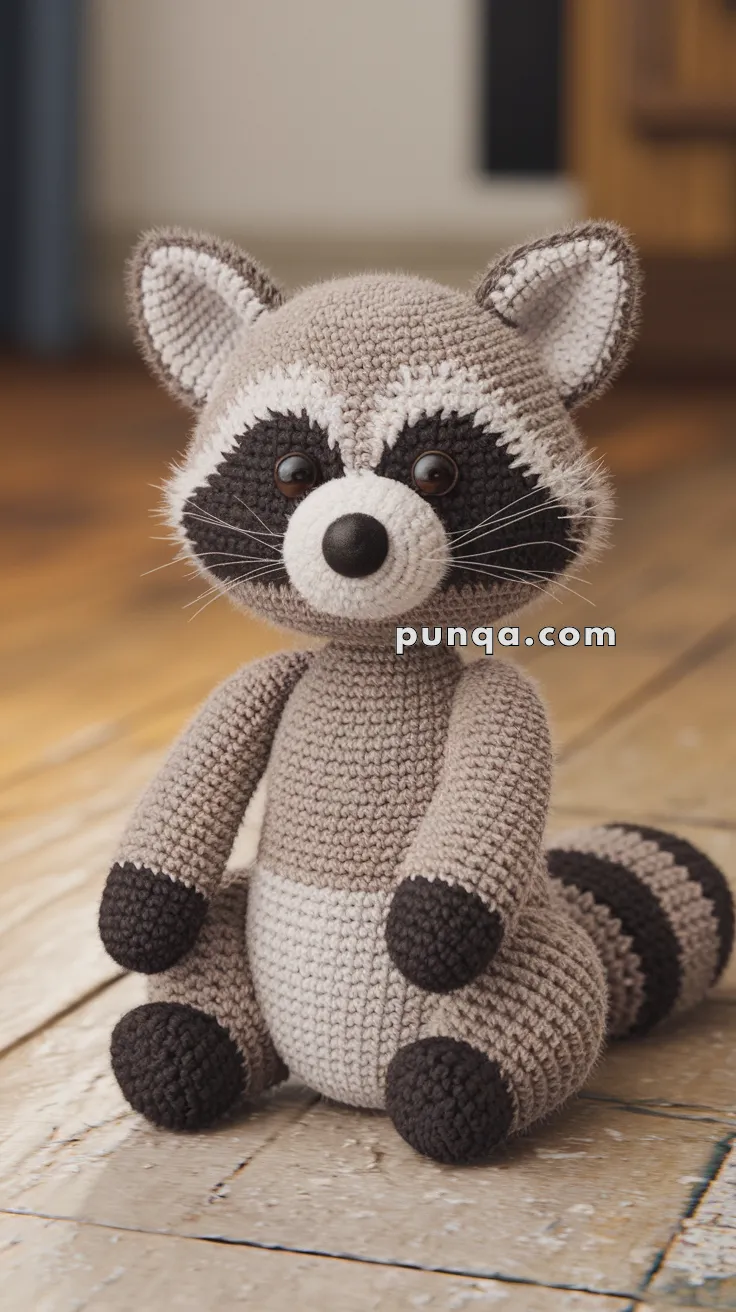
🦝 Amigurumi Raccoon Baby Crochet Pattern
Bring a touch of woodland charm into your home with this adorable crochet raccoon baby! With its signature black face mask, fluffy striped tail, and curious eyes, this raccoon is the perfect project for forest-animal lovers.
✨ Skill Level
Intermediate – requires color changes, applique sewing, and shaping.
📏 Finished Size
Approx. 25–28 cm (10–11 in) tall when seated, using worsted yarn and 3.5 mm hook.
🧶 Materials
-
Worsted weight yarn:
-
Light gray – main body & head
-
Dark brown/black – paws, mask, tail stripes
-
White – muzzle, belly patch, ear insides
-
Black – nose embroidery
-
-
3.5 mm crochet hook
-
10 mm safety eyes
-
Polyester stuffing
-
Tapestry needle
-
Stitch marker
-
Nylon filament or black thread for whiskers
🧵 Abbreviations (US Terms)
-
MR = Magic Ring
-
sc = single crochet
-
inc = increase (2 sc in same st)
-
dec = decrease (sc2tog)
-
ch = chain
-
sl st = slip stitch
-
FO = fasten off
🐾 Head (Gray)
-
MR, 6 sc [6]
-
inc ×6 [12]
-
(1 sc, inc) ×6 [18]
-
(2 sc, inc) ×6 [24]
-
(3 sc, inc) ×6 [30]
-
(4 sc, inc) ×6 [36]
7–15. sc around [36] → makes head taller like in the photo -
(4 sc, dec) ×6 [30]
-
(3 sc, dec) ×6 [24]
👉 Place safety eyes between R10–11, about 11 sts apart, over the mask pieces. -
(2 sc, dec) ×6 [18]
-
(1 sc, dec) ×6 [12]
-
dec ×6 [6]
FO, close, stuff firmly.
🦴 Face Mask (Make 2 – Black/Dark Brown)
-
Ch 10
-
R1: sc in 2nd ch, sc across, 3 sc in last st. Rotate, sc across, 2 sc in last st. [20]
-
R2: sc around, inc at ends [24]
-
R3: sc evenly [24]
FO, leaving tail.
👉 Sew each patch behind safety eyes, pointing inward in a triangular shape under the muzzle.
🐽 Muzzle (White)
-
MR, 6 sc [6]
-
inc ×6 [12]
3–5. sc around [12]
FO, stuff lightly, sew centered between eyes.
Embroider small black oval nose on top.
👂 Ears (Make 2 – Gray Outer, White Inner)
Outer (Gray):
-
MR, 6 sc [6]
-
(1 sc, inc) ×3 [9]
-
(2 sc, inc) ×3 [12]
-
sc around [12]
FO.
Inner (White):
Repeat R1–3 only.
Sew white inner ear to gray outer. Flatten, pinch slightly, and sew to top sides of head.
🧸 Body (Gray + White Belly)
-
MR, 6 sc [6]
-
inc ×6 [12]
-
(1 sc, inc) ×6 [18]
-
(2 sc, inc) ×6 [24]
-
(3 sc, inc) ×6 [30]
6–18. sc around [30] -
(3 sc, dec) ×6 [24]
-
(2 sc, dec) ×6 [18]
-
(1 sc, dec) ×6 [12]
-
dec ×6 [6]
FO, stuff firmly.
Belly Patch (White Oval – separate piece):
-
Ch 9.
-
sc in 2nd ch, sc across, 3 sc in last. Rotate, sc across, 2 sc in last [18].
-
sc around, inc at ends [22].
FO, sew onto front center of body.
🐾 Arms (Make 2 – Black → Gray)
-
With black: MR, 6 sc [6]
-
inc ×6 [12]
3–5. sc around [12]
Switch to gray:
6–13. sc around [12]
FO, lightly stuff, sew to body sides.
🐾 Legs (Make 2 – Black → Gray)
-
With black: MR, 6 sc [6]
-
inc ×6 [12]
-
(1 sc, inc) ×6 [18]
4–6. sc around [18]
Switch to gray:
7–14. sc around [18] → longer legs for seated look -
(1 sc, dec) ×6 [12]
-
sc around [12]
FO, stuff, sew to bottom sides.
🌀 Tail (Striped – Gray & Black)
-
With gray: MR, 6 sc [6]
-
inc ×6 [12]
-
(1 sc, inc) ×6 [18]
4–5. sc gray [18]
6–7. sc black [18]
8–9. sc gray [18]
10–11. sc black [18]
12–13. sc gray [18]
FO, stuff, sew to lower back.
✨ Finishing Touches
-
Insert whiskers: Use nylon filament or black thread. Cut 6–8 short lengths, thread with needle, and knot inside muzzle to secure.
-
Add light blush on cheeks if desired.
-
Shape head by gently pinching around the mask area for expression.
🌟 Final Result
You now have a cuddly raccoon friend with big round eyes, a bold black mask, soft paws, and a stripey tail. Perfect for woodland décor, nursery gifts, or just a cozy handmade companion! 🦝💛