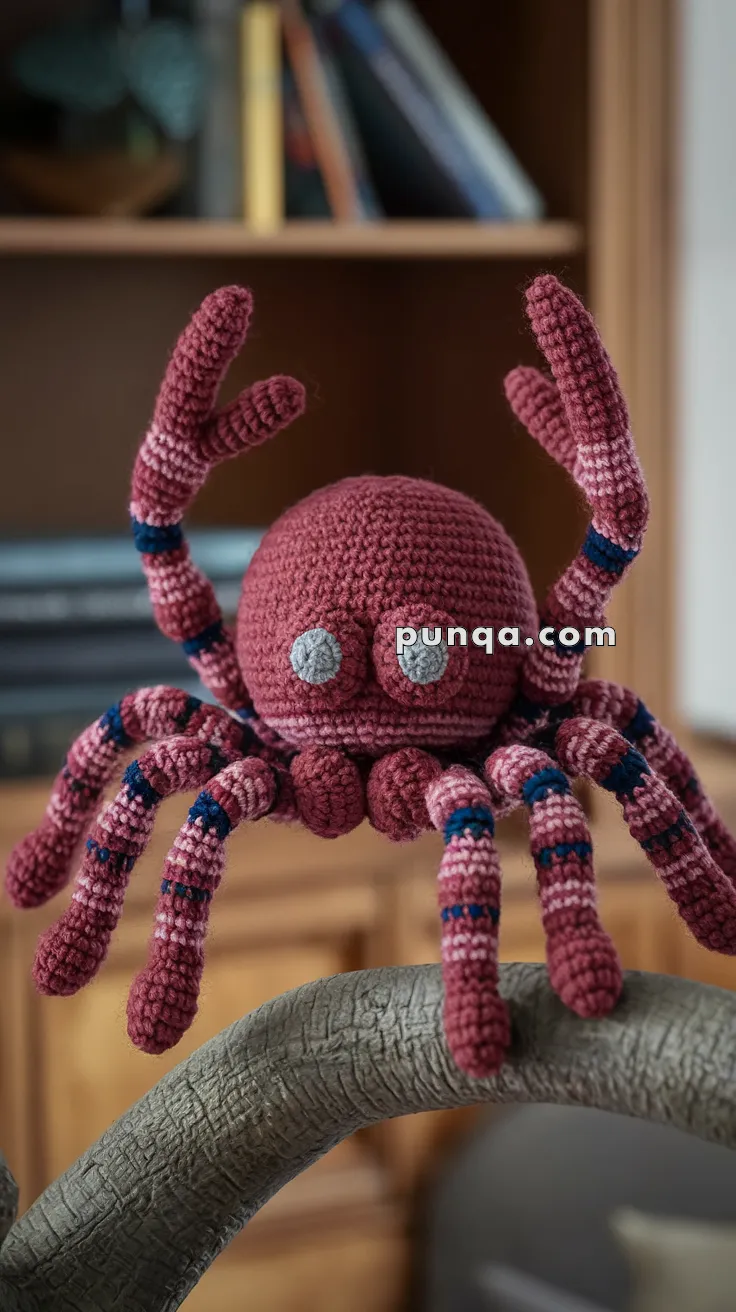
Spin some handmade charm into your crochet collection with the Amigurumi Spider, a quirky and lovable little creature that’s bursting with personality! 🕷️🧶 Featuring a bold burgundy body, soft striped legs, and expressive grey eyes, this eight-legged friend is more delightful than spooky. Whether you’re crafting for Halloween, decorating a nature-themed space, or just love unique amigurumi designs, this spider is sure to weave its way into your heart.
Perfect for crocheters who enjoy playful shapes and character-rich details, this pattern invites you to explore texture, color, and creativity in every stitch. Add a tiny web, pair it with other critters, or make a whole colony in different colors for a fun display. The Amigurumi Spider is a joyful way to stitch up whimsy, charm, and a sprinkle of handmade magic—one loop at a time! 🧵✨🌟
🕷️ Amigurumi Spider Crochet Pattern
Creepy? Maybe a little. Cute? Absolutely! This amigurumi spider combines a bold burgundy body, soft striped legs, and expressive grey eyes for a handmade friend that’s full of personality. Whether perched on a shelf or guarding your yarn basket, this spider is the perfect blend of quirky and cozy.
✨ Skill Level
Intermediate – shaping, frequent color changes, multi-limb assembly.
📏 Finished Size
Approx. 18 cm (7 in) wide leg-to-leg using worsted yarn and a 3.5 mm hook.
🧶 Materials
Worsted Weight Yarn
-
Burgundy / dark rose – body & legs
-
Navy blue – leg stripes
-
Dusty pink – leg stripes (lower legs only)
-
Light grey – eyes
Other Supplies
-
3.5 mm crochet hook
-
Polyester fiberfill
-
Tapestry needle
-
Stitch marker
-
Optional: thin wire or pipe cleaners (legs)
🪡 Abbreviations (US)
MR – magic ring
sc – single crochet
inc – increase
dec – decrease
FO – fasten off
🧠 Body
Worked in continuous rounds.
With burgundy yarn:
-
R1: 6 sc in MR (6)
-
R2: inc ×6 (12)
-
R3: (sc, inc) ×6 (18)
-
R4: (2 sc, inc) ×6 (24)
-
R5: (3 sc, inc) ×6 (30)
-
R6: (4 sc, inc) ×6 (36)
-
R7–R11: sc around (36)
Body should be wide and low, not tall.
-
R12: (4 sc, dec) ×6 (30)
-
R13: (3 sc, dec) ×6 (24)
-
R14: (2 sc, dec) ×6 (18)
Stuff firmly, flattening slightly underneath.
-
R15: (sc, dec) ×6 (12)
-
R16: dec ×6 (6)
FO and close.
👀 Eyes (Make 2)
Eyes are small, flat discs, not domes.
With light grey yarn:
-
R1: 6 sc in MR (6)
-
R2: inc ×6 (12)
Do not stuff.
FO, leaving a long tail.
Sew eyes close together, low on the front of the body, between Rnds 6–8.
🦵 Legs (Make 8)
Legs are even thickness, short stripes, pink only near the ends.
With burgundy yarn:
-
R1: 6 sc in MR (6)
-
R2–R3: sc around (6)
Switch to navy:
-
R4–R5: sc around (6)
Switch to burgundy:
-
R6–R8: sc around (6)
Switch to dusty pink:
-
R9–R10: sc around (6)
Switch to burgundy:
-
R11–R14: sc around (6)
Switch to navy:
-
R15–R16: sc around (6)
Switch to burgundy:
-
R17–R19: sc around (6)
FO, leave long tail.
Lightly stuff or insert wire before closing.
🧷 Assembly
-
Sew eyes first
-
Attach legs low around the body, centered between Rnds 8–12
-
Placement:
-
Front pair: sewn slightly forward and curved inward & upward
-
Middle pairs: angled outward
-
Back pair: angled slightly backward
-
-
Adjust bends so spider perches naturally
✂️ Finishing Touches
-
Shape body into a low dome
-
Curve raised legs forward, not vertical
-
Ensure pink stripes sit near the “feet” only
-
Weave in ends neatly
🌟 Final Look
Your finished spider should have:
-
A low, plush burgundy body
-
Two small flat grey eyes close together
-
Eight chunky striped legs
-
Two front legs raised in a playful arc
Cute, expressive, and perfectly perched 🕷️🧶