Say hello to the Amigurumi Owl Baby, a wide-eyed woodland wonder that’s ready to perch in your heart! 🦉🧶 With its oversized eyes, fluffy tufts, and tiny golden feet, this adorable plush brings a cozy forest vibe to your crochet collection. Whether nestled on a shelf, gifted to a nature lover, or added to a lineup of forest friends, this little owl is sure to charm with every stitch.
Perfect for crocheters who love soft textures and expressive features, this pattern invites you to create a cuddly companion full of personality and warmth. Add a tiny branch, pair it with other woodland critters, or customize its colors for a unique twist. The Amigurumi Owl Baby is a joyful way to stitch up sweetness, whimsy, and a sprinkle of handmade magic—one loop at a time! 🧵✨🌲
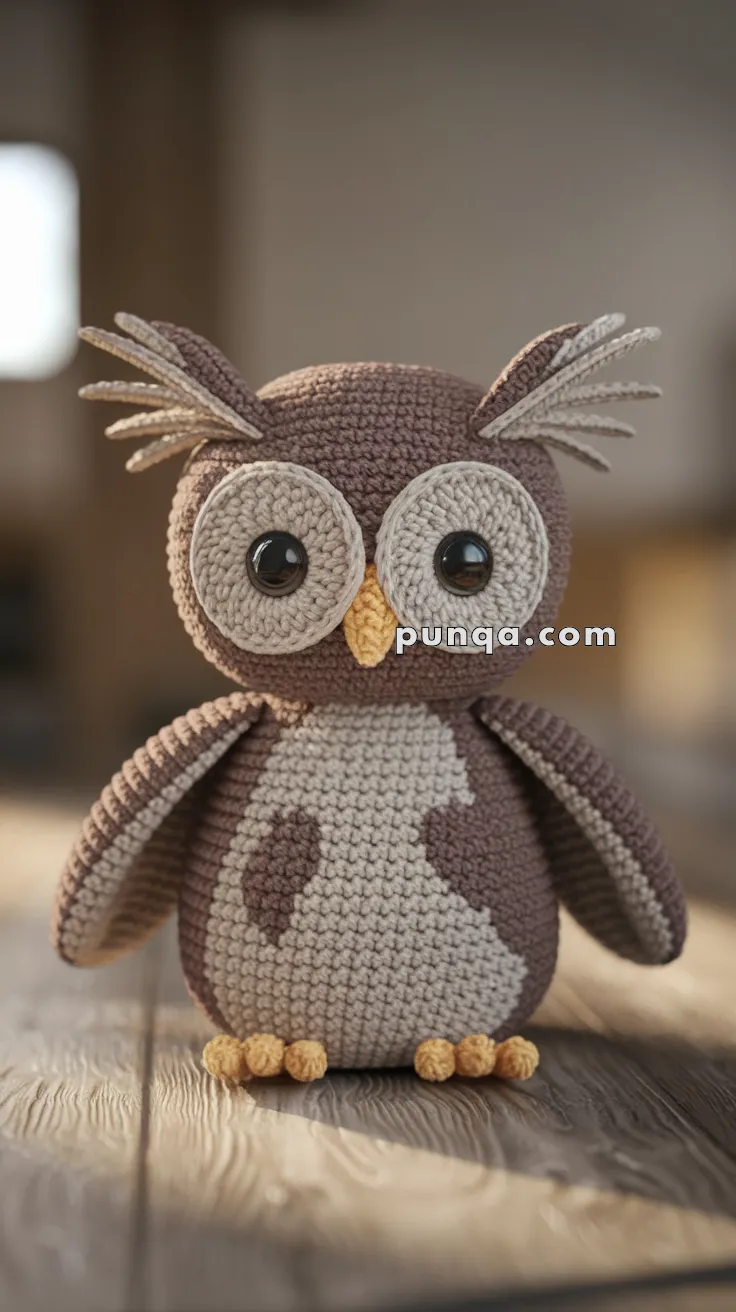
🦉 Amigurumi Owl Baby Crochet Pattern
Bring the quiet charm of the forest into your home with this beautifully detailed Amigurumi Baby Owl Crochet Pattern. With its oversized eyes, layered wing stripes, and soft woodland hues, this little owl is a heartwarming project for cozy afternoons — perfect as nursery decor, a woodland gift, or a collector’s favorite handmade friend.
✨ Skill Level
Beginner–Intermediate — Simple shaping, basic color changes, and minimal sewing required.
📏 Finished Size
Approx. 17–18 cm (6.5–7 in) tall when made with worsted weight yarn and a 2.5–3 mm crochet hook.
🧶 Materials
-
Brown Yarn (Main Body & Stripes): 50 g
-
Beige Yarn (Belly, Eye Rings, Wing Stripes, Tufts): 30 g
-
Golden Yellow Yarn (Beak & Feet): 10 g
-
Hook: 2.5–3.0 mm
-
Safety Eyes: 12–14 mm
-
Fiberfill Stuffing
-
Tapestry Needle & Scissors
-
Stitch Marker
🪡 Abbreviations (US Terms)
MR – Magic Ring
sc – Single Crochet
inc – Increase (2 sc in same st)
dec – Decrease (sc2tog)
sl st – Slip Stitch
FO – Fasten Off
🟤 Head
With brown yarn:
R1: MR, 6 sc (6)
R2: inc ×6 (12)
R3: (sc, inc) ×6 (18)
R4: (2 sc, inc) ×6 (24)
R5: (3 sc, inc) ×6 (30)
R6: (4 sc, inc) ×6 (36)
R7: (5 sc, inc) ×6 (42)
R8–R12: sc around (42)
R13: (5 sc, dec) ×6 (36)
R14: (4 sc, dec) ×6 (30)
🧷 Eyes Placement: Insert safety eyes between R9–10, about 12–13 sts apart (they’ll sit inside the beige eye rings).
R15: (3 sc, dec) ×6 (24)
R16: (2 sc, dec) ×6 (18) — stuff firmly.
R17: (sc, dec) ×6 (12)
R18: dec ×6 (6)
FO and close tightly.
🟤 Body
With brown yarn:
R1: MR, 6 sc (6)
R2: inc ×6 (12)
R3: (sc, inc) ×6 (18)
R4: (2 sc, inc) ×6 (24)
R5: (3 sc, inc) ×6 (30)
R6: (4 sc, inc) ×6 (36)
R7: (5 sc, inc) ×6 (42)
R8–R16: sc around (42)
R17: (5 sc, dec) ×6 (36)
R18: (4 sc, dec) ×6 (30)
R19: (3 sc, dec) ×6 (24) — stuff firmly.
R20: (2 sc, dec) ×6 (18)
R21: (sc, dec) ×6 (12)
R22: dec ×6 (6)
FO and close.
🪶 The head and body should be similar in size for a balanced silhouette.
🤎 Belly Panel (Beige)
Ch 9
Row 1: sc in 2nd ch from hook, 7 sc, 3 sc in last st; continue on other side, 7 sc, inc (18)
Row 2: inc, 6 sc, inc ×3, 6 sc, inc ×2 (24)
Row 3: sc, inc, 6 sc, (sc, inc) ×3, 6 sc, (sc, inc) ×2 (30)
Row 4: 2 sc, inc, 6 sc, (2 sc, inc) ×3, 6 sc, (2 sc, inc) ×2 (36)
Row 5: sc around (36)
FO, leaving a long tail for sewing.
Attach to lower front of body — rounded end at the bottom.
Side Feather Spots (Brown, ×2):
Ch 4 → sc in 2nd ch from hook 3 (3)
Row 2: sc, inc, sc (4)
Row 3: sc across (4), FO.
Sew symmetrically to lower third of belly panel.
👁 Eye Rings (Beige – Make 2)
R1: MR, 6 sc (6)
R2: inc ×6 (12)
R3: (sc, inc) ×6 (18)
R4: (2 sc, inc) ×6 (24)
R5: (3 sc, inc) ×6 (30)
FO, leaving long tail.
Insert 12–14 mm safety eyes into centers. Lightly stuff backs for dimension.
Sew high on head so inner edges touch or slightly overlap in the center.
🧡 Beak (Golden Yellow)
R1: MR, 4 sc (4)
R2: (sc, inc) ×2 (6)
R3: sc around (6)
R4: (2 sc, inc) ×2 (8)
R5: sc around (8)
Stuff lightly. FO and sew centered between inner edges of eye rings, pointing downward.
🪶 Ear Tufts (Beige + Brown Mix)
Cut 5–6 strands per side, approx. 9–10 cm each: 3–4 beige + 2–3 brown.
Fold in half and attach above eyes by looping through stitches.
Pull ends through, tighten knot, and trim to spiky length.
For a natural look, keep tufts slightly angled upward.
🪽 Wings (Brown & Beige Striped, Make 2)
With Brown:
R1: MR, 6 sc (6)
R2: (sc, inc) ×3 (9)
R3: (2 sc, inc) ×3 (12)
Switch to Beige: R4–R5 sc around (12)
Switch to Brown: R6–R7 sc around (12)
Switch to Beige: R8–R9 sc around (12)
Switch to Brown: R10–R11 sc around (12)
Switch to Beige: R12–R13 sc around (12)
Switch to Brown:
R14: (2 sc, dec) ×3 (9)
R15–R16: sc around (9)
FO and flatten (no stuffing).
Attach to body sides at a 30° angle, tips pointing downward and slightly outward.
Each wing should align with the top edge of the belly patch.
🟡 Feet (6 Toes Total – 3 Per Side)
With yellow yarn:
R1: MR, 5 sc (5)
R2–R3: sc around (5)
FO and lightly stuff.
Sew 3 toes together for each foot.
Attach both feet at the front-bottom edge of body with toes facing forward and slightly outward for balance.
🧩 Assembly
1️⃣ Sew head to body with a slight forward tilt so the owl’s eyes face straight ahead.
2️⃣ Attach belly panel to front and add brown side spots.
3️⃣ Sew eye rings high on head, making sure they touch or overlap at the center.
4️⃣ Sew beak between the eyes, pointing slightly downward.
5️⃣ Add mixed-color ear tufts above each eye and trim evenly.
6️⃣ Sew striped wings at 30° downward angle from shoulders.
7️⃣ Attach assembled feet to bottom front edge.
8️⃣ Shape and adjust proportions — ensure tufts, wings, and belly sit symmetrically.
✨ Finishing Touches
-
Use a small brush or your fingers to gently fluff ear tufts for a natural look.
-
Add a light touch of blush or dry pastel to cheeks for warmth.
-
To make your owl stand upright, gently flatten the base or add a small weighted pouch inside the bottom.
💛 Final Look
Your completed baby owl features:
-
Horizontal striped wings for realism
-
A soft oval belly patch with symmetrical side feathers
-
Large, puffed eye rings that meet at the center
-
A tiny beak at the inner curve of the eyes
-
Long, mixed-color tufts and three-toed golden feet
With its curious eyes and cuddly proportions, this little woodland owl brings cozy charm wherever it perches. 🦉✨
Happy Crocheting!