Sip your holiday cocoa with a touch of mischief thanks to the Amigurumi Grinch Mug, a crochet project that’s as playful as it is festive! 💚☕🧶 This cheeky design transforms an ordinary mug into a whimsical holiday accent, featuring the Grinch’s expressive face, mischievous eyes, and cozy seasonal details. Perfect for holding your favorite warm drinks or simply adding a dash of personality to your décor, it’s a handmade treasure that brings smiles with every stitch.
Whether displayed on a kitchen shelf, gifted to a Grinch-loving friend, or used as a quirky holiday companion, this mug cover is sure to spread laughter and charm. Fun to make and delightful to use, the Amigurumi Grinch Mug is a joyful way to crochet coziness, character, and a sprinkle of handmade magic—one loop at a time! 🎄✨🧵
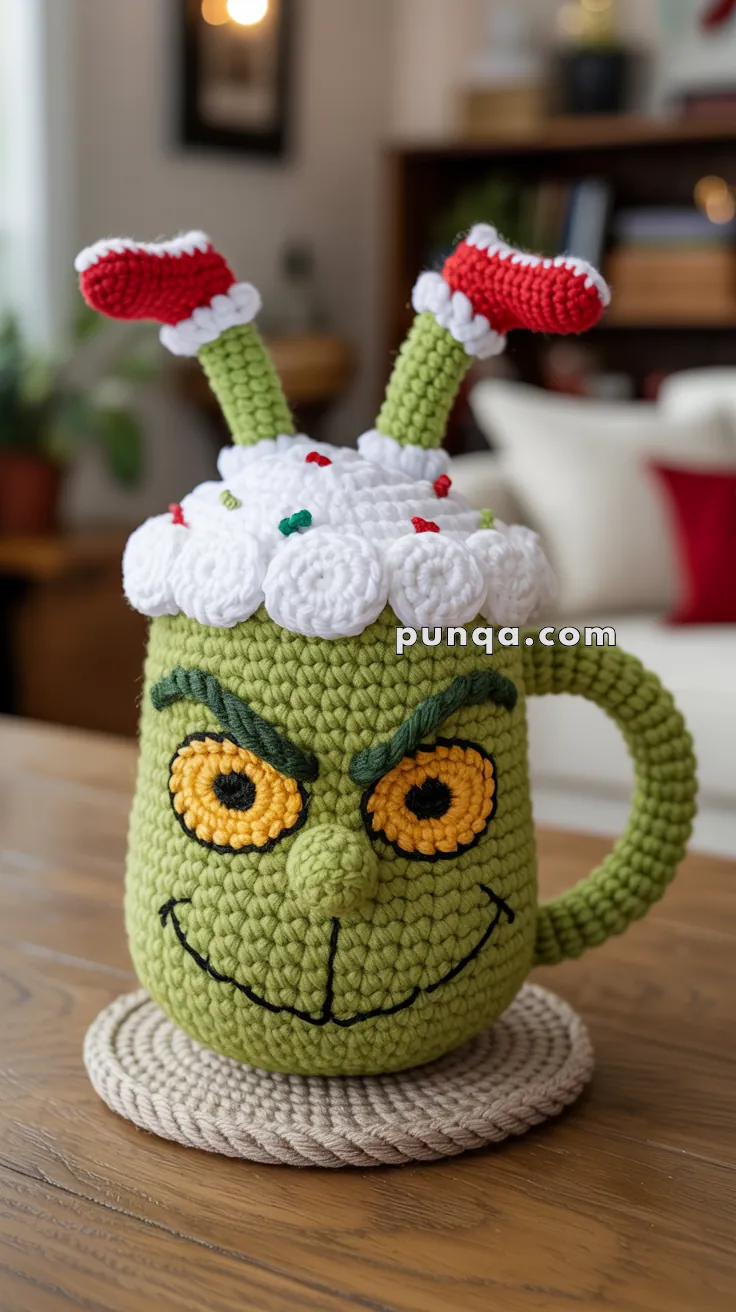
🎄 Grinch Mug Amigurumi Crochet Pattern
Bring a little mischievous holiday charm to your crochet table with this playful Grinch Mug Amigurumi. This design captures the Grinch peeking out of a cozy mug topped with fluffy whipped cream, complete with expressive eyes, arched brows, cheeky smile, sturdy handle, and his iconic Santa boots sticking straight up. It’s a joyful seasonal project full of personality and texture—perfect as festive décor or a memorable handmade gift.
✨ Skill Level
Intermediate
Includes tight single crochet, shaping, embroidery details, and optional wire support for stability.
📏 Finished Size
Approx. 18–20 cm (7–8 inches) tall, including legs.
The mug body is short and stout, with height roughly equal to width.
🧶 Materials
Yarn (tight stitch definition recommended):
- Olive green – 70–80 g (mug body, face, handle, legs)
- White – 25–30 g (whipped cream, boot trim)
- Red – 15–20 g (Santa boots)
- Yellow / mustard – small amount (eyes)
- Black – small amount (face embroidery)
- Dark green – small amount (eyebrows)
Tools & Supplies:
- Crochet hook: 4.0–4.5 mm
- Polyester fiberfill
- Aluminum craft wire or floral wire (2–3 mm thick), optional but recommended
- Tapestry needle
- Stitch marker
- Scissors
Yarn amounts are approximate and based on tight stitching with aran or thick worsted yarn.
✂️ Abbreviations (US Terms)
MR – magic ring
sc – single crochet
inc – increase
dec – decrease
sl st – slip stitch
ch – chain
hdc – half double crochet
BLO – back loop only
🧱 Mug Body (Green)
Worked in continuous rounds from the bottom up.
R1: MR 6
R2: inc ×6 (12)
R3: (sc, inc) ×6 (18)
R4: (2 sc, inc) ×6 (24)
R5: (3 sc, inc) ×6 (30)
R6: (4 sc, inc) ×6 (36)
R7: (5 sc, inc) ×6 (42)
R8: BLO sc around (42)
R9–R18: sc around (42)
Stuff firmly to maintain a rigid, mug-like shape.
Fasten off and close without flattening the base.
👃 Nose (Green)
R1: MR 6
R2: (sc, inc) ×3 (9)
R3–R4: sc around (9)
Lightly stuff.
Sew centered between the eyes, tipping the top slightly upward.
👀 Eyes (Make 2)
Yellow:
R1: MR 6
R2: inc ×6 (12)
R3: sc around (12)
Black pupil:
MR 4, sl st, fasten off.
Sew pupils onto yellow circles.
Attach eyes wide-set on the mug front.
Run one vertical tension stitch through each eye and pull gently to create a subtle oval shape.
😈 Eyebrows (Make 2)
Using dark green yarn:
Ch 8
Sl st back along the chain.
Sew above the eyes with a soft downward curve for a mischievous expression.
😏 Mouth & Face Embroidery
Using black yarn:
- Stitch a wide curved smile
- Add a short vertical line beneath the nose
Keep embroidery relaxed for a friendly, hand-drawn look.
☕ Mug Handle
R1: MR 8
R2–R18: sc around (8)
Insert gently curved wire inside the handle.
Add minimal stuffing and shape into a smooth “C”.
Sew securely to the mug at top and bottom attachment points, pulling the first stitch at each point slightly tighter to create subtle indentations.
🍦 Whipped Cream Topping
Whipped Cream Base (White)
R1: MR 6
R2: inc ×6 (12)
R3: (sc, inc) ×6 (18)
R4: (2 sc, inc) ×6 (24)
R5: (3 sc, inc) ×6 (30)
R6: sc around (30)
Lightly stuff if needed to keep a soft dome shape.
Fasten off, leaving a long tail.
Whipped Cream Puffs (Make 8)
R1: MR 6
R2: inc ×6 (12)
R3–R4: sc around (12)
R5: dec ×6 (6)
Stuff firmly, close, and fasten off.
Sew the 8 puffs evenly around the edge of the whipped cream base, forming a ring of rounded dollops.
Sew the completed whipped cream piece onto the top of the mug.
Add small red and green embroidery stitches on the top surface only for sprinkles.
🦵 Legs with Santa Boots (Make 2)
Green Leg Shaft
R1: MR 6
R2–R10: sc around (6)
R11: (sc, inc) ×3 (9)
R12–R13: sc around (9)
Red Boot
Change to red.
R14–R15: sc around (9)
R16: (sc 2, inc) ×3 (12)
R17: (sc, inc) ×6 (18)
R18–R19: sc around (18)
White Boot Trim
Change to white.
R20: BLO sc around (18)
R21–R22: sc around (18)
Stuff the boot toe firmly and the leg lightly above.
Leg Stability & Positioning
Insert wire into each leg before final stuffing.
Bend wire at the ankle so boots angle outward horizontally.
Insert legs through the whipped cream layer, not on top.
Flatten wire ends inside the mug and secure firmly.
This ensures playful, upright legs with excellent stability.
🧵 Assembly Order
- Sew eyes
- Sew nose
- Embroider face
- Attach whipped cream topping
- Insert and secure legs
- Attach handle
- Final shaping and adjustments
✨ Optional: Coaster Base
For display, place the mug on a simple crocheted coaster worked in continuous rounds using natural beige or off-white yarn. This piece is decorative and not attached.
🎁 Final Thoughts
This Grinch Mug Amigurumi combines sturdy construction with expressive character details, making it a standout holiday project. From the cheeky smile and arched brows to the fluffy whipped cream and iconic Santa boots, every element works together to create a fun, festive piece that holds its shape beautifully.
Take your time with the face and leg positioning—these small details are what bring the Grinch’s personality to life. Whether displayed on a shelf, table, or holiday vignette, this mug is sure to steal hearts (and maybe Christmas).
Happy crocheting and happy holidays! 🎄🧶


Hermoso trataré de hacerlo para tenerlo de recuerdo gracias x compartir 🙏😘
Que hermoso dios los bendiga siempre 😍😍😍🙏🙏🙏🙏
Bello amigurumi, lo tejer para recuerdo. Gracias por compartir
Lindoooo parabéns.vou fazer ..obrigado por passar a receita..