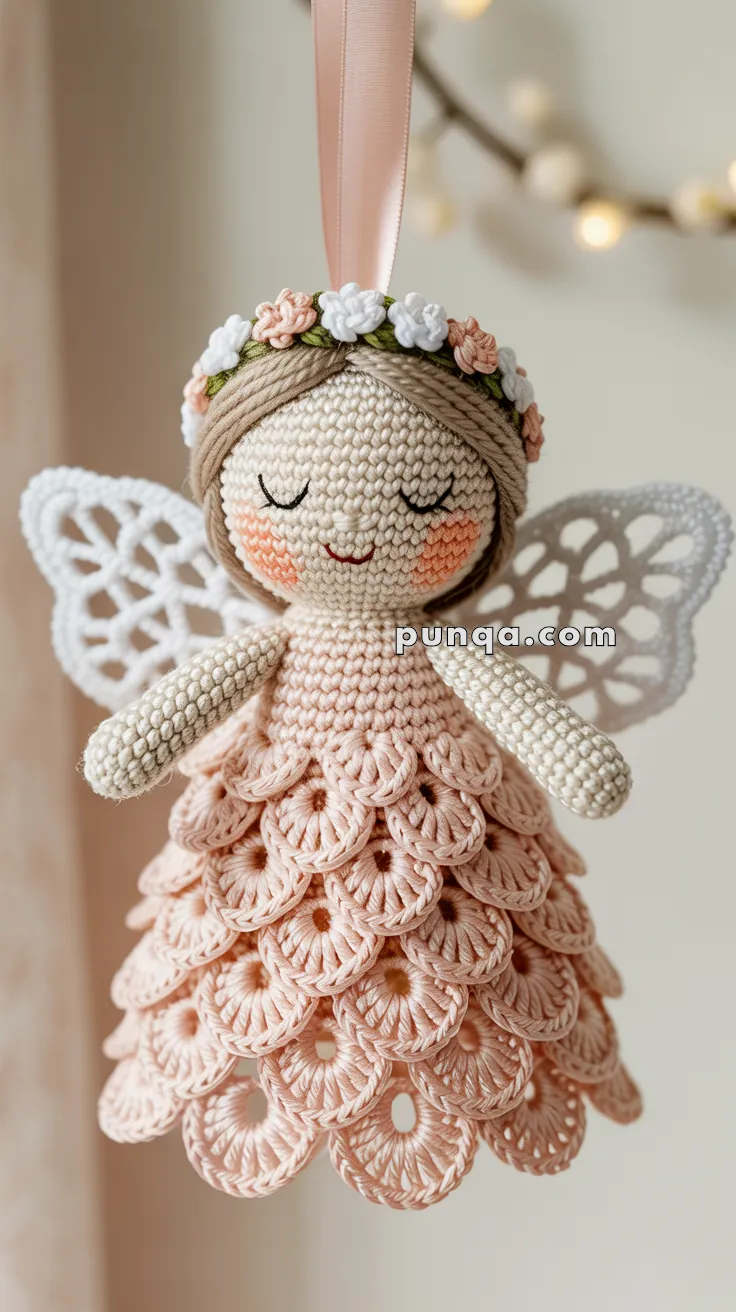
Bring a touch of whimsy to your décor with the Amigurumi Hanging Flower-Fairy Ornament, a crochet project that’s as dreamy as it is delightful! 🧚🧶 With her scalloped rosette dress, embroidered flower crown, and airy lace wings, this soft little fairy looks like she’s stepped straight out of a storybook. Her gentle design makes her a charming handmade accent for any space, especially when hung where she can flutter gracefully in the light.
Perfect for spring celebrations, nursery decorations, or simply adding a sprinkle of magic to your home, this ornament is both fun to make and enchanting to display. Whether gifted to someone special or kept as a treasured piece of your own collection, the Amigurumi Hanging Flower-Fairy Ornament is a joyful way to crochet beauty, imagination, and a sprinkle of handmade magic—one loop at a time! 🌸✨🧵
✨ Amigurumi Hanging Flower-Fairy Ornament Pattern
A dreamy, lightweight fairy ornament with a rosette-layered dress, soft embroidered features, a lush flower crown, and delicate lace wings. Perfect for nurseries, seasonal décor, or charming handmade gifts.
🌸 Skill Level
Intermediate – includes embroidery details, rosette-loop motifs, and lace wings.
📏 Finished Size
Approx. 14–15 cm (5.5–6 in) tall (without ribbon).
🧶 Materials
- Sport weight cotton yarn (2):
- Light peach – ~35 g (dress)
- Cream – ~20 g (head, arms)
- Brown – ~15 g (hair)
- White – ~10 g (wings + flowers)
- Soft pink + green – tiny amounts (flower crown)
- Hook 2.25–2.5 mm
- Fiberfill stuffing
- Satin ribbon (12–15 cm)
- Tapestry needle
- Scissors
- Blush
🧵 Abbreviations (US Terms)
MR – magic ring
sc – single crochet
inc – increase
dec – decrease
ch – chain
sl st – slip stitch
Head (Cream)
R1: MR 6
R2: inc × 6 (12)
R3: (sc, inc) × 6 (18)
R4: (2 sc, inc) × 6 (24)
R5: (3 sc, inc) × 6 (30)
R6–11: sc around (30)
R12: (3 sc, dec) × 6 (24)
R13: (2 sc, dec) × 6 (18)
Stuff firmly.
R14: (sc, dec) × 6 (12)
R15: dec × 6 (6)
FO and close.
Face Embroidery
- Eyes: curved lashes spaced 5–6 stitches apart.
- Cheeks: wide blush area.
- Mouth: small, soft curve.
- Nose: tiny horizontal stitch.
Hair
Hair Cap (Brown)
R1: MR 6
R2: inc × 6 (12)
R3: (sc, inc) × 6 (18)
R4: (2 sc, inc) × 6 (24)
R5: (3 sc, inc) × 6 (30)
R6: sc around (30)
FO and sew to head.
Hair Strands
Cut 32–36 strands, each 20–22 cm long.
Attach across the center part line.
Smooth to each side.
Trim and shape.
Flower Crown
Create tiny lazy-daisy embroidered flowers using white and soft pink.
Add miniature green leaf stitches between them.
Work all the way around the hairline.
Body & Bodice (Cream → Peach)
R1: MR 6
R2: inc × 6 (12)
R3: (sc, inc) × 6 (18)
R4–6: sc around (18)
R7: (sc, dec) × 6 (12)
Switch to peach.
R8–11: sc around (12)
FO.
Arms × 2 (Cream)
R1: MR 5
R2–14: sc around (5)
Stuff lightly only at the hand.
FO, sew both arms angled slightly forward.
Rosette Dress (Peach)
Each rosette is created individually and sewn on, forming 4 layered tiers exactly as in the photo.
One Rosette
- Ch 12
- Wrap yarn around finger 14–15 times to form long even loops
- Insert hook into first chain
- Yarn over and pull through all loops
- sl st to secure
- sl st around the outer edge to form a smooth oval
- Leave a 10–12 cm tail for sewing
Dress Tiers
Sew rosettes directly to the peach bodice rounds:
- Top tier: 10 rosettes
- Second tier: 12 rosettes
- Third tier: 14 rosettes
- Bottom tier: 16 rosettes
Overlap each layer by about 40% to create the cascading scale effect.
Lace Wings (White)
Each wing is one lightweight lace unit formed entirely from chain arches.
One Wing (Make 2)
Upper arches:
- Ch 16, sl st to base
- Ch 14, sl st to base
- Ch 12, sl st to base
- Ch 14, sl st to base
- Ch 16, sl st to base
(5 radiating large arches)
Lower arches:
- Ch 10, sl st to base
- Ch 12, sl st to base
- Ch 10, sl st to base
(3 smaller arches beneath)
FO and block lightly.
Sew wings symmetrically to the upper back.
Hanging Ribbon
Insert ribbon through the top of the head with a yarn needle.
Secure ends inside the head before closing.
Final Assembly
- Sew head to body with a tight, short connection.
- Attach arms.
- Sew rosettes neatly in overlapping layers.
- Sew and shape wings.
- Add flower crown.
- Style hair smoothly.
- Apply blush.
Finished Fairy
A delicately layered rosette dress, airy chain-lace wings, soft facial details, and a floral crown come together to create a graceful hanging fairy ornament perfect for display or gifting.


bonjour il est adorable et je te remerci pour ta gentillesse